|
|

Problem
The screen may dim randomly or flicker on the Samsung Business Notebooks NP400B2B or NP400B4B.
Cause
This issue is caused by an updated Intel Graphics driver which is incompatible with these machines.
- If the problem appeared without a recent changed in driver (or other software change - for example, a recent batch of Windows Updates) then you are not affected by this issue.
Check to see which version of the Intel graphics driver you have installed by looking at the display driver properties in Device Manager.
The Intel graphics driver versions above 8.15.10.x installed from Intel's website are incompatible with these models and cause an issue with the Samsung Display Manager software.
Resolution
To resolve this issue:
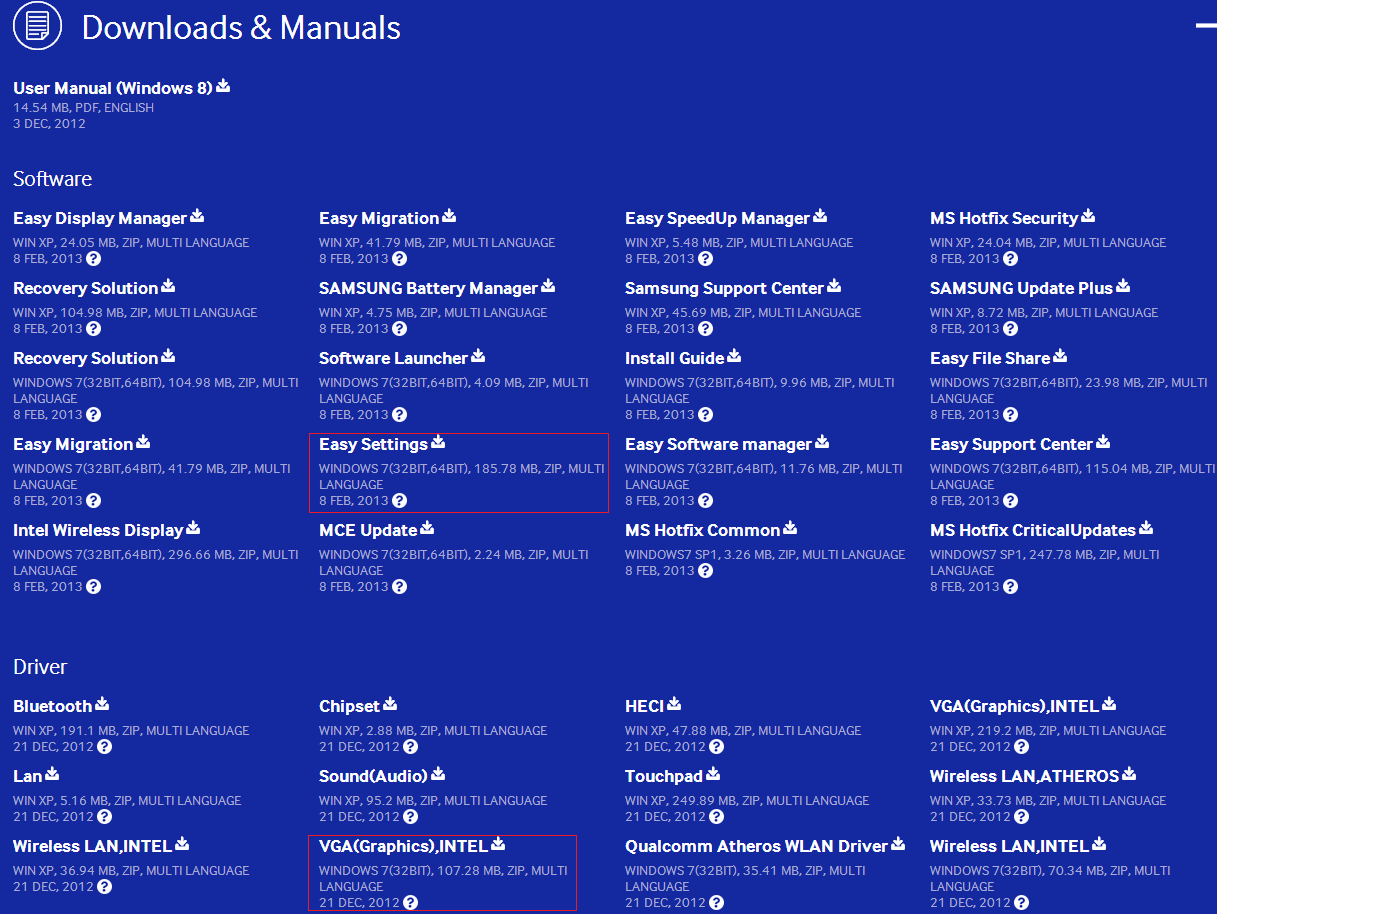
- Download the recommended driver published on Samsungs official website (for example, here) and select VGA (Graphics), Intel 8.15.10.xxxx.
- Uninstall the incompatible display driver and the Samsung Display Manager.
- Restart the notebook
- Now update the display driver with version 8.15.10.xxxx downloaded from the Samsung site and then reinstall the Samsung Display Manager
Display manager will now function correctly and the dimming or flickering will be resolved.
Applies to:
- Samsung Business Notebooks NP400B2B / NP400B4B

Recovering Windows to the Factory State
Samsung laptops include an inbuilt recovery solution which allow you to restore the machine to the initial factory state. This is useful if Windows no longer boots, or has been severely damaged or affected by malware, viruses etc.
Note: Most recovery options completely restore the system to the factory state. This will result in the removal of all user data including add-on programs, documents, favourites, desktop icons etc. Data should be backed up first if possible. If you need to backup your data and can't start Windows, you may need to contact your IT department for them to do this for you. Stone can also offer a service where we can carry this out for you at an additional cost.
Steps
- Shut down the machine if already running.
- Start the machine.
- Start tapping the F4 key straight away.
- Follow the onscreen instructions.
Applies to:
- Samsung laptops, netbooks and tablets running Microsoft Windows

Scenario
- Your system starts loading Windows and then the system appears to reset without any error message being displayed on screen.
- You may or may not be able to see a blue screen appear for a brief moment before the system resets
- The system continues to reset at the same point during the boot process, and Windows never loads.
How to Troubleshoot This Scenario
There are numerous causes of this problem:
- Software damage caused by a virus
- A recent change to hardware - for example, something you recently plugged in, changed or upgraded
- A BIOS update which has changed some BIOS settings back to default (see SATA controller mode, below)
- A PC that has been newly reimaged (again, see SATA controller mode, below)
- A system that was not shut down cleanly - i.e. the power was turned off without Windows being shut down (see Disk Consistency check, below)
- Failing hardware such as a memory fault, hard disk drive fault, or other component issue.
If you are working inside a managed IT environment (for example a large school, a college or a university), in many instances, if your PC does not contain your data or files, it is often advisable to request that your system is reimaged first. This eliminates problems cause by viruses, unclean shutdowns and often BIOS settings.
If you need to troubleshoot the ready for the reboot please follow the process below.
How to Get the Stop Code from the blue Screen
The first stage is to get the Stop code which is momentarily reported by Windows before the system resets. This stop code, along with any text message, may help in the identification of the root cause.
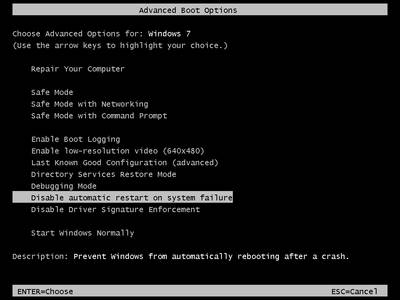
- Start the system and after the Stone splash screen, start tapping the F8 key to enter Advanced Boot Options.
- You should now see the screen below.

3. Using the arrow keys on your keyboard highlight ‘Disable automatic restart on system failure’ and press Enter.
The system will reboot and windows will begin to load, but this time when the problem occurs the STOP message will be displayed.
For example:
.jpg)
Stop 0x0000007B Inaccessible Boot Device
Usuall causes:
- SATA Controller Mode
Change the Serial ATA Controller mode type from AHCI to IDE, or IDE to AHCI in the system BIOS. This problem normally only occurs on a newly imaged system, or a system that has just had a BIOS update. BIOS updates can cause BIOS settings to be lost meaning that the Serial ATA Controller mode is set incorrectly.
To change the SATA controller settings, carry out the following procedure:
- Restart the notebook and press the F2 to enter the BIOS.
- Select the ‘Advanced’ tab, change the SATA controller setting from ‘AHCI’ to ‘IDE’, or 'IDE to 'AHCI'
- Select the ‘Exit’ tab, click on ‘Save changes and Exit’ (or press the F10 key).
- Restart the system and it should now boot into Windows.
- Unclean Shutdown - Disk Consistency Check Required
The file system is damaged. This can normally be fixed by reimaging the system, or by booting from a Windows CD and initiating a file system consistency check (CHKDSK).
IRQL_NOT_LESS_OR_EQUAL or PAGE_FAULT_IN_NONPAGED_AREA
These messages are often caused by a driver update, or an additional device plugged into the system. Unplug any recently added devices, especially any USB to serial adapters.
If this does not resolve the problem, try rolling back to the previous driver configuration:
- Start the system and after the Stone splash screen, start tapping the F8 key to enter Advanced Boot Options.
- Select the option to use Last Known Good Configuration
- If the system still does not boot, you may need to boot in Safe mode and then uninstall any recent driver update or software change.
If you have a stop code or blue screen error message which is not covered above, try these steps:
- Unplug any recently added hardware
- Try using the Last Known Good Configuration
- Try booting in Safe mode (then uninstall any recently added program or driver update)
- Use the Microsoft System Recovery options, here.
- Reimage the system (ensure that any data or documents on the machine are backed up first. If you cannot boot the system you will need your IT team to do this for you, or alternatively please contact Stone to find out what additional services we may be able to offer you, at an additional cost).
- If you suspect your system has a hardware fault, please contact Stone support.

Problem
The AMD Hybrid Graphics driver provided by Samsung for the NP350E7C-S02UK under Windows 7, possibly provided through the Samsung download center or the Easy Update manager, will not install or does not function.
Cause
The cause is that this model is intended primarily for use with Windows 8 by Samsung. Windows 7 driver support is limited.
How to Solve this Issue
Install an alternative version of the AMD Hybrid Graphics driver, provided for the NP350V5C-A06UK, at the Samsung download center here.

Note: This driver is also available from the Stone FTP
Applies to:

Problem
Some models of older notebook do not allow you to adjust the display brightness if you use an updated Intel HD Graphics Video driver. This means that the following functionality doesn't work:
- Automatic reduction of screen brightness to save energy, when disconnecting the AC mains supply.
- Automatic brightness reduction depending on ambient light level (certain applicable models only)
- The ability to adjust the screen brightness manually depending on personal preference, using the function keys.
This behaviour has been seen in Lenovo and Samsung models and may apply to others. It mainly applies to systems that use Sandybridge CPUs (Intel HD Graphics HD 2000 / HD 3000) and Ivybridge CPUs (Intel HD Graphics HD 2500 / HD 4000).
Cause
This issue is caused by a manufacturer customisation of the video system. If you install the older, manufacturer provided original video driver and the functionality returns, then you may be affected by this issue. If you have upgraded your video driver, or perhaps upgraded operating system and have automatically received a later video driver, and the problem appears, then again, you are likely affected by this issue.
For example:
Samsung NP400B4C-A01UK
Latest Provided Samsung Reference Video Driver: Intel HD4000 Graphics Driver 8.15.10.2712 for Windows 7 64bit
- Upgrading to a newer Windows 7 driver from Intel stops the brightness adjustment functionality from working.
- Reverting to either the Samsung 8.15.10.2712 driver or the 8.15.10.2712 driver from Intel directly restores the functionality.
- Upgrading to Windows 8.1 or Windows 10 and using the latest Intel Video Driver (either from Microsoft or from Intel) will again stop the brightness adjustment functionality from working.
Resolutions
Please follow the steps below to resolve this problem:
1/ Check your notebook's manufacturer's website for an updated video driver for your model and operating system.
2/ Or, check to see if there is an updated Onscreen Display or Hotkey Utility for your model and the new operating system.
In the case of the example Samsung NP400B4C, neither of these apply. There are no newer video drivers available for Windows 8.1 or Windows 10 which provide this functionality. The Samsung Easy Settings program from Windows 8 can be installed on Windows 8.1 or Windows 10, but does not provide this functionality.
3/ We have a third alternative resolution which involves a registry fix. This has been tested on Windows 8.1 and Windows 10 on both Samsung and Lenovo machines.
Note: This registry fix has been tested on a limited number of models and situations. Please thoroughly test that this registry fix solves your problems and meets your user's needs before deploying it on a wide scale.
- Download the file attached
- Extract the .REG file and double click to install it onto the target system.
- Reboot the system.
- Test that when you disconnect the AC mains adapter, that the screen dims automatically. If it does not, check your Power Plan that it is configured correctly.
- Test that the brightness hotkeys function. If it does not, and the onscreen Windows brightness indicator graphic does not appear, you may need to reinstall the Video driver using the full package from the Intel website, then reapply the fix again, reboot, and re-test.
- If the Windows provided graphics indicator does appear and the brightness level does not adjust, ensure you rebooted the system after applying the fix.
- If the fix stil does not appear to work, try the alternative registry file, reboot and re-test.
Please also note that if you reinstall or upgrade the video driver in the future, you will need to reapply the fix. If you are managing multiple users in a domain environment, you may wish to deploy the registry settings as part of computer settings group policy.
This fix works by changing the value of "FeatureTestControl" to 0000f048 in several places in the registry.
4/ As a final option, try using the Microsoft Basic Display Adapter driver instead of the updated Intel HD Graphics display driver. However, note that video performance is likely to be reduced and the system may even have less battery runtime as it may consume more energy.
Steps
Applies to:
- Third Party Branded Notebooks with 2nd or 3rd Generation Intel Core Processors, using Intel HD Graphics.

Problem
- The function key for adjusting the brightness doesn't work
- The screen is too dim, especially when on battery, and cant be increased
Cause
This is caused by incorrect driver and/or application software being installed.
Resolution
- Ensure that the Samsung Easy Settings Manager for Windows 7 for your model is installed
- (Remove other Windows XP only Samsung applications that you may have installed - for example, the Samsung Easy Display Manager for the NP370R5E is only for use with Windows XP).
- If the problem is still not resolved, use the Samsung specifically provided video driver
- Often the Samsung Easy Settings Manager may only with the exact video driver version that it was designed for or tested with

Tip: If you do have to downgrade to a specific Samsung provided video driver, you can prevent Windows Update from automatically re-upgrading the video driver by hiding the update which contains the driver.
Applies to:
- Samsung Notebooks supported under Windows 7 such as the NP370R5E

Problem
Windows 7 KMS Product Activation may not work on Samsung laptops purchased with Windows 8 (non-Pro). You may not be able to activate Windows 7 machines using a Key Management Server (KMS) on these models. KMS Activation is a common method of performing Microsoft Product Activation on large numbers of machines (more than 25) in an organisation.
Cause
This is caused by the Windows 8 BIOS of the Samsung machine not having the necessary SLIC tables for Windows 7 activation. As Windows 8 (non-Pro) does not have any downgrade rights to Windows 7, these SLIC tables have not been included.
Windows 7 KMS activation requires that the machine was purchased with an eligible version of Windows. Windows 8 (non-Pro) is not eligible as Windows 8 does not have downgrade rights.
Work Around
- Purchase machines that have downgrade rights to Windows 7 (for example, purchase machines which include a Windows 8 Pro license)
- Use a Multiple Activation (MAK) key instead of KMS. Please note that you will need to check your licensing agreement for the eligibility and availability of a MAK key for Windows 7 for your organisation. You may need to adjust your software image or image deployment method for the replacement method. Ensure that you are licensed to use this method.
- Purchase machines that already have a suitable Windows 7 license for you to upgrade to your intended Windows 7 product.
Additional Information
- See Microsoft KB Article 942962
Applies to:
- Samsung branded notebook products sold with Windows 8 (non-Pro)
- Potentially other branded notebooks, such as Toshiba, sold with the same operating system

Wireless Guide 1
Use the guide below to assist you in troubleshooting signal problems such as low signal strength or low throughput performance on wireless networks.
Low Signal Strength
Consider Your Expectations
- How far away from the access point are you?
- How many walls or obstructions are between you and the access point?
- Are you connecting to a 2.4GHz or 5GHz network?
- 2.4GHz networks are more crowded and therefore subject to more interference.
- 5GHz networks are less crowded however the signal deterioates more quickly i.e. the signal doesn't travel as far. Whereas 2.4GHz networks will go through 2-3 walls in close proximity to the access point (less than 3M between walls) a 5GHz network signal will only go through 1-2 walls at the same proximity.
- If possible, try the equipment in a different location and/or on a different access point to determine if it is localised interference which is causing your problem.
- If you are in a large multi-access point wireless network, ensure that the machine has roamed, or that you are connected to the nearest wireless access point.
- Some managed network systems will manage the clients roaming or transfer to a different access point
- Use any managed infrastrucure system to tell you which access point the client device is connected to, if you cant tell from the device itself
- For example, on some systems, such as Meru, the virtual access point feature makes it difficult from the client end to determine which physical access point the client is connected to, as the access point MAC address is virtualised.
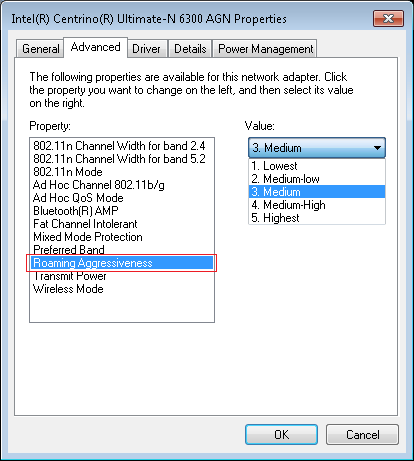
- Try adjusting the network cards "roaming agressiveness" setting. Increase the aggressiveness to make the system look for stronger signals from other access points sooner, however this may result in more frequent brief disconnections whilst the system moves from one access point to another:

Reduce the possibility of being Affected by Interference
- Turn off Bluetooth devices in the area if you are using 2.4GHz
- If using 2.4GHz, try using the 5GHz spectrum instead
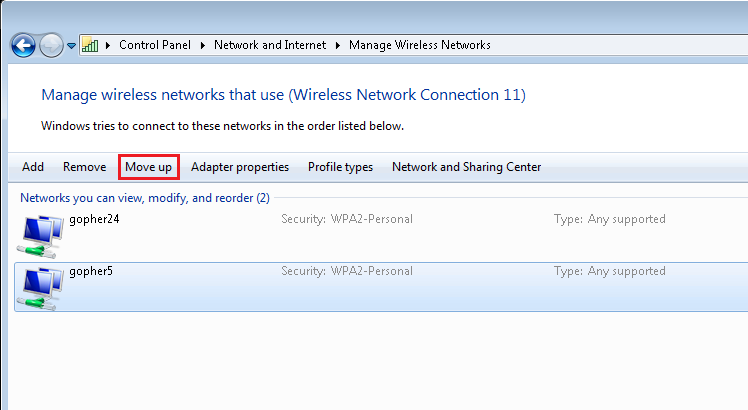
- If you are using an unmanaged wireless infrastructure but have 5GHz capability, use a differently named SSID for the 5GHz network and set this higher in the network preference order.

- Legacy or basic unmanaged systems: Try changing the wireless channel that is used.
- Try removing legacy client devices from the network.
- 802.11b wireless devices can caused signal and performance problems on modern wireless networks, as these devices require too much "airtime" to transfer data efficiently.
- Turn off support for legacy client devices on your wireless system. Where possible, support for 802.11b and 802.11g devices should be disabled.
- Try different locations and eliminate possible sources of interference - cordless phones, wireless cameras etc.
Other Tips
- Ensure that your wireless access point has up to date firmware.
- Ensure your wireless network card driver is up to date.
- Make sure you use WPA2 and AES encryption. The use of WPA/TKIP will result in drastically reduced wireless system throughput.
- Enable Wireless AC features on your access point, if available, and use Wireless AC devices where possible. Wireless AC presents a significant performance improvement over Wireless N.
- Ensure your wireless system has the faster transmission modes enabled.
Applies to:
- All mobile products with wireless functionality.
|


.jpg)


