|
|
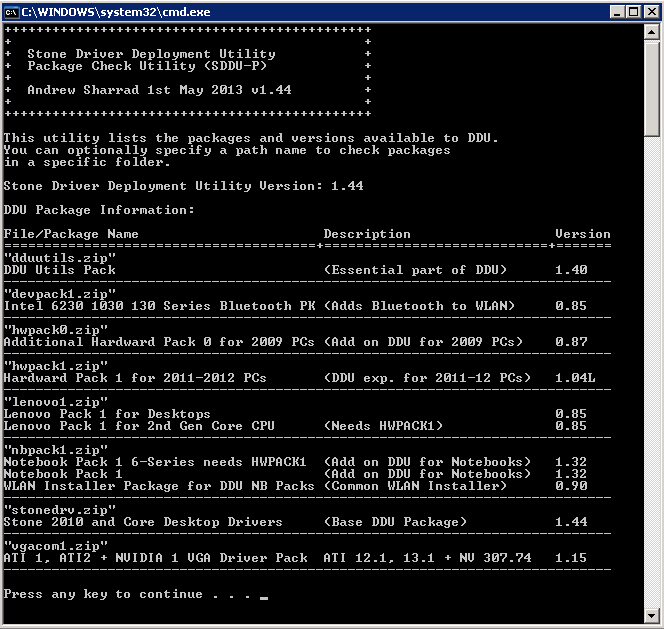
Showpack UtilityThe DDU includes the Showpack utility to list the installed DDU version and packages. To access this utility, first of all find where the DDU is installed using Windows Explorer. The DDU is normally installed in this location: X:\RMNetwork\RMManage\RMRebuild\XPBuild\I386\$OEM$\$1\RM\HotFix\StoneDRV - where X is the drive that holds your RMNetwork folder. Then find the Showpack icon and doule click. This will list the DDU version and packages as below. Applies to:
ProblemSome modern systems with Windows 8 compliant BIOSes may cause the text-mode Windows 98 portion of the build process to hang the system, typically just after the "Scanning for Drivers" stage. CauseThis problem appears to be a caused by a combination of BIOS compatibility and levels of system performance that were not envisaged when the Windows 98 DOS mode environment was designed. ResolutionDownload and extract this ZIP file (last updated 21/9/13) to your build disk, to update the BUILD.CAB file. This replacement BUILD.CAB file will slow the build process, so this download should only be used where needed. Note: This ZIP file does not contain the updated NDIS2 network drivers which are also needed when updating the build disk. These should also be downloaded and extracted to the build disk.
Applies to:
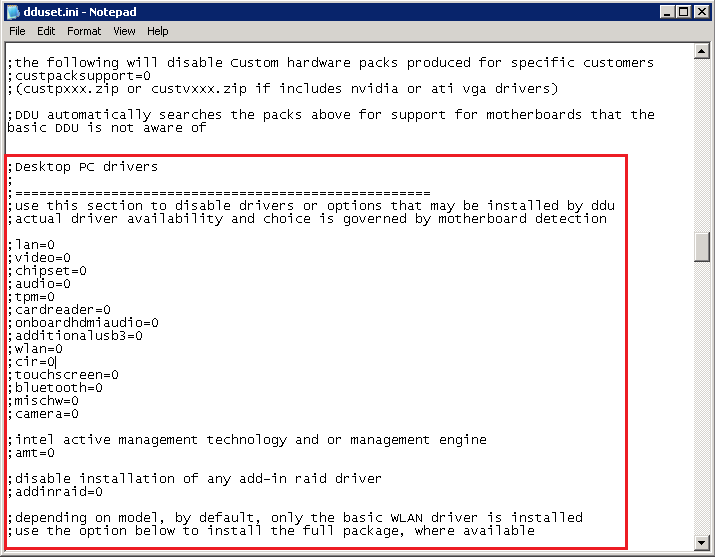
ScenarioThere are situations where you may wish to prevent the DDU installing certain drivers, for example, a network controller driver for a specific motherboard. The DDU includes basic functionality to control which types of driver are deployed. Instructions for Global SettingsSimply modify the DDUSet.INI file located in the DDU folder. This has a section for desktop and notebook drivers. Modify each section as required to turn off those driver types. Instructions for Specific ModelsUse this option to turn off drivers, again using the desktop and laptop sections as above, but this time for specific models. Steps:
An example of the Settings.ZIP file for the motherboard above is attached. This Settings.ZIP file will turn off the network driver installation for the Stone / MSI H61M-P31/W8 (BOAMOT-443) model. Note: The Stone DDU folder is located in: x:\RMNetwork\RMManage\RMRebuild\XPBuild\I386\$OEM$\$1\RM\HotFix\StoneDRV (where x is the drive that holds your RMNetwork folder)
Applies to:
ProblemDuring the graphical (GUI) part of Windows Setup on CC3, the machine doesn't get a network Connection. Even though the DDU installs and appears to install the correct LAN driver, LAN connectivity is available until the machine is rebooted. Rebooting the machine during the build process breaks the build process from fully completing. This problem occurs on machines manufactured in 2012 and 2013 that have a Realtek LAN Controller. CauseThe cause is the Realtek LAN driver that is installed by CC3 early during installation. This driver is installed as it has a matching base device ID, however this driver does not properly support the Realtek LAN controller that is present, resulting in no functioning network connection. Because an old driver is installed, when the Stone DDU installs a new driver Windows XP automatically requests a restart before the new driver can take effect. ResolutionThis issue can be resolved by upgrading some of the native CC3 drivers to more modern versions. This can be done either by installing the latest CC3 Hardware support pack, or by using the Stone DDU Realtek NIC Hotfix utility. This utility upgrades the Realtek LAN drivers in the PC201LAN and c_Novatec1 subfolders in the build area:
Note: We recommend that you take a backup copy of these folders before using the upgrade utility, as this upgrade cannot be uninstalled.
Instructions
Applies to:
ProblemPackages may not deploy reliably on Stone systems on a CC3 network in some situations. This usually occurs when the system boots faster and completes loading all of the required services before the network adapter has had a chance to finish connecting to the network. CauseThis is caused by the performance of the machine being far greater than was originally anticipated when Windows XP was designed. There are two sub-causes:
ResolutionDDU 1.42 and newer has enhanced fixes for both of these problems. The main fix is the AutoFIX component which is installed by the DDU and causes the AUTOEXNT service to succeed by adding a time delay. Install the latest DDU available to get access to the latest features. The AutoFIX program is also available as a stand-alone utility however this cannot help with the package deployment during buildtime, whereas the AutoFIX utility included with the DDU can. Installation Methods Available
Applies to:
ProblemCustomers may experience problems on the Stone / MSI H61M-P31/W8 based systems during the CC3 build process. The symptoms are a B2 code being displayed on the BIOS POST screen. The system then does not boot any further. CauseThe MSI H61M is primarily designed for Windows 8 and Windows 7. Whilst Stone have ensured that this platform is as compatible as possible with legacy operating systems such as Windows XP, the CC3 build process uses a Windows 98SE boot sector. The MSI H61M Windows 8 BIOS does not recognise the Windows 98SE boot sector as valid on hard drives. This causes the POST to fail to complete, displaying a B2 code on the screen. ResolutionIf affected by the issue, you will need to perform a BIOS flash downgrade on the system to version 3.0. However, to boot the system to run the downgrade, you may need to disconnect the hard drive first. DownloadsThere are several BIOS flashes available:
Steps for Downgrade to BIOS version 3.0
Note 1: To boot from a Windows 98SE USB pen drive, you may need to disable Secure Boot in the BIOS (Advanced > Secure Boot > Disabled). An alternative method of flashing is to go into the BIOS and to use the M-FLASH menu - this will negate the need for changing any other BIOS settings.
Note 2: This problem does not appear on the older G3 version of the motherboard, as this does not use the updated Windows 8 BIOS.
Applies to:
Main Downloads for Stone Computers 2010-2012 Desktops and LaptopsDDU for Desktops and Laptops (1.48 26/9/2013)
Note: If you dont need laptop support you can download and install a smaller package: DDU for Desktops Only (1.48 26/9/2013).
Bootdisk Drivers DownloadExtract this download to your build disk to make it support all of the recent Stone desktop network adapters: DDU ManualBasic DDU Instructions1/ Always ensure the machine is set to run in IDE mode. Set the machine's BIOS Advanced > Drive Controller Configuration mode from "AHCI" to "IDE". For More Downloads
Applies to:
The Stone Computers DDU for CC3 compatibility list is attached. This enables you to see which Stone models are supported by the DDU. (Last Updated 30/9/2013). As of September 2013, no new models are planned to be supported due to the industry's withdrawal of support for Windows XP. The last models to be added were:
Note: The Compatibility list spreadsheet contains links to all of the DDU downloads and packages.
Applies to:
|


