

|
|
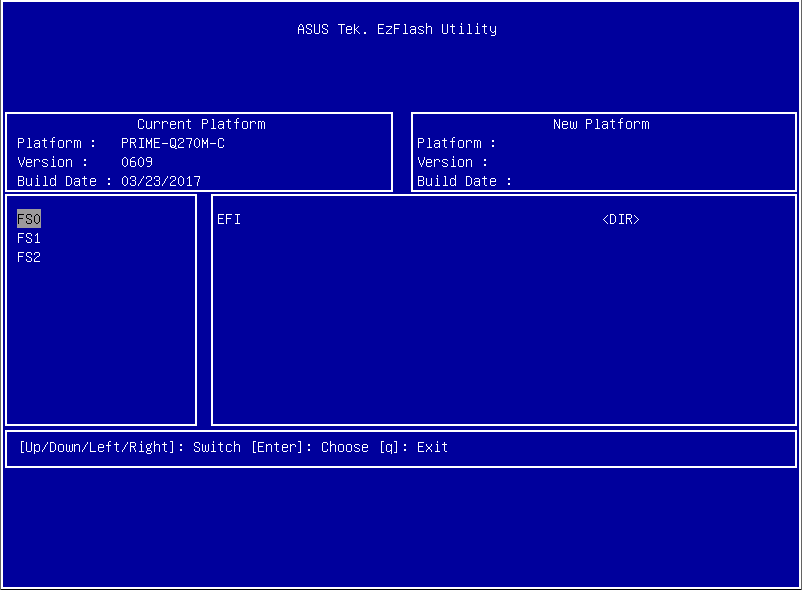
BOAMOT-489 - Asus PRIME Q270M-C is part of the Asus commercial range, for which Asus have opted to use the traditional text based menu system instead of the 'consumer' orinetated GUI.. To access the motherboard's built in EZFlash BIOS update utility, you need to press ALT + F2 during POST. Note: If you have trouble accessing the EZFlash utility, try the following steps:
Applies to:
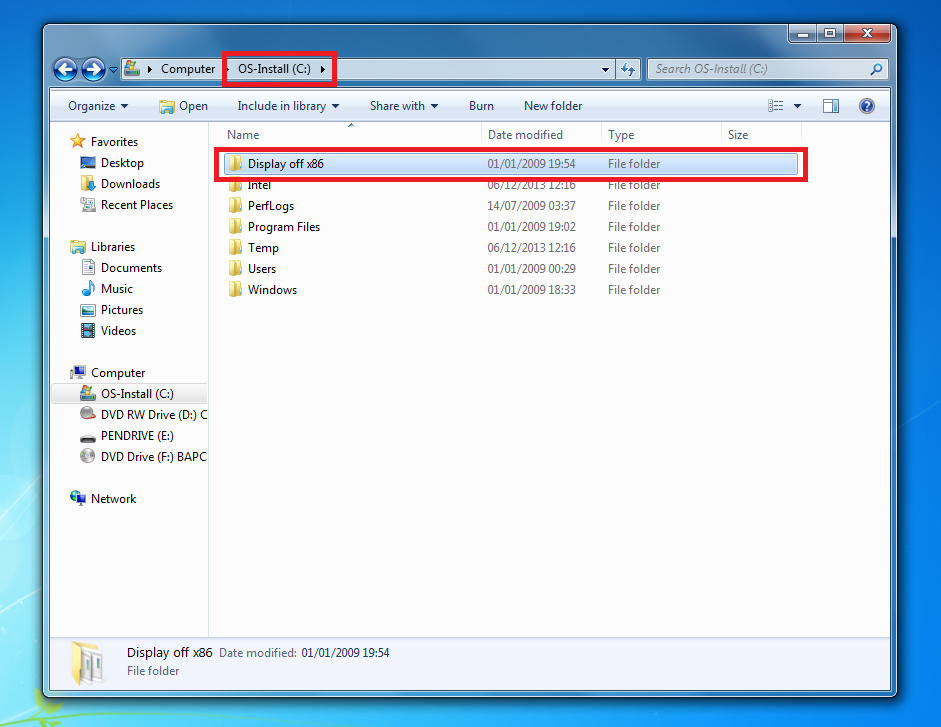
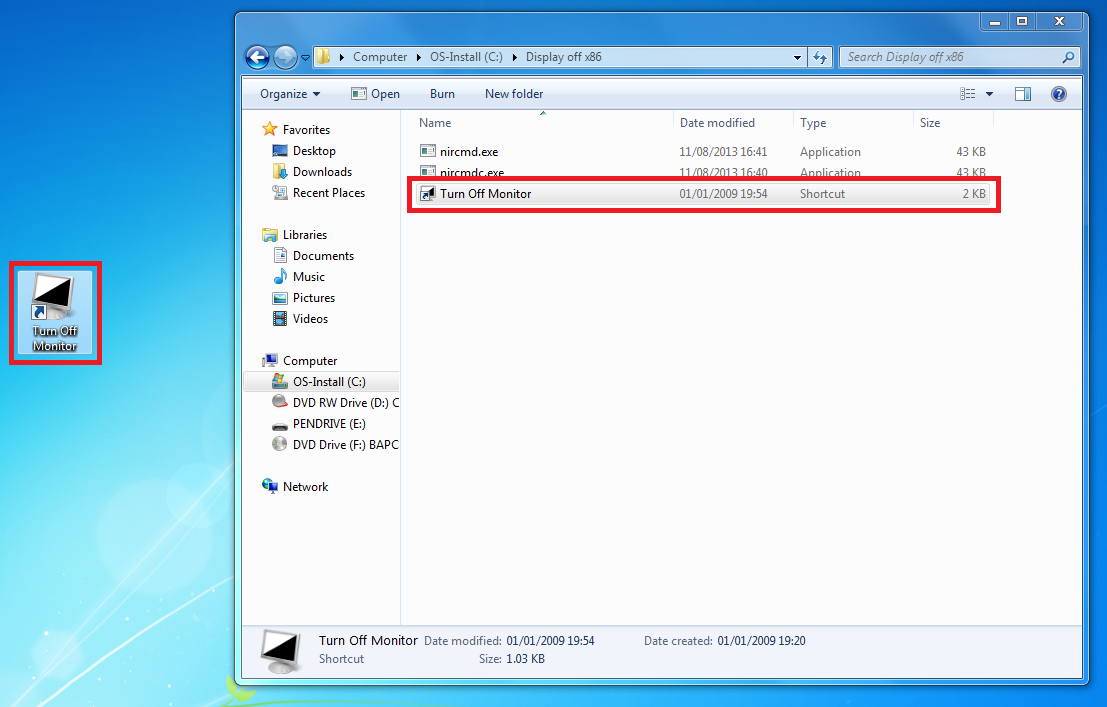
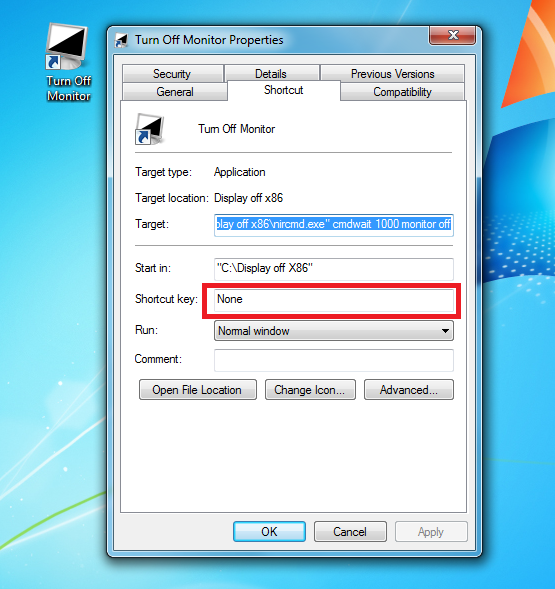
Putting the Display Panel of your Stone All in One PC into SleepThe chassis design of the Stone All in One does not incorporate an independent power button to control the power state of the display panel. The panel is normally fully active when the machine is awake. Customers wishing for the ability to manually control the screen power state could use the attached alternative software based method of putting the display to sleep. Setup
Applies to:
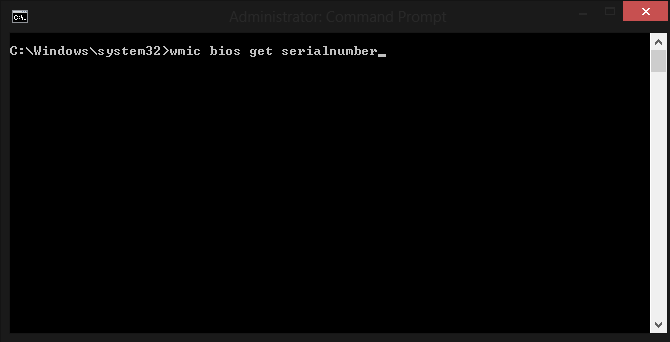
Utility to Change DMI InformationPlease use the attached utility if you need to change the DMI information in either DOS or Windows on Stone / MSI H61 based systems. You can use it to change the system serial number, chassis serial number or asset number. This DMI utility will also program "OEGStone" into the BIOS as a manufacturer string. InstructionsDOS
Windows
Note: This utility will not work on Intel branded desktop boards. The Windows version of the utility requires BIOS 2.7 or higher to program all DMI information including the asset tag correctly on the Stone H61M-P31 G3 (non-Windows 8 version).
Last Updated 1/5/14. Applies to:
Utility to Change DMI InformationPlease use the attached utility if you need to change the DMI information in either DOS or Windows on Stone / MSI H81 based systems. You can use it to change the system serial number, chassis serial number or asset number. This DMI utility will also program "OEGStone" into the BIOS as a manufacturer string. InstructionsDOS
Windows
Note: This utility will not work on Intel branded desktop boards.
Last Updated 31/7/14. Applies to:
Changing DMI StringsSome of the DMI strings in the Stone / Intel NUC BIOSes can be changed using the utilty attached to this article. To run the utility, you will need a Windows 98SE bootable USB pen drive.
The following strings will be prompted for:
This DMI string update method reflashes the entire BIOS, so please note any BIOS settings needed for your operating system as these may be reset during the upgrade process, including:
This DMI utility will also program "OEGStone" into the BIOS as a manufacturer string. Note: Please do not use this utility on MSI desktop boards or non-Intel NUCs.
Applies to:
Changing DMI StringsSome of the DMI strings in the Intel desktop board BIOSes can be changed using the utilty attached to this article. To run the utility, you will need a Windows 98SE bootable USB pen drive.
The following strings will be prompted for:
This DMI utility will also program "OEGStone" into the BIOS as a manufacturer string. Note: This utility only works with Intel 4, 5 and 6 series motherboards. It will not work with 7 series motherboards such as the DQ77MK, or with the the Stone / MSI H61M motherboard. It also does not work with Intel 6 series motherboards which have been upgraded to Windows 8 "secure boot" capable BIOSes, such as DH61CR / DH61WW BIOS 0099 or later.
Applies to:
Changing DMI StringsSome of the DMI strings in the Intel desktop board BIOSes can be changed using the utilty attached to this article. To run the utility, you will need a Windows 98SE bootable USB pen drive.
The following strings will be prompted for:
This DMI string update method reflashes the entire BIOS, so please note any BIOS settings needed for your operating system as these may be reset during the upgrade process, including:
This DMI utility will also program "OEGStone" into the BIOS as a manufacturer string. Note: This utility only works with Intel 7 series motherboards and 6 series motherboards with BIOS files that are Windows 8 "secure boot" capable BIOSes, such as DH61CR / DH61WW BIOS 0099 or later. Please also note that some motherboards also have a two or three stage upgrade process which must be followed to bring the system up to the latest version, for example the DH61CR and DH61WW.
Applies to:
Utility to Change DMI InformationPlease use the attached utility if you need to change the DMI information in either DOS or Windows on a Stone / Asus based systems, with a 7 series chipset or later. You can use it to change the system serial number, chassis serial number or asset number. Motherboards supported include:
This DMI utility will also program "OEGStone" into the BIOS as a manufacturer string. InstructionsDOS
Windows
Updating the UUIDInvalid UUIDs (such as UUIDS made up of just 0 or f) can be fixed by running /SU AUTO. For example: AMIDEWINx64.exe /SU AUTO Note: This utility will not work on Intel branded desktop boards.
Last Updated 30/6/16. Applies to:
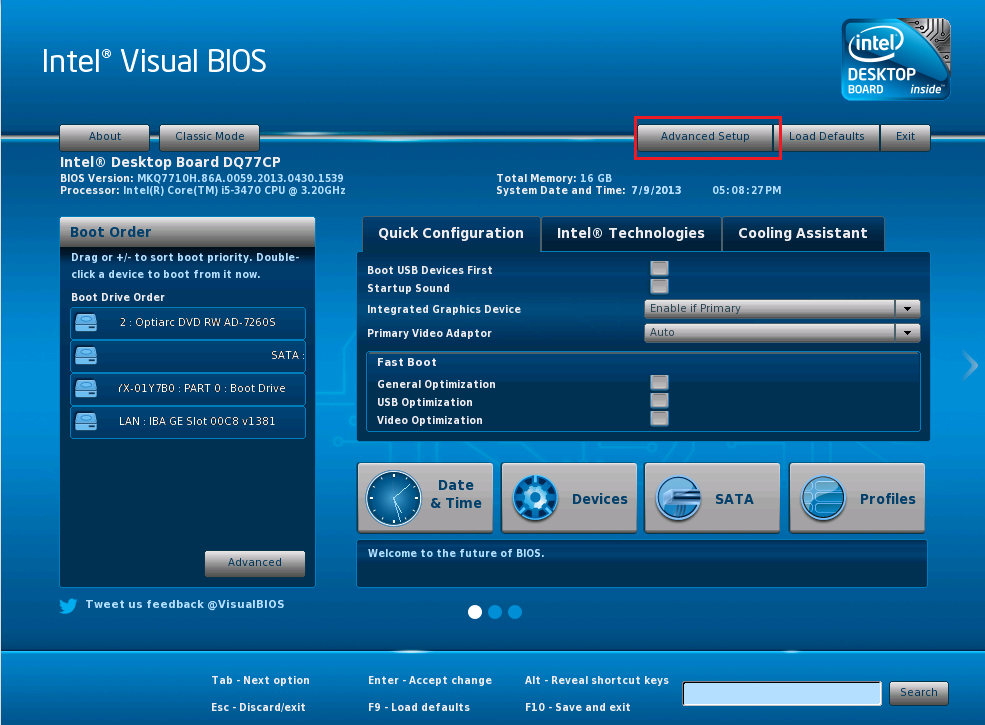
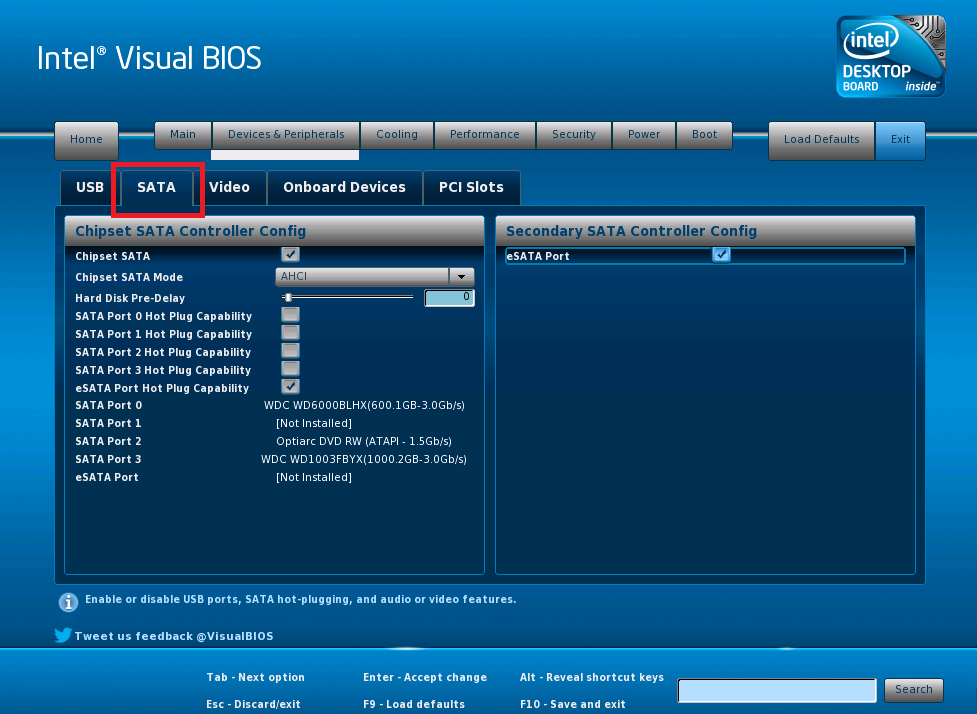
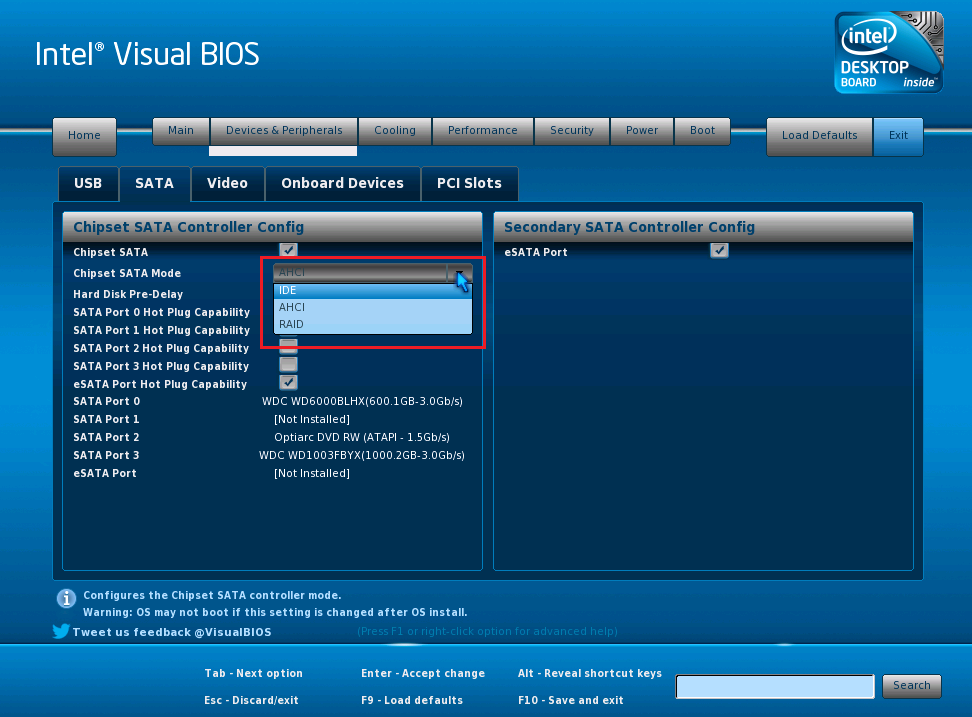
Intel Visual BIOSThe Intel Visual BIOS is the new BIOS layout and is the default in the Q77 series BIOS with later BIOS revisions. The guide below explains how to find the Serial-ATA Controller Mode setting which is useful if you need to disable AHCI model for legacy operating systems, such as Windows XP. Instructions
Note: Instead of using the Visual BIOS, you can switch to the Classic BIOS by using the Classic Mode button in the top left hand corner of the main Visual BIOS screen.
Applies to:
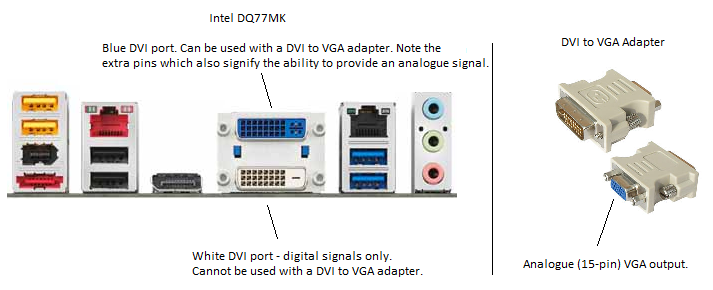
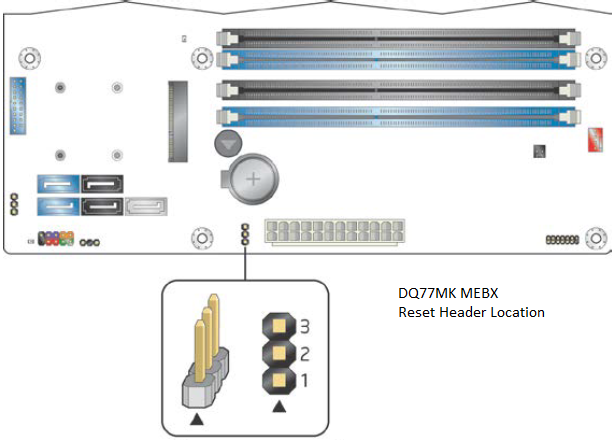
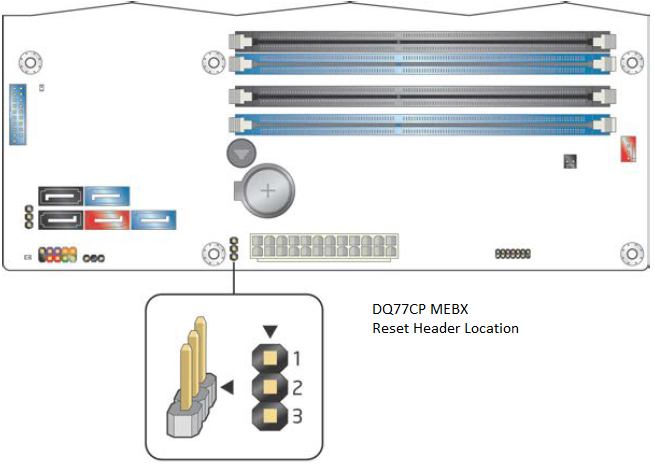
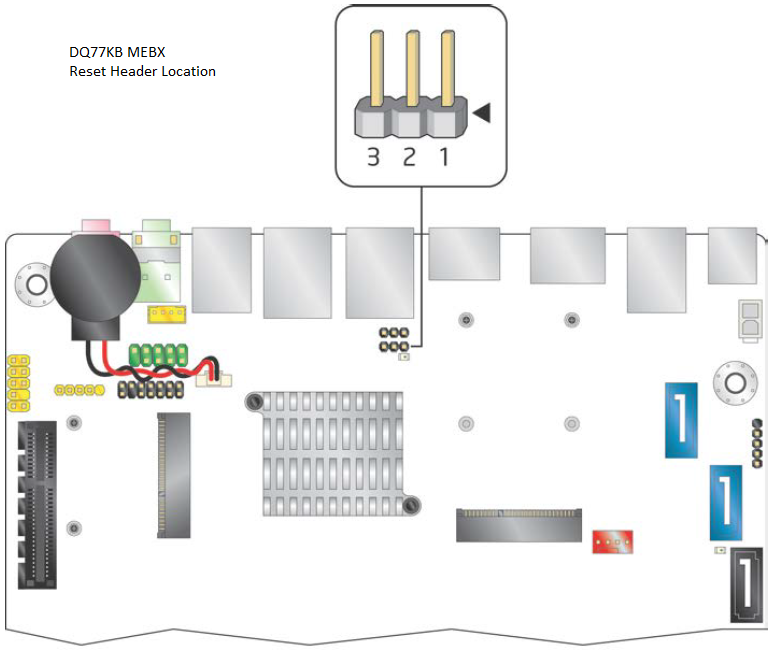
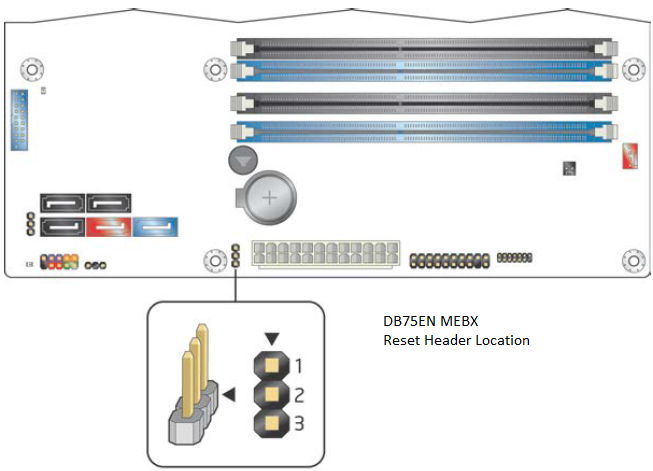
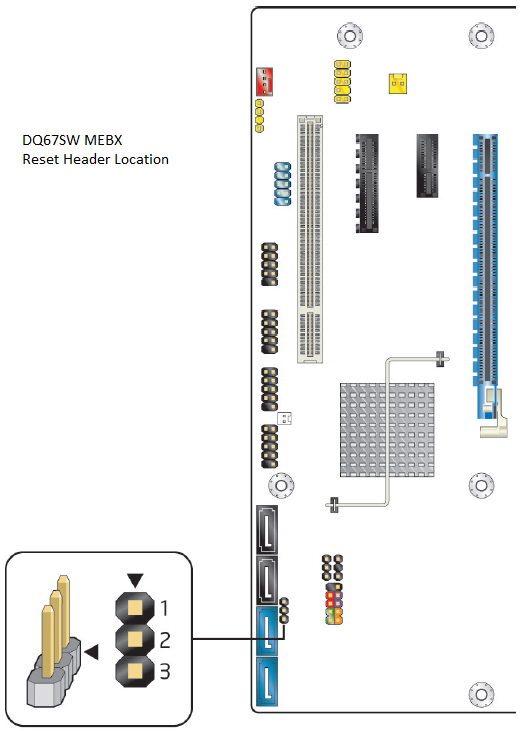
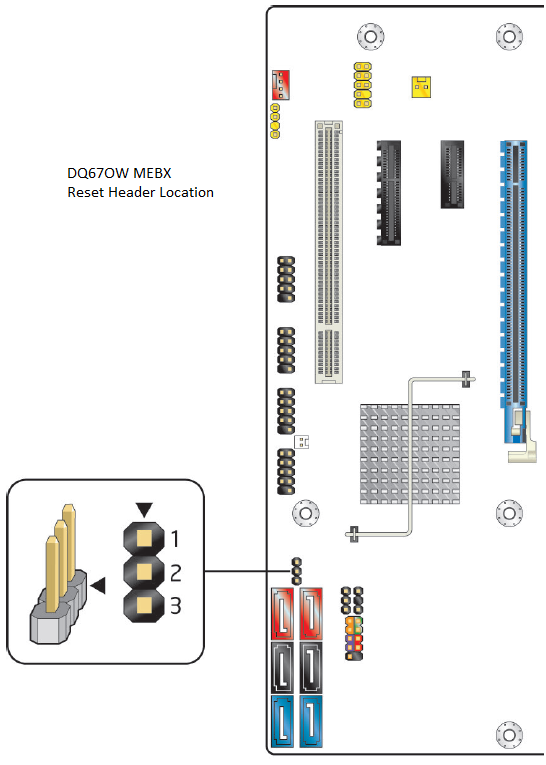
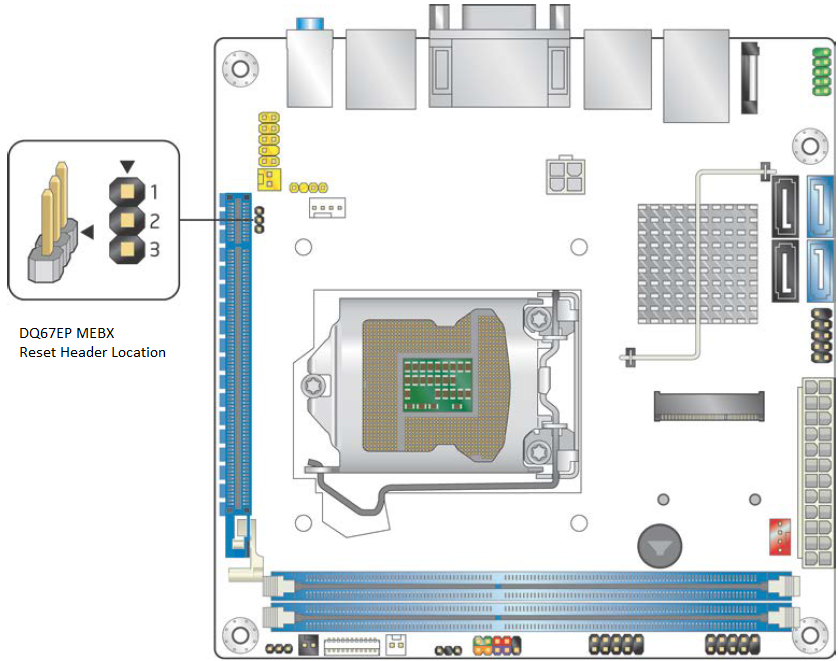
Clearing the CMOSThe method used to clear the CMOS settings on an Intel Desktop motherboard is different to the method used on Asus or MSI motherboards. Use the instructions below to clear the settings. Intel Desktop Board CMOS Clear InstructionsMethod 1
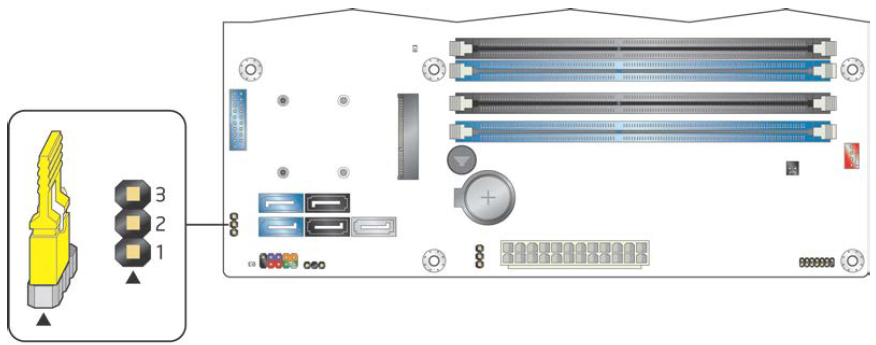
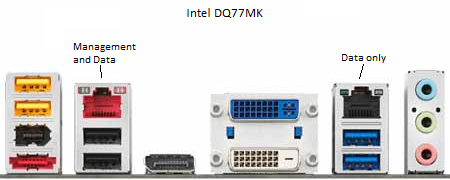
Location of the Recovery Jumper on the Intel DQ77MK
Configuration Jumper Summary
Remember: Turning the system on with the configuration jumper completely removed will put the system into BIOS recovery mode. In this mode, the system will attempt to reflash the BIOS from media such as a FAT32 formatted USB pen drive or a CDROM drive.
Method 2
Applies to:
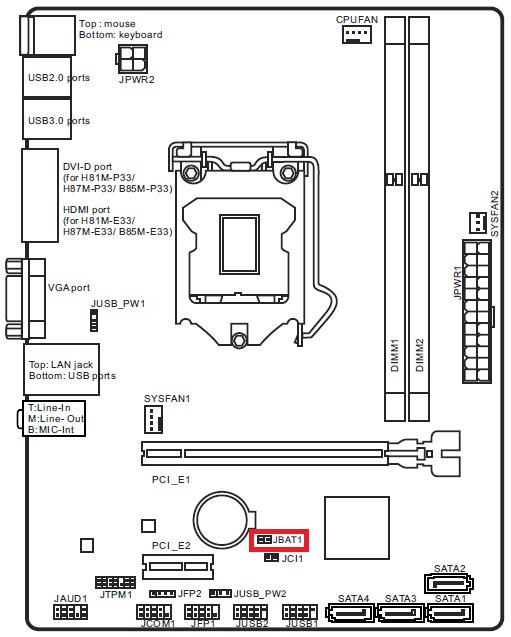
Clearing the CMOS
MSI CMOS Clear Instructions
Note: Do not short the JBAT1 terminal while the system is powered on.
Use a suitable screwdriver or a 2-pin jumper to short JBAT1.
Applies to:
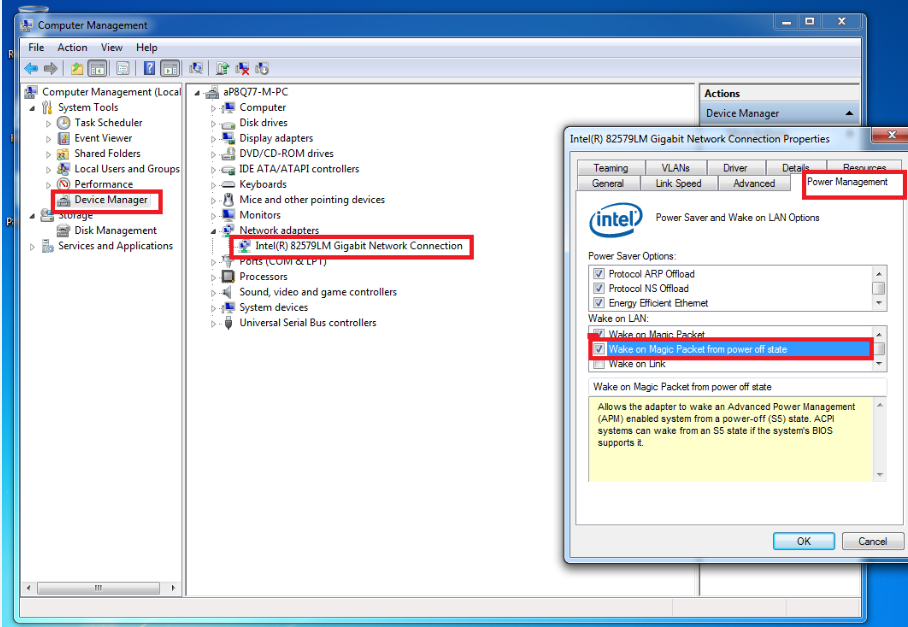
Wake On LANWake on LAN from S5 (power-off) state on systems that include an Intel LAN / Ethernet Controller may require operating system configuration so that the system wakes up when a magic packet is sent to the adapter.
Install the latest tested driver from the Stone Driver Finder or the motherboard manufacturer's web site. IMPORTANT: Please ensure that you install the full driver package, not just the base driver. The base driver does not give you access to additional features installed by the full package.
Enable the following setting in the LAN controller’s properties within Windows; ‘Wake on Magic Packet from power off state’ as shown in the image below. |


| Q170M-C | Q270M-C | Q370M-C | |
| Latest BIOS version | 4212 | 1607 | 2811 |
| ME Available with latest BIOS or otherwise available from Asus | 11.8.65.3590 | 11.8.65.3590 | 12.0.70.1652v3 |
| ME Potentially vulnerable to SA-00391 | Yes | Yes | Yes |
Availability of a Management Engine Update
A management engine update is available below.
Recommendations:
- Always test your deployment against a small number of machines first
- As part of this, ensure that any considered VPRO settings are maintained
- Always ensure you flash the right update to the right model of system
- Some of the exploits in SA-00391 may require other system configuration changes or software updates in addition to the management engine firmware update
Requirements to Perform the Update:
- You must install the Intel Management Engine Driver before attempting to install the update
- Local Administrator privileges are required
Download links:
Applies to:
- Q170M-C (BOAMOT-482)
- Q2170M-C (BOAMOT-489)
- Q370M-C (BOAMOT-494)
All current Stone PC systems (with exception of some netbook and tablet products) are 64-bit Windows capable. 64-bit capable systems allow a 64-bit version of Windows to address more memory, whereas traditional 32-bit systems were limited to 4GB of memory. If your system has more than 4GB of memory you will need to be running 64-bit Windows to take advantage of this increased capacity.
Applies to:
- All desktop, laptop, netbook and tablet products.
We recommend you use the standard 32-bit version of Internet Explorer for the best experience.
- For most purposes the standard (32-bit) version of Internet Explorer will perform perfectly.
- While the 64-bit version of Internet Explorer can potentially use more system memory, you may find that some web page add-ons do not load or install using 64-bit Internet Explorer.
Applies to:
- Desktop and Laptop Products
- Microsoft Windows
- Internet Explorer
USB Wake from Sleep
By default, systems that include the MSI H81M-P33 motherboard and were produced before 16/1/2014 will not wake from sleep using a USB or PS/2 keyboard or mouse. To wake the system from the S3 Sleep State (STR), you need to use the system's power button.
Systems produced on 16/1/2014 or later have this functionality enabled in the factory.
If you want to configure the system to wake using USB or PS/2 devices, BIOS settings must be changed and jumpers on the motherboard must be moved.
Instructions
Motherboard Jumpers
- Shut down the PC and disconnect the AC mains
- Remove the PC lid
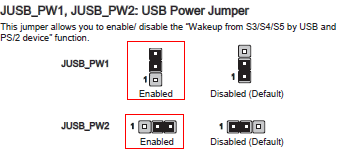
- Locate the JUSB_PW1 and JUSB_PW2 jumpers.
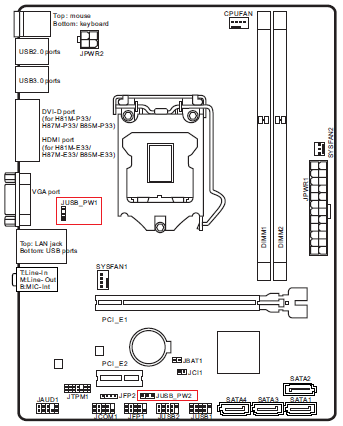
- Move the jumpers from the "disabled" position (pins 1-2) to the "enabled" position (pins 2-3) on JUSB_PW1 and JUSB_PW2.
- This means that JUSB_PW1 (behind the CPU, near the VGA port) jumper should be in the right hand position when looked at from the main ATX power connector side of the board.
- JUSB_PW2 (near the PCI Express x1 slot) jumper should be in the front position, when looked at from the main ATX power connector side of the board.
BIOS Settings
- Reconnect the AC mains and turn on the system.
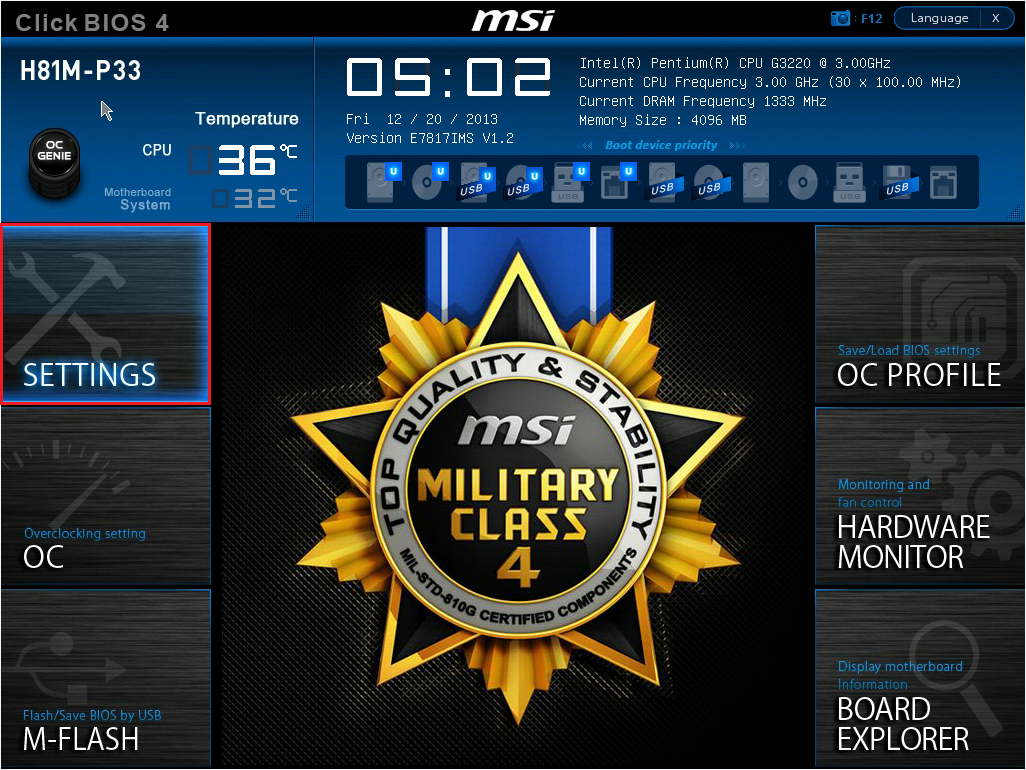
- Enter the BIOS by using the DEL key immediately from power-on.
- Enter the Settings menu.
- Enter the Advanced menu.
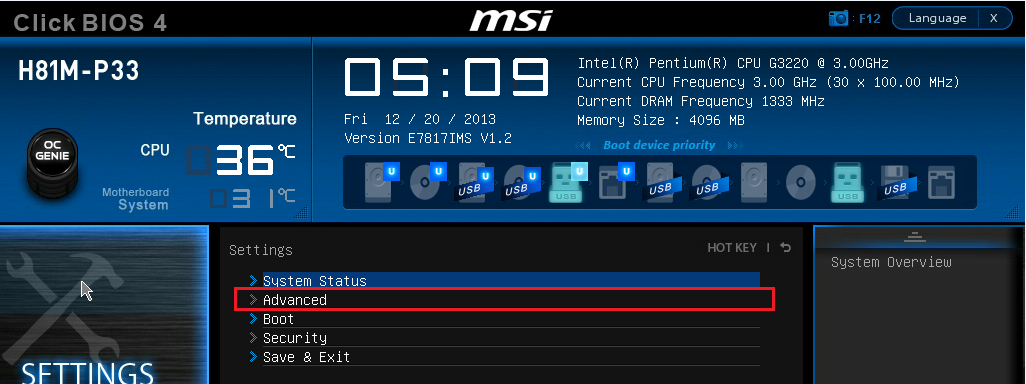
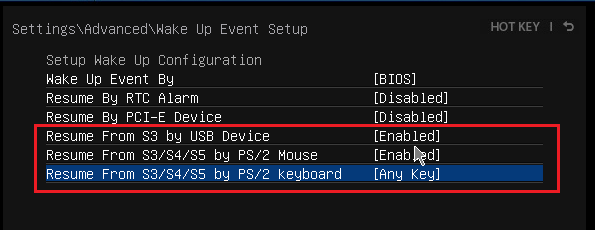
- Then go into the Wake Up Event Setup menu.
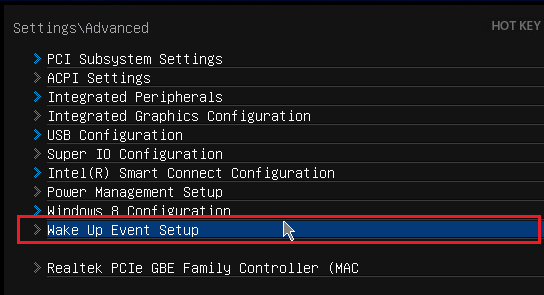
- Enable wake on USB and/or PS/2 as required.
- Press F10 to save and exit the BIOS.
Applies to:
- BOAMOT-464 - Stone / MSI H81M-P33
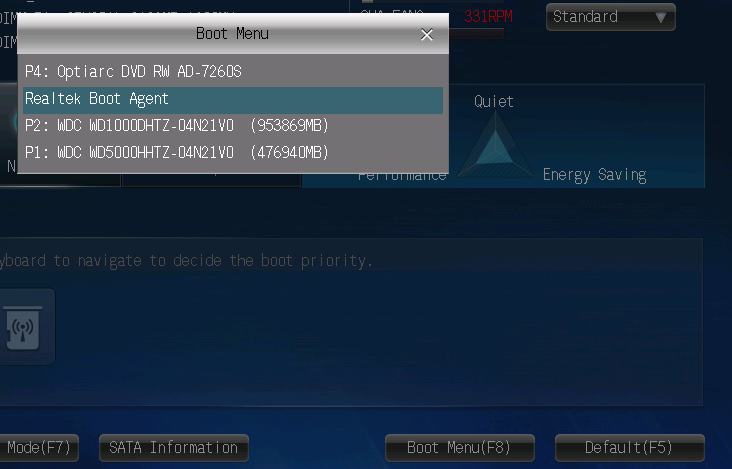
Scenario
You wish to boot your Windows 8.x (or Windows 10) Stone Desktop PC or All-in-one (AiO) machine using the in-built legacy PXE option firmware so that you may connect to your existing bootable network infrastructure for the purposes of operating system deployment.
You system has been supplied to you from Stone with Windows 8 or above and when you attempt to to use PXE boot you are unable to find the boot device in the F8 boot menu or in the boot device priority list within the system BIOS.
Cause
Windows 8.x (and 10) based machines must be shipped from the manufacturer with a BIOS feature called 'Secure Boot' enabled. This feature is intended to ensure that only authorised software can be booted on the host system
When Secure Boot is activated on a PC, the PC checks each piece of software, including the Option ROMs and the operating system, against databases of known-good signatures maintained in the firmware. If each piece of software is valid, the firmware runs the software and the operating system. This restricts the use of the Legacy PXE option ROM.
Resolution
- Boot the machine into the BIOS by tapping either F2 or DEL immediately after powering it on.
- Go to the "Boot" section.
- Go to "Secure boot" sub-menu.
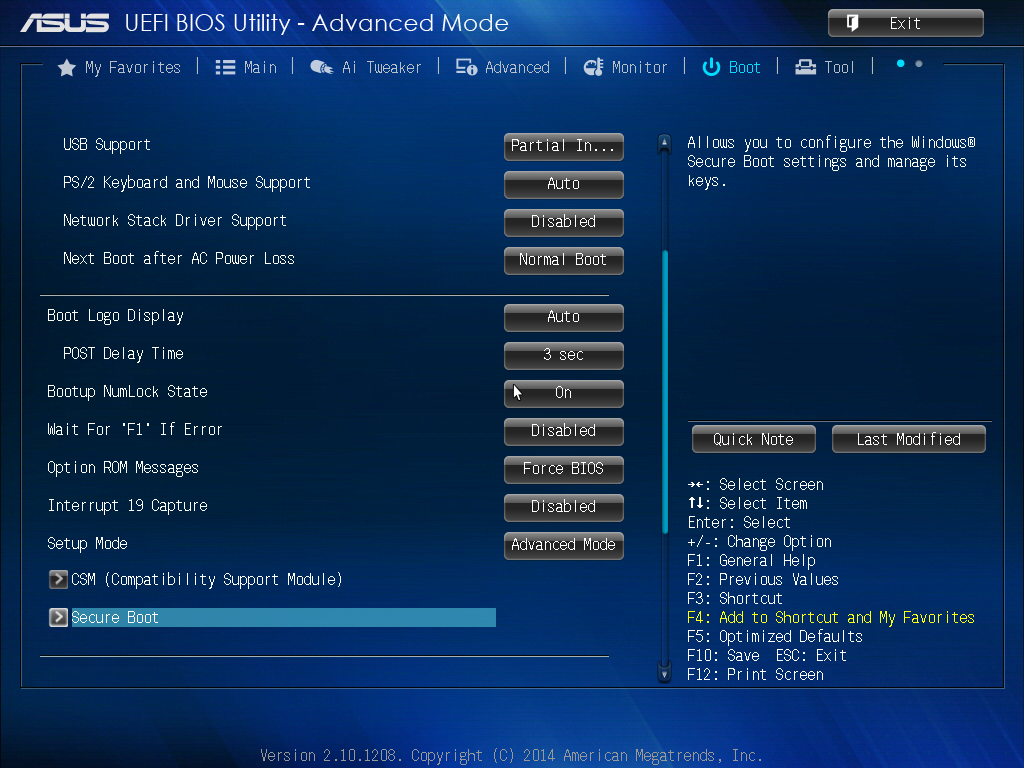
- Change 'OS type' from 'Windows UEFI mode' to 'Other OS'.
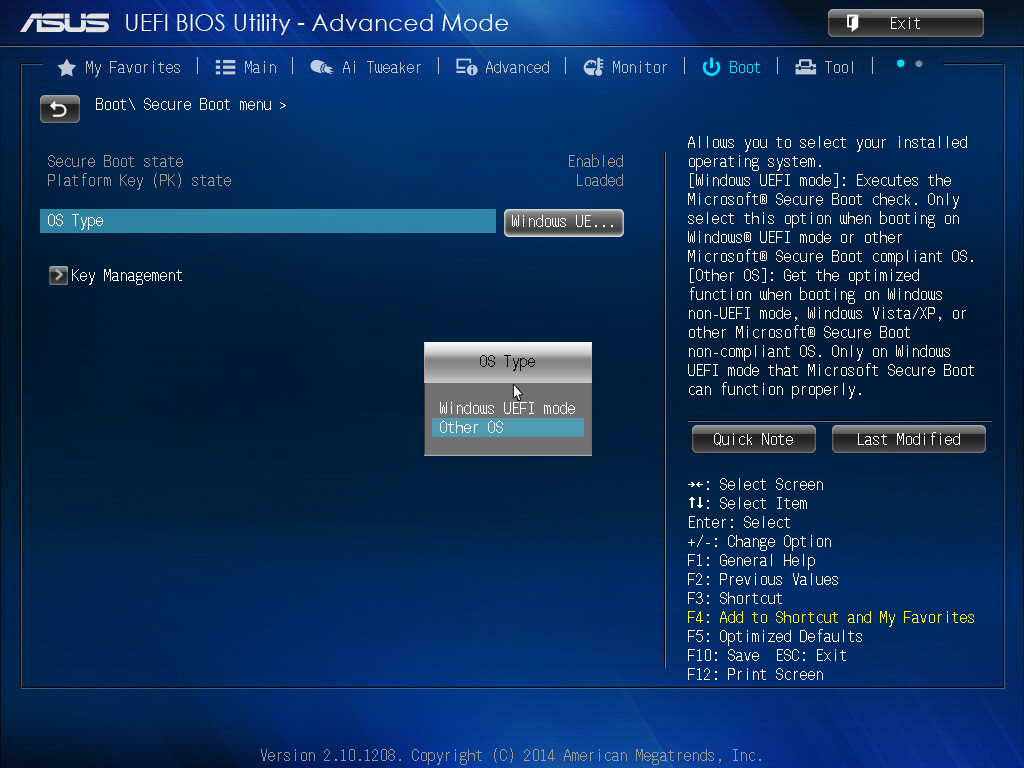
- Exit the BIOS saving the changes
- After the system restarts the Intel or Realtek (as shown in the image below) network boot agent will now be available in the F8 boot menu and boot priority list within the BIOS.
Applies to:
- Stone PCs with Asus motherboards including but not limited to: H81T (BOAMOT-471), B85M-E (BOAMOT-463), CS-B (BOAMOT-467), Q87M-E (BOAMOT-473), H81M-P-SI (BOAMOT-476) and the Q87-T (BOAMOT-470). Asus Skylake based platforms using Intel 6th generation core i processors
Using Bitlocker and TPM 2.0 on Windows 7
TPM is a method of storing the encryption key used by Bitlocker to protect the contents of the Windows drive. Typically the new Skylake platform systems and newer have moved from TPM 1.2 to TPM 2.0. This is natively supported by Windows 10.
If you want to use TPM 2.0 on Windows 7 then this is possible, but only with the following:
- You must use Windows 7 x64. 32-bit / x86 versions of Windows 7 do not support TPM 2.0
- You need to install Windows 7 in UEFI mode. This is a BIOS setting that has to be made before you partition the hard drive or install Windows. Systems installed in UEFI mode will have a GPT partitioned hard disk.
- In addition to enabling UEFI mode, you may need to disable Secure boot in the BIOS setup, to enable Windows 7 booting.
- The Windows 7 hotfix for Microsoft Knowledgebase article 2920188 must be installed. If you have all of the latest Windows updates, then this should already be included.
Stonebook Pro and Stonebook Lite
The Skylake Stonebook Pro and Stonebook Lite notebooks support Windows 7 and UEFI mode. This support was added in the 6/9/16 BIOS update. Without this BIOS, the system will not be able to operate in UEFI mode with Windows 7, meaning that TPM functionality will not be available. If you switch from non-UEFI (legacy) to UEFI modes, you may need to remove the partitioning information on the notebooks hard drive to complete your operating system deployment.
Applies to:
- All desktops and notebooks with TPM 2.0 required to run Windows 7
Problem
The webcam detects in device manager, but the end user cannot access it in some, or all apps.
Steps
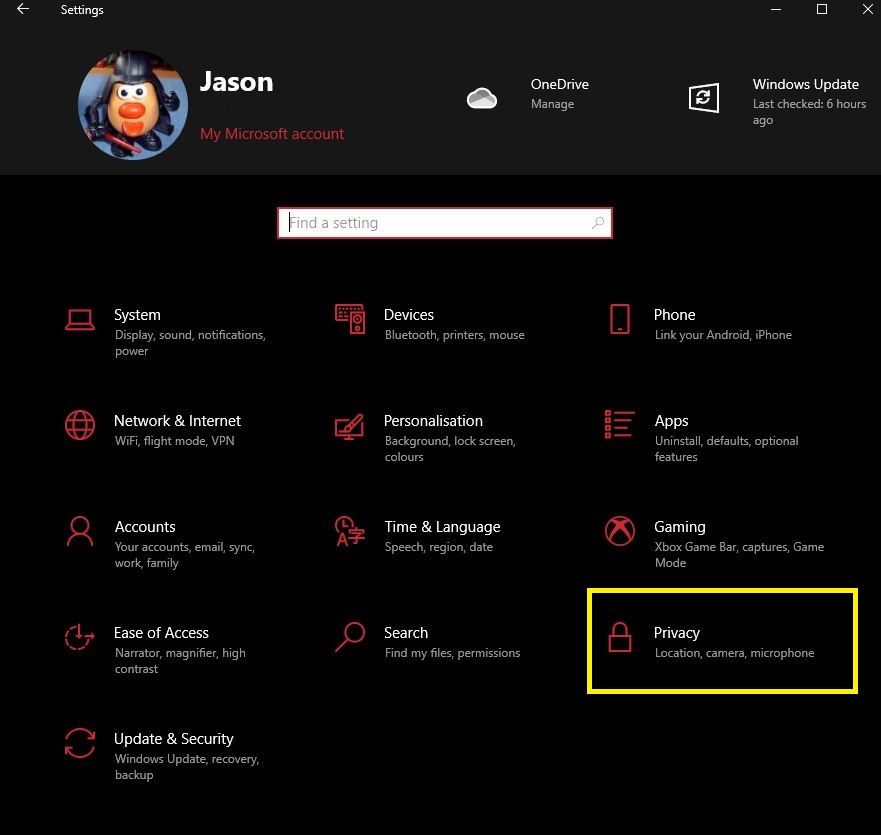
1. Go to Windows settings and select Privacy. Alternatively you can start a search for camera privacy settings
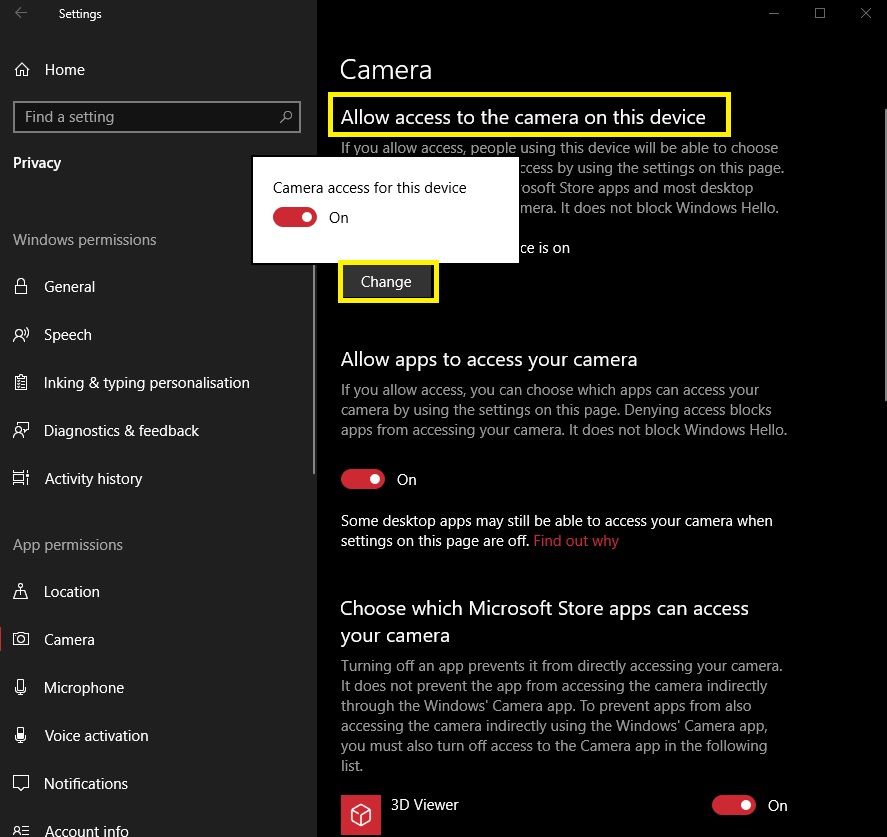
2. Select the camera option in the left pane and verify that it says "Camera access for this device is on". If it's off click on change and toggle it to on.
3. Make sure the “Allow apps to access your camera” switch is on.
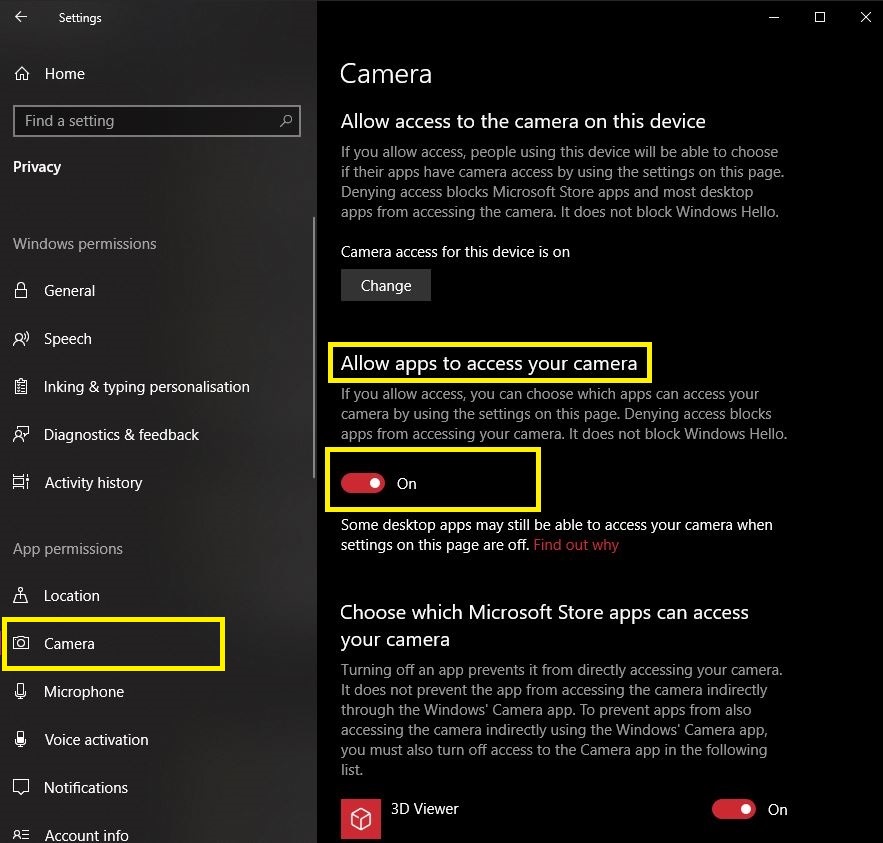
4. Under "Choose which Microsoft Store apps can access your camera" you can now toggle on the apps you want to use.
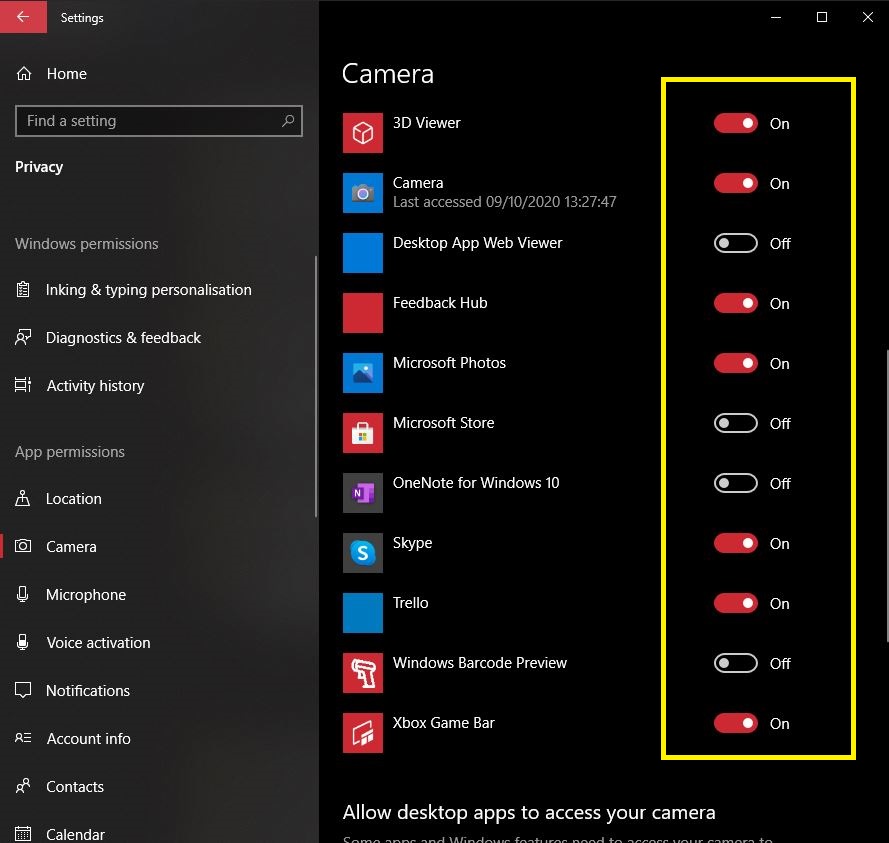
5. Make sure that the "Desktop App Web Viewer" is turned on as some desktop applications will need it.
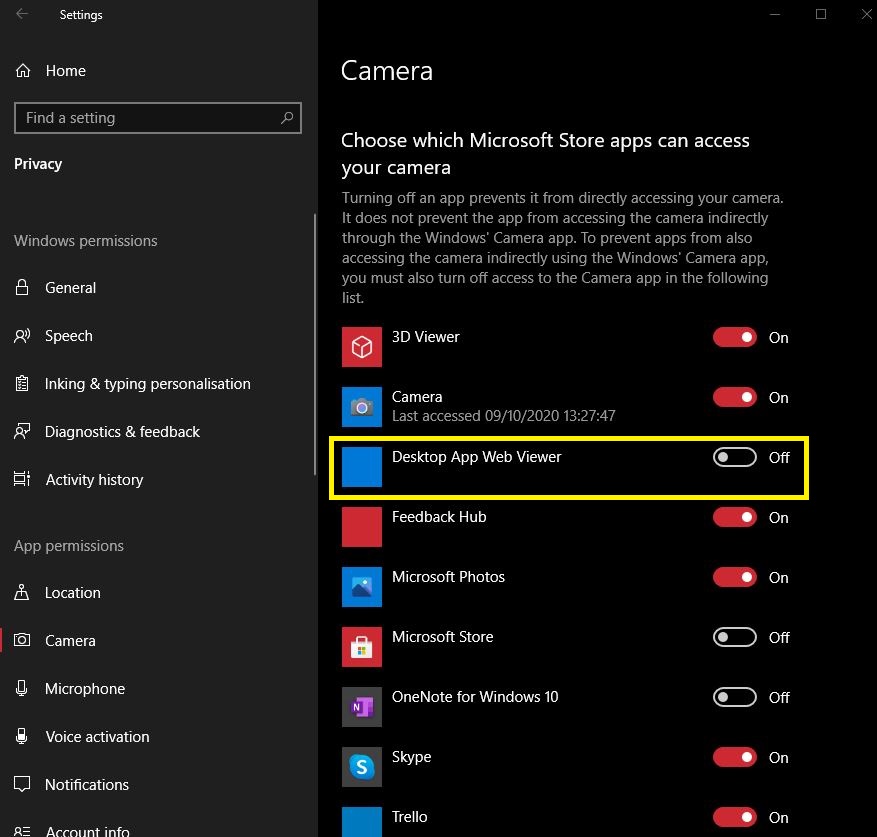
6. Scroll down and ensure the "Allow desktop apps to access your camera" is toggled on.
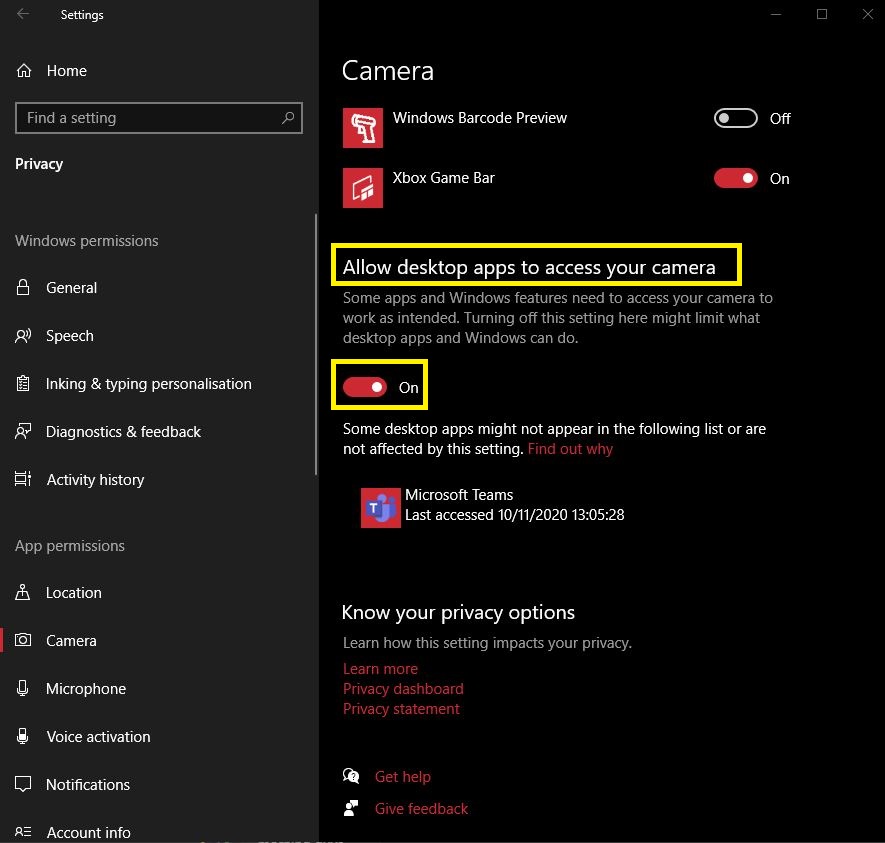
7. You will also need to apply these same changes for the microphone privacy settings.
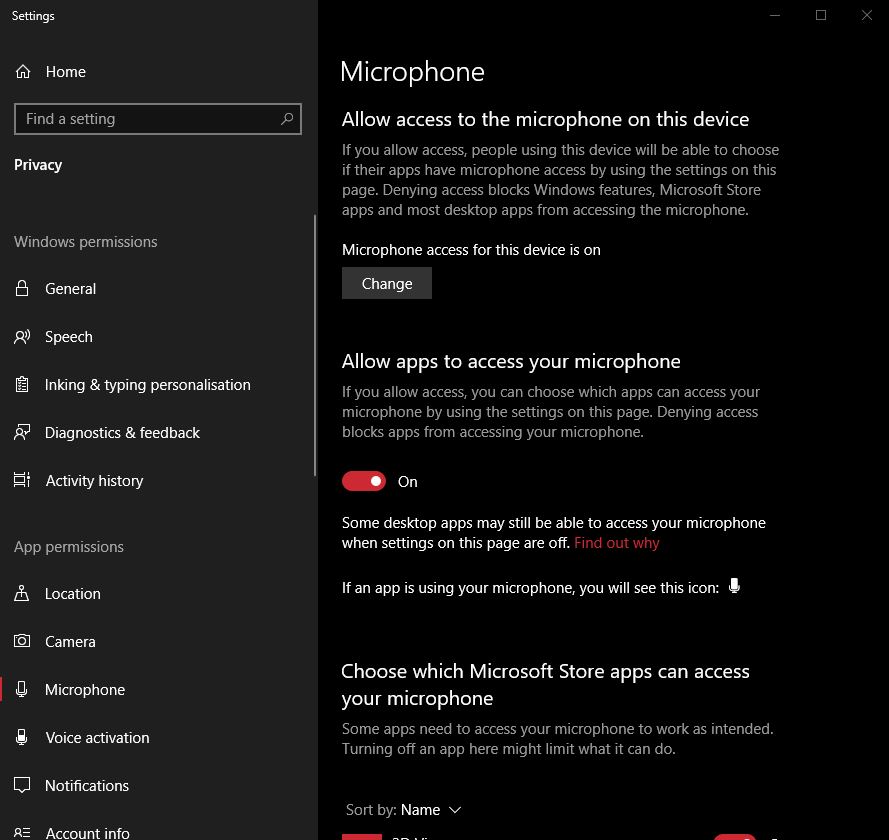
8. Restart the applications you were having issues with that required the use of the webcam & mic.
Applies to:
- Any machine that has an inbuilt webcam & microphone.
What is a Dead, or Stuck Pixel?
All modern flat panel screens are made up of tiny lit elements known as pixels. These pixels use combinations of red, blue and green light to build images on the screen.
It is a fact of the technology that even despite the highest manufacturing standards, that sometimes it is possible to receive a new screen and have a dead pixel. This could be visible as a pixel that is constantly white, constantly black, or partially stuck - for example, it might be a stuck on as red, blue or green.
![]()
What Is the Pixel Policy Standard?
Manufacturers make equipment to an international standard (called ISO 13406-2) so that users receive the experience that they expect. Most equipment that Stone supplies is known as Class II equipment as regards pixel policy. Details of what the policy is are covered below. It is only when you have a number of dead pixels over the amount specified in the table is the product deemed to have fallen short of the standard.
| Class | White Pixels | Black Pixels | R/G/B Pixels | W/B Clusters | R/G/B Clusters |
| II - Per Million Pixels | 2 | 2 | 5 | 0 | 2 |
- W/B Clusters: How many white or black stuck pixel clusters are permitted: 0.
- R/G/B Clusters: How many Red/Green/Blue semi stuck pixel clusters are allowed: Up to 2.
These numbers are all per million screen pixels. On a standard 15.6" laptop screen that has a 1366x768 resolution, there are just over one million pixels, so the above numbers apply exactly.
So, am I Covered by Warranty?
Stone is proud to deliver excellent products and customer service, and as such we support our partners and suppliers with this pixel policy. If you receive a product that is outside of this policy please let us know within 30 days so that we can get the unit exchanged under our dead-on-arrival (DOA) facility.
If you have a single black or white stuck pixel, then usually this is not covered. Please do not hesitate to contact our Support team if you are unsure if you are covered or not.
Applies to:
- Monitors
- All-in-one screens
- Laptops, netbooks and tablets
Secure Boot and UEFI Boot
Secure Boot and UEFI boot are two technologies that go hand in hand to enhance the security and capabilities of a modern PC system.
Secure Boot uses a signature to ensure that the operating system loader is trusted. In other words, if the operating system loader is damaged by a malicious attack, such as by a virus or malware, the system can detect this and prevent the system from booting. This gives the system administrator awareness of a problem; the system can be cleaned and then restored to normal service, protecting the users data.
UEFI boot is an alternative to the legacy method of booting an operating system, known as the "BIOS". The way the system firmware interacts with the operating system is different and more flexible. For example, bootable devices greater than 2TB in size are supported. However, the operating system has to be UEFI aware - for example, Windows XP cannot boot if UEFI is enabled in the BIOS - and the disk needs to be partitioned using a newer method known as GPT, as opposed to the older MBR (master boot record) method.
Additionally, you will usually need to reinstall or redeploy a system if you change to UEFI mode after original installation. If you are using Windows images, you may need to build a new image.
What do I need to get UEFI or Secure Boot Functionality?
Generally, most 7 or 8 series chipset based systems have BIOSes that have been developed with UEFI support and secure boot support in mind.
Some 6 series based systems have a mixture of capabilities:
- H61 based systems: Usually have Secure Boot and UEFI boot capability with a BIOS update. Some manufacturers (i.e. MSI) have release a specific version of the motherboard with Windows 8 - and thus Secure boot and UEFI support.
- H67 / Q67 based systems: Usually have UEFI capability, often available after a BIOS update. Often Secure boot functionality is missing. Customers looking to buy Windows 8 capable systems in 2012 either bought H61 (with a BIOS update) or B75/H77/Q77/Z77 motherboards; there was no need for the motherboard manufacturers to make these systems secure boot capable.
Older systems, such as those based on the 4 or 5 series chipsets do not generally have UEFI or secure boot capabilities.
What Mode Should I Be Using?
Windows 8 / Windows 8.1
Generally secure boot should be ENABLED. For secure boot to operate, UEFI boot must also be enabled.
Windows 7
Secure boot is not supported by Windows 7. UEFI boot is supported but many IT departments prefer to leave UEFI boot disabled to preserve compatibility with operating system images.
Windows 7 and Windows 8 Dual boot
As secure boot is not supported by Windows 7, this will need to be disabled. Leave UEFI boot disabled if you prefer to maintain compatibility with non-UEFI software images.
Windows Vista
Windows Vista does not support Secure boot or UEFI boot. These need to be disabled for Windows Vista.
I Have Changed the Motherboard in the System and Windows won't Start
In this situation, it is best to configure the BIOS to the recommended secure boot and UEFI settings depending on the operating system that is installed on the machine.
What If I want to Boot from a Hard Disk Larger than 2TB?
If you want to boot from a hard disk larger than 2TB, you need the following:
- UEFI to be enabled in the BIOS
- The disk must be partitioned as GPT (if you try and install Windows when UEFI only mode has been selected, this partitioning method is usually selected automatically).
- You need a UEFI compliant version of Windows - Windows 7 is capable; Windows 8.1 is recommended. Windows XP and Windows Vista are not UEFI capable.
Applies to:
- Desktop and laptop systems with 6, 7 or 8 series motherboards.
We do not recommend that you update your BIOS unless you have a specific problem that needs resolving. In this instance, please contact Stone support for assistance. We can help you diagnose any problem, and can give you all of the information you need for any BIOS update.
If you would like to try the BIOS update on your own, these are made available when necessary on the Stone driver finder - Stone Driver Finder.
Applies to:
- All Stone Desktop and Laptop systems