Stone Computers Knowledgebase

ISRMOT-174 - Stone / Gigabyte MW50-SV0 - Workstation Motherboard BIOS Update

Article ID: 674
Last updated: 09 Aug, 2017
Article ID: 674
Last updated: 09 Aug, 2017
Revision: 8
Views: 1167
Posted: 10 May, 2017
by Paul Watkins
Updated: 09 Aug, 2017
by Andrew Sharrad
Security Advisory: In May 2017, Intel released details regarding a critical security issue present in some Intel business chipsets. 

The product referenced on this page is impacted by this security issue. As a precaution, this product ships with unaffected Consumer Management Engine Firmware. BIOS Update R06 enables HEDT AMT Functionality and includes the necessary patch.

To confirm your products status (i.e. patched, requiring a patch, or running in Consumer ME mode) and details of mitigating actions please see here.

Summary

Update package and instruction for updating BIOS of Gigabyte MW50-SV0 workstation motherboard.

Procedure

  1. Download the update package (version R06).
  2. Prepare bootable USB pen drive with real DOS and extract the entire flash archive to the pen drive.
  3. Boot the system to be updated into BIOS setup.
  4. Check and make note of the BIOS settings as regards UEFI / Legacy Boot, Secure Boot, and SATA Controller / SATA RAID settings.
  5. Disable Secure Boot in the BIOS.
  6. Boot from the USB pen drive using the F10 boot menu (Note - choose the USB key option without "UEFI")
  7. Change to appropriate directory (MW50-SV0_R06) and run fb 1
  8. Allow BIOS update process to complete and follow on screen prompts.
  9. Once complete, turn off the system.
  10. Turn the system back on and restore your BIOS settings, i.e. Secure Boot.

What To Do if the Flash Fails

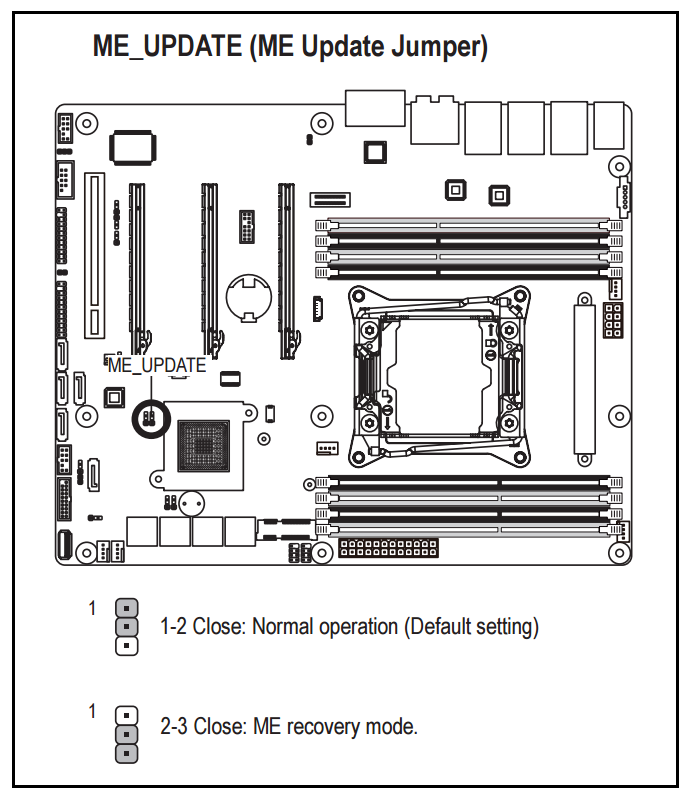
This process does not normally require changes to the ME Flash jumper. However, if the BIOS update or ME update does not complete, you may need to change the ME Flash jumper on the motherboard.

  1. Turn off the system.
  2. Move the ME_Update jumper to pins 2 and 3 (Note: Not the ME_Recovery jumper).
  3. Insert the USB pen drive.
  4. Boot the system to real DOS using the USB pen drive.
  5. Change to appropriate directory (MW50-SV0_R06) and run fb2
  6. Allow BIOS update process to complete and follow on screen prompts.
  7. Once complete, turn off the system.
  8. Move ME jumper back to pins 1 and 2.
  9. Remove the USB pen drive.
  10. Power on the system, enter BIOS menu and check settings.

Warning: Do not power of the system while the firmware update is in progress.

Applies to:

  • ISRMOT-174 - Gigabyte MW50-SV0 workstation motherboard
This article was:  
Article ID: 674
Last updated: 09 Aug, 2017
Revision: 8
Views: 1167
Posted: 10 May, 2017 by Paul Watkins
Updated: 09 Aug, 2017 by Andrew Sharrad
Also read