|
Article ID: 405
Last updated: 13 Feb, 2016
BIOS UpdatesImportant: The instructions in this article are for advanced users only, or experienced IT personnel. It is not recommended to perform a BIOS update on your Classmate 3 unless you have a specific issue which can only be rectified by a BIOS update. If you require assistance with any issue, please contact our support team first.
As of November 2014, there is now a BIOS update available to support the new USB 3.0 / Gigabit LAN Adapter, CABUSB-224. This is version 1.04. (This is seperate to the previous update for the touchscreen firmware for early units - see related articles - however the update for the touchscreen is not related to the main BIOS). Overview The original BIOS 1.00 (dated 2014.0606) was shipped on systems until the end of November 2014. To flash the latest BIOS 1.04, an intermediate BIOS version 1.02 must be installed first. To perform the flash, the EFI System Partition must be present on the hard drive. This means that the hard drive/SSD/flash module must be fitted and working before the BIOS can be updated. Once you have an EFI system partition, the BIOS update(s) can be performed either in the EFI Environment or the Windows PE Environment. BIOS 1.04 has an optional dock firmware update ("dock_V106"). This firmware update is only applicable to the original dock models which use an orange power connector. This update can only be done in Windows PE or full Windows. It cannot be done inside EFI. Additionally, BIOS 1.04 has an optional tablet EC firmware update ("Tablet_V106"). This can be applied to any model that was shipped before December 2014. This update can only be done in EFI. It cannot be done inside Windows or Windows PE. Initial Steps (Assuming BIOS 1.00 is currenly installed)
Tip: If you have the Classmate 3 Windows PE boot pen drive, it may be a good idea to store the BIOS update files in a directory on this pen drive. This way, if you have to use the Windows PE boot to create the EFI System Partition (ESP) you can then proceed with the flash process as soon as you have finished making the partition.
Once you are sure an EFI System Partition is present: Option 1: Flash From Within Windows This option is quickest if the system is already booted into Windows or Windows PE.
Note: The BIOS flash process is completed after a system reboot.
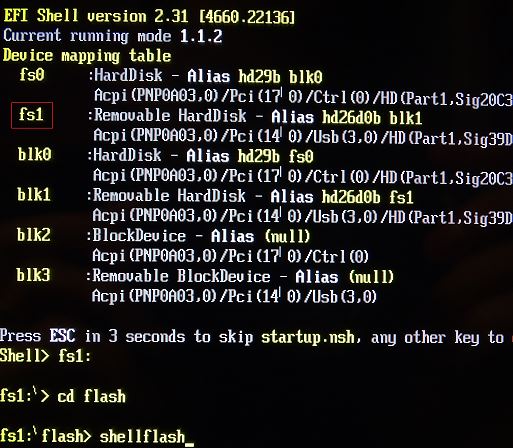
Option 2: Flash from the EFI Shell This option is quickest if you don't have an Administrative logon to the copy of Windows that is installed, or don't want to wait to boot full Windows. Again, the EFI System Partition needs to be present. If you have the EFI System Partition, when you boot to the EFI Shell the pen drive will be available as FS1:. If you do not have an EFI system partition the only drive available to you will be FS0:, and you will need to create the EFI System partition using a bootable Windows PE drive.
Note: The flash process is completed after a system reboot.
If the Flash Process FailsIf you get an error message about ESP, or the flash process fails at the point of "Reading the file", you likely don't have an EFI system partition. Create the partition, and repeat the flash process. Other reasons for failure in flashing include already having the same BIOS installed. Creating the EFI System Partition (ESP)The EFI System Partition (ESP) is a reserved partition on the hard drive (which could be a mechanical or flash based drive) which some EFI tools, including BIOS update utilities, can use to store code. Note: Creating the ESP using the method below is recommended on systems that have no operating system, as the instructions below will erase the contents of the hard drive.
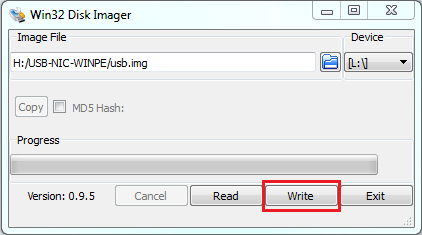
Instructions Stage 1 - Create Windows PE Media which includes Support for the Classmate A specific download of Windows PE is available which includes support for the Classmate 3 Intel drivers, to allow the keyboard and mouse to function in the PE environment.
Stage 2 - Copy the BIOS Update Files to the Windows PE Pen Drive (optional)
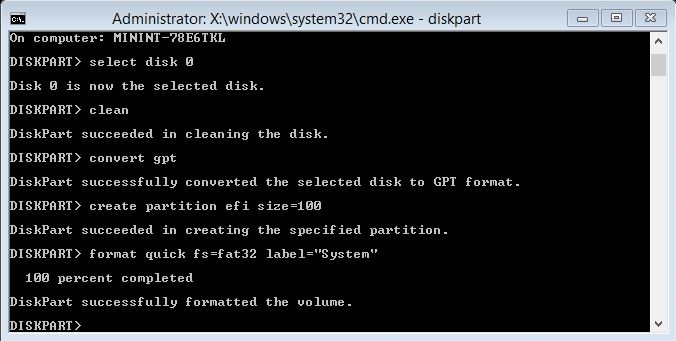
Stage 3 - Boot the Unit and Create the ESP
diskpart (the system will enter the diskpart context)
Remember: Creating the ESP above is a destructive process that will erase the contents of the first system hard drive.
Stage 4 - Run the Classmate 3 Windows Flasher If you extracted the Classmate 3 BIOS update files to the pen drive, you can now re-attempt flashing. No reboot is required in-between creating the ESP and re-attempting the flash. Standard BIOS DownloadsCurrent BIOS BIOS 1.00 0606 Original Stone Logo BIOS (this is the original shipping BIOS until November 2014). BIOS 1.02 Intermediate BIOS (this BIOS must be installed before you can update to BIOS 1.04; this is not a Stone Logo BIOS so machines should not be left running the BIOS). BIOS 1.04 Stone Logo BIOS (includes "dock_v106" for docks which have an orange power connector, and "tablet_v106" - an EC update for all models shipped before December 2014). Combined BIOS Package 1.00 to 1.04 - All BIOSes and Firmwares (includes all of the above and the touchscreen update for early units with unresponsive touchscreens). Applies to:
This article was:
Article ID: 405
Last updated: 13 Feb, 2016
Revision: 18
Views: 3833
Posted: 03 Nov, 2014 by
Andrew Sharrad
Updated: 13 Feb, 2016 by
Andrew Sharrad
Also read
|