|
|
Export plugin is not installed.
Installation, Drivers and Software

Windows XP Driver Deployment Utility
Please use this link to download the Ultimate DDU Utility (Approx 1.59GB).
This utility allows for fully automated installation of drivers and appropriate software for most Stone branded desktops and laptops from 2009 to early 2013.
Usage:
- Extract the package to a CD, USB pen drive or network location as appropriate
- Run "install_xp_drivers_now.bat" on the machine that requires installation. This will initially copy the packages to a C:\Stone folder on the local machine, and then execute the installation. This method is usually recommended. Drivers need to be copied to the machines local C drive as USB and network devices may be restarted during the installation.
OR:
- Extract the package directly to the C drive of the machine to be installed
- Run "install_xp_drivers_now-no_file_copy.bat" - this will start the driver installer from the current location. This method isnt suitable for running directly from a USB key or network location as the installer may become unavailable when these drivers are installed.
Note: See the related articles to check which models are compatible with this utility, as this utility shares its code with the DDU for CC3. 32-bit Windows XP only supported. This utility will install Windows Installer and Dotnet Frameworks as required.
Last updated 21/9/13.
Applies to:
- Most Stone branded Desktop and laptop products produced between 2009 and 2012
- Selected Lenovo models.
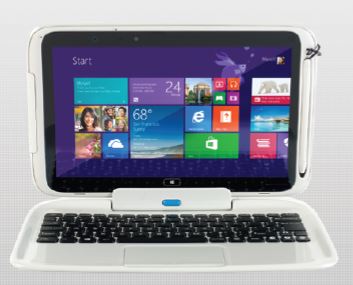
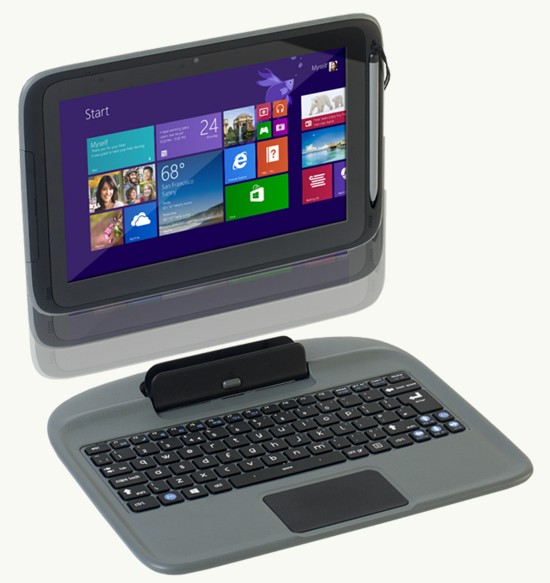
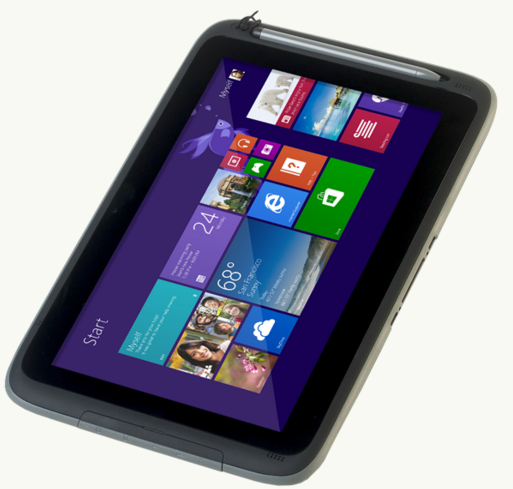
Classmate 3 and Windows 10
We do not recommend that you attempt to upgrade to Windows 10 in your Classmate 3 yet. Our own testing has determined that the Classmate 3 may not be fully compatible with Windows 10. If you attempt to do an upgrade from Windows 8.1 to Windows 10, the upgrade may fail at around 70%. When it fails, it may leave your Classmate 3 in an unusable state.
For customers that are looking for the Windows 10 experience, we will be launching a range of new products that deliver the best in new Windows 10 features shortly.
If you have any queries or questions regarding this please don't hesitate to talk to one of the support team, or your account manager.
Applies to:
- NOTCHA-263 / NOTCHA-264 - Stone Classmate 3
To ensure optimal performance and long-term reliability of your Stonebook Edge-R device, a critical firmware update is now available.
This update addresses system stability improvements.
Why This Update Is Important
The latest firmware version includes targeted fixes and enhancements designed to alert and mitigate potential isolated system behaviours in field deployments.
Key improvements include:
- Enhanced power management to mitigate rare anomalies during sleep/modern-standby/hibernate/off power modes.
- Improved USB stack handling to detect and improve control of rare peripheral anomalies during active mode.
These changes are part of our ongoing commitment to deliver a robust and reliable computing experience, especially in environments where uptime, predictability and longevity are critical.
Who Should Apply This Update
All owners/users of the Stonebook Edge-R devices are strongly encouraged to apply this update.
How to Update
Prerequisites (Applies to all methods)
- Ensure the device is plugged into AC power, updates will not proceed while the device is using battery power.
- Confirm the target BIOS image is correct, it should be version SP41MD103_STE_V15.bin or later.
- Backup critical data if needed (BIOS flashing is low-risk but precautionary).
- Identify current BIOS version if audit logging is required.
- Suspend BitLocker is enabled.
Warning: If Microsoft BitLocker is enabled on your device, you must suspend it before applying the firmware update to avoid being locked out of your device by BitLocker recovery mode. It is also recommended that you verify your BitLocker recovery key is stored safely on removable media, stored in your Microsoft account, or Stored in the domain account provided by your employer / education institution.
More information and guidance on how to perform this task are available directly from Microsoft.
Suspend BitLocker protection for non-Microsoft software updates - Windows Client | Microsoft Learn
BitLocker Suspension
- Control Panel
- Press the Windows key, type "Manage BitLocker", then press the Enter key.
- Within the new BitLocker Drive Encryption window which appears, you can see the status of BitLocker.
- Select 'Suspend Protection'.
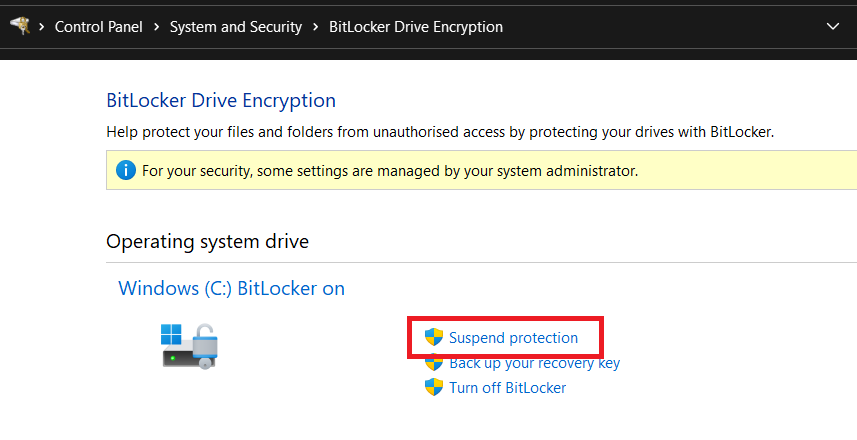
Note: After the firmware update has been successfully applied using one of the methods described in the next section, return to the BitLocker Drive Encryption screen to Enable Protection agaim.
- PowerShell
- Press the Windows key, type "Powershell" and run as Administrator.
- In the Administrator PowerShell window type the following command and press the Enter key.
Suspend-BitLocker -MountPoint "C:" -RebootCount 1
Note: This command suspend BitLocker for one reboot, after which it automatically enables again.
Apply The Update
Below is information detailing the four methods available to apply this update.
- 1: EFI Shell Update
This method is performed using removable USB media, which boots into the EFI shell.
USB Preparation
- Download the relevant BIOS and shell files available from our Driver Finder here - Link
- Format a USB stick as FAT32.
- Extract and Copy the downloaded files onto the USB stick retaining the same file structure.
- The folder structure should look like this:
USB Root
├── EFI
│ └── BOOT
│ └── startup.nsh
├── SP41MD103_STE_V15.bin
└── AfuEfix64.efi
Disable Secureboot
- Power on the system and immediately press the DEL key to access the BIOS.
- Navigate to Secure Boot Settings
- Go to the Security tab.
- Scroll down and select Secure Boot Menu.
- Modify Secure Boot Configuration
- Set Secure Boot Mode to Custom.
- Then, disable Secure Boot.
- Save changes and Exit/Reboot
Flashing the BIOS
- Once you have disabled secureboot, restart your notebook with the USB stick connected and press F7 during start-up to open the Boot Menu.
- From the boot drive list, select your USB stick to boot from it.
- From this point flashing process will begin automatically - when prompted, simply press the Y Key to confirm and continue, or the N key to cancel.
- Wait until the notebook has completed the flashing process.
- Access the BIOS menu again to re-enable secureboot, save the new changes and exit.
Note: Do not remove the AC Adapter whilst the BIOS update is in progress, as this could render the battery or machine unusable.
- 2: Windows runtime update
This method is initiated from a Windows operating system using a supplied flash utility and automated script file.
- Download the Windows based flash tool from the Driver Finder - Link
- Extract the zip file to local storage on the device which is to be updated.
- Run the flash.bat file as an administrator, this will start the flash process.
- You will receive the following "Are you ready" prompt, press the 'Y' key to begin, or the 'N' key to cancel.
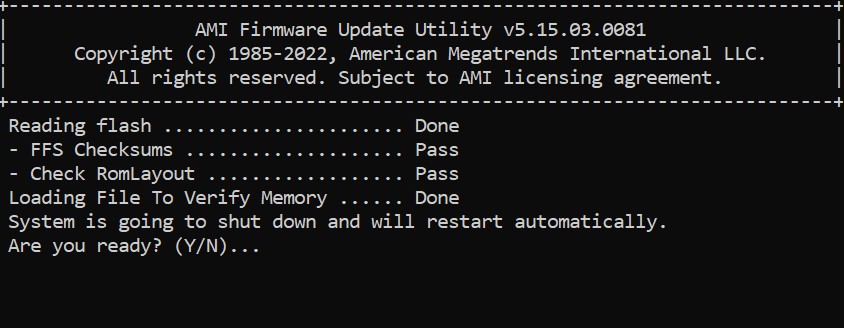
The device will automatically reboot and the flashing process will continue with no further user input required.
Note: The device will reboot in between flashing processes before finally before shutting down. It's essential that you do not interrupt the process.
- 3: Microsoft Intune application
This method provides an Intune application that can be targeted at compatible devices and will automatically suspend BitLocker and apply the update.
It is intended exclusively for use by those who are familiar with managing devices, groups and applications in Microsoft Intune.
- Download the package from our Driver Finder - Link
- Extract the files contained within the zip.
- Read through the documentation provided, which covers the function of the application and how to implement it.
- 4: Windows Update
The firmware is offered via Windows Update for eligible systems.
To check if the firmware is available for your device:
- Open Windows Settings, press the Windows key + I simultaneously on your keyboard. Alternatively, press the Windows key, type "Settings", and press the Enter key.
- In Settings, select Windows Update from the left hand menu, followed by Advanced Options.
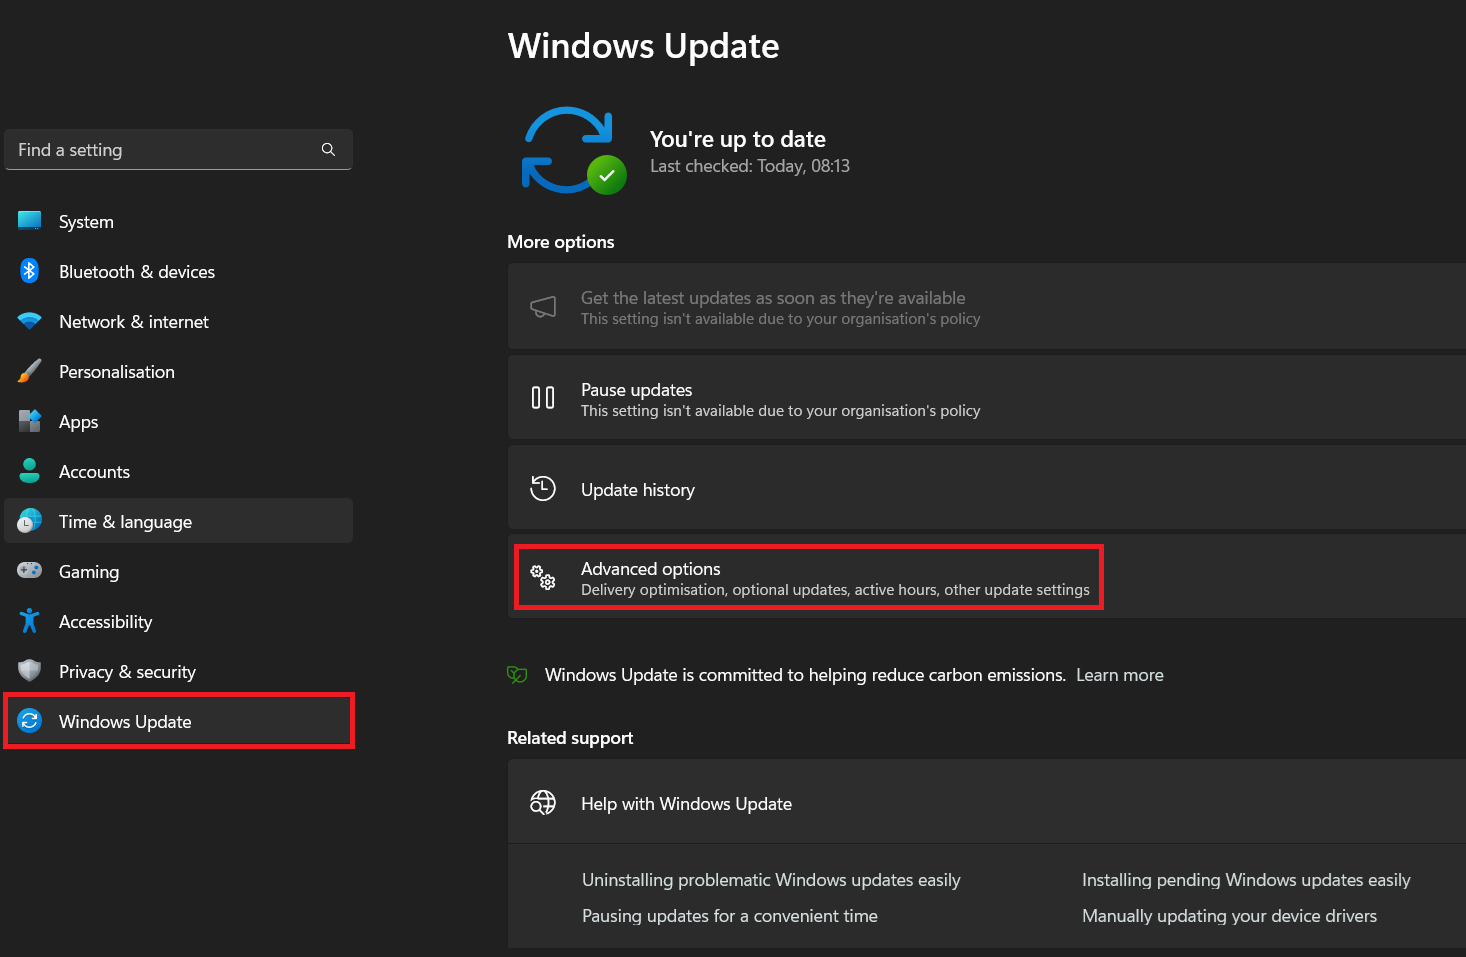
- Now select Optional Updates.
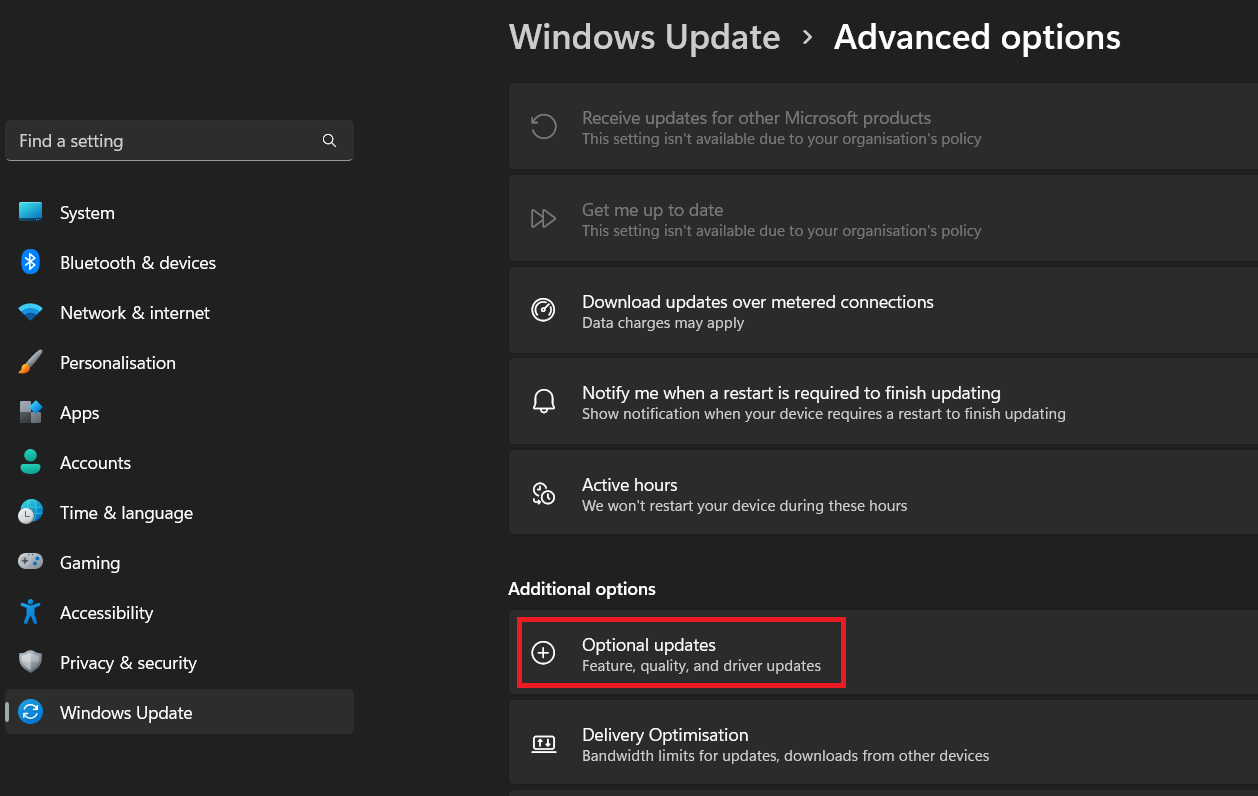
- Expand the Driver Updates section, and here you will see a firmware update listed if available. Click on the checkbox next to the corresponding firmware update and choose Download & Install.
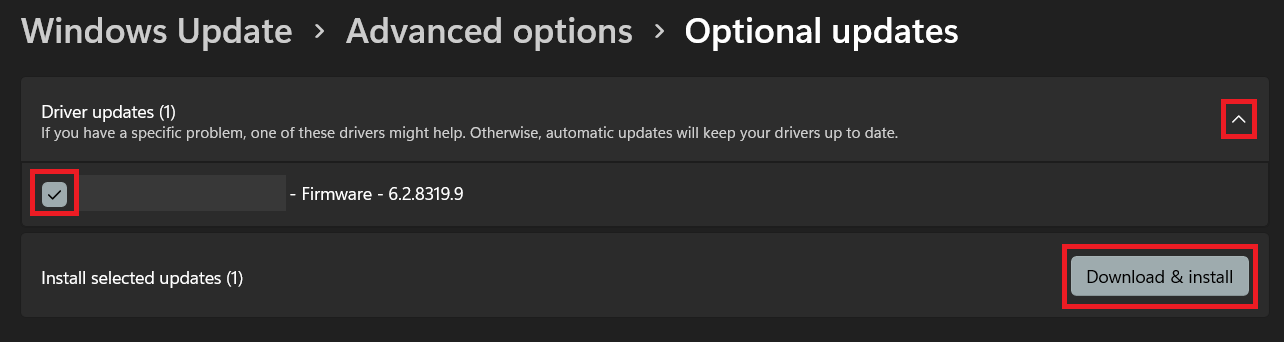
- Windows will download and install the firmware package and prompt you to restart your device.
- During the restart process the device will take over and apply the firmware update, do not interrupt, turn off the device, or disconnect the AC power during this phase. the device may reboot multiple times.
- Once complete, the device will boot back into Windows.
Affected Products
Applies to:
- Stonebook Edge-R EZ2R3A - NOTCHA-346
- Stonebook Edge-R EZ2R3B - NOTCHA-347
- Stonebook Edge-R EZ2R5A - NOTCHA-358
- Stonebook Edge-R EZ2R5B - NOTCHA-359
Process
Note: Ensure the notebook is plugged into the AC adapter before proceeding with any EC or BIOS update.
In this example, we're updating a Stonebook Lite L105B BIOS from 1.07.03 to 1.07.04TRO
Download and extract the relevant BIOS files, then locate the Insyde BIOS updater application, highlighted below.
.JPG)
Open the application and you will get the following prompt.
.JPG)
Click on OK and the notebook will reboot and begin the BIOS update process.
Note: You cannot use the keyboard whilst performing the update!
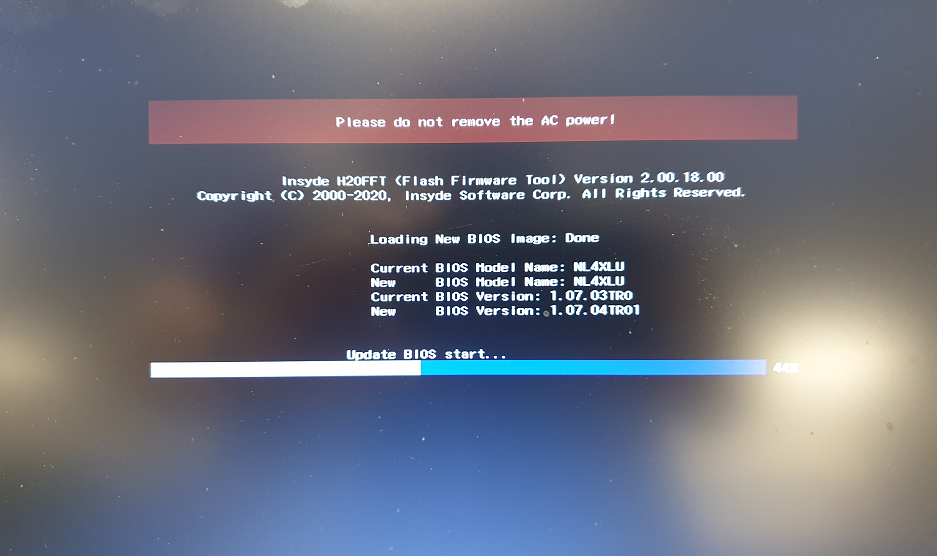
Once complete the notebook will turn off. When turning the machine back on it will take up to 30 seconds to POST. Once on enter the BIOS and check it has updated correctly.
Applies to:
- All Stone notebooks with an Insyde BIOS
Process
Note: Ensure the notebook is plugged into the AC adapter before proceeding with any EC or BIOS update.
In this example, we're updating a Stonebook Lite L105B to a custom EC that disables num lock.
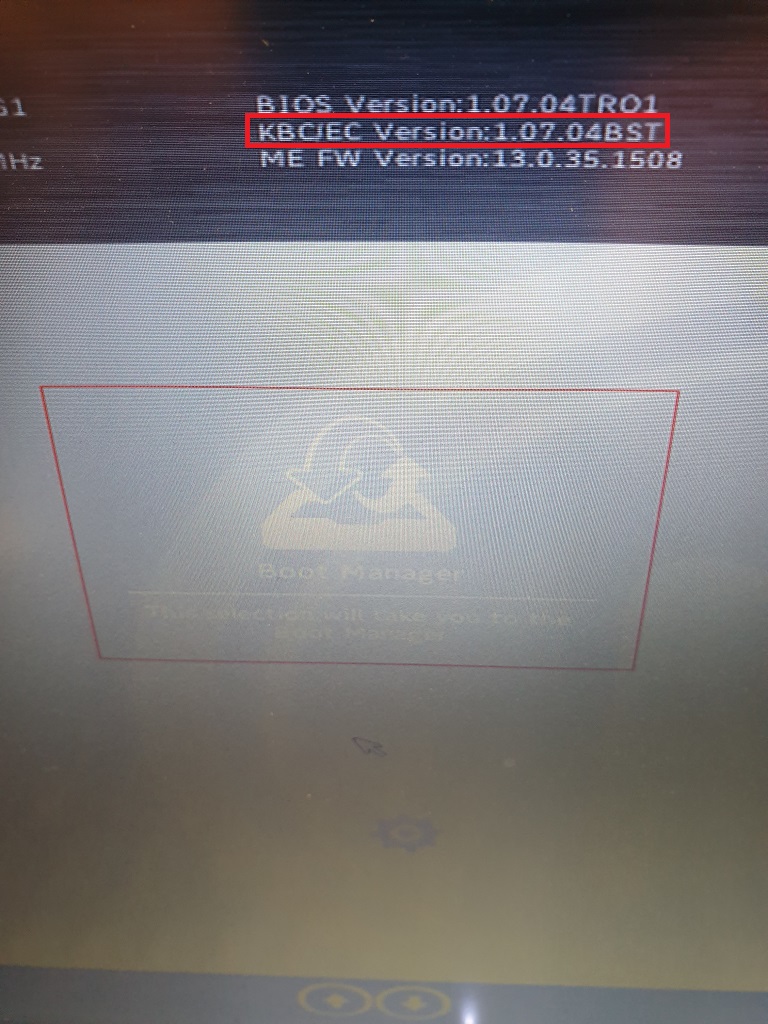
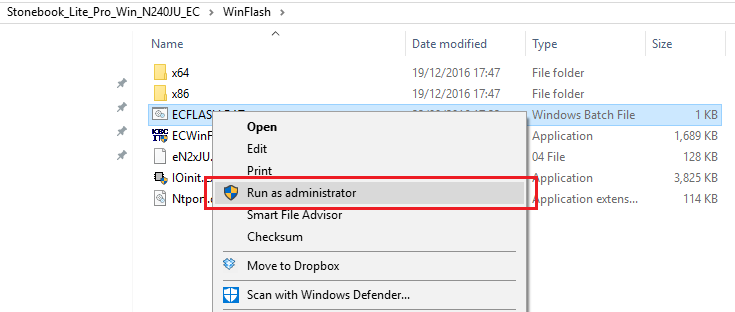
Download and extract the relevant EC files, then run the ECFLASH batch file. The correct batch file will be located in the WinFlash directory. This will start the process of updating the KBC/EC.
.JPG)
Note: You cannot use the keyboard whilst performing the update!
Once the EC update has been completed successfully the machine will automatically shut down. When the unit has turned off disconnect the power cable for 10 seconds, then reconnect and power the machine back on.
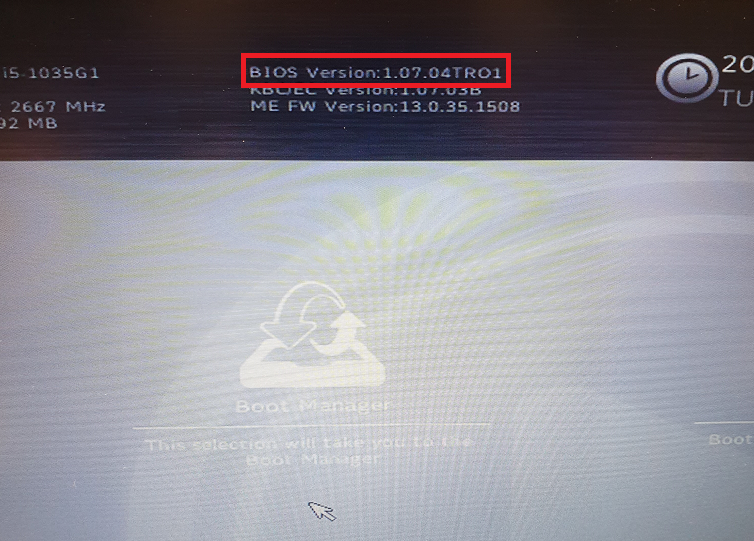
You can check in the BIOS to see if the update has been completed successfully, the update in this example should now be at 1.07.04BST.
Applies to:
- All Stone notebooks with an Insyde BIOS
What does this fix?
This firmware is designed to update the ANX chip in the notebook that controls the USB-C DisplayPort. The update brings better compatibility with external USB-C connected monitors and docking stations.
Prerequisites
The following instructions apply to the 10th gen Stonebook Pro and Stonebook Lite with the "B", "D", "E", and "F" revision suffix - L103B, L105B, P103B, P105B, P103D, P105D, L103E, L105E, P103E, P105E, L103F, L105F, P103F, P105F. Before running the ANX update tool, please ensure you have updated the BIOS, EC, and ANX drivers to the latest versions. These can all be found on the Stone Driver Finder
Note: Please ensure the notebook is plugged into the AC mains before proceeding with any EC or BIOS update.
Process
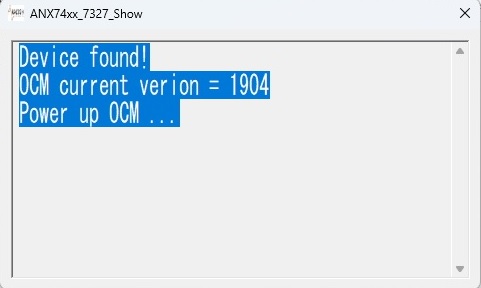
Download the latest ANX Firmware update tool, also found on the Stone Driver Finder, and extract the files, we then need to ascertain what version of the firmware we're running. To do this execute the " ANX74x_7327_Show.exe" found in the Show_tool_V0.6 folder. This will generate a version text file called log.txt. Check the version you are running and if it's older than 1.09.04 then proceed with the steps below.
1. Run the ANX7411_OCM-V1.904_V17.exe to initiate the update.
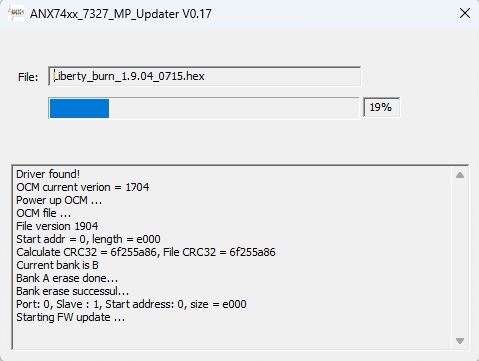
2. Run the Clevo_OCM1700_SINK20V_CR7EBE9E94D-over40w_CTS.exe to complete the update.
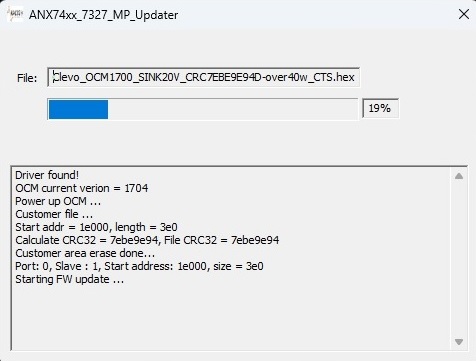
3. Restart the system
4. Run the ANX74x_7327_Show.exe in the show tool folder to check if the system has updated correctly. OCM current version = 1904 means it has updated correctly to the latest version 1.09.04.
Applies to:
- Stonebook Lite L103B & L105B - NOTCHA-312 & NOTCHA-313
- Stonebook Pro P103B & P105B - NOTCHA-314 & NOTCHA-315
- Stonebook Pro P103D & P105D - NOTCHA-321 & NOTCHA-322
- Stonebook Lite L103E & L105E - NOTCHA-324 & NOTCHA-325
- Stonebook Pro P103E & P105E - NOTCHA-326 & NOTCHA-327
- Stonebook Lite L103F & L105F - NOTCHA-333 & NOTCHA-334
- Stonebook Pro P103F & P105F - NOTCHA-335 & NOTCHA-336
What does this fix?
This firmware is designed to update the ANX chip in the notebook that controls the USB-C DisplayPort. The update brings better compatibility with external USB-C connected monitors and docking stations.
Prerequisites
The following instructions apply to the 11th gen Stonebook Pro and Stonebook Lite - L115A, P113A, P115A. Before running the ANX update tool, please ensure you have updated the BIOS, EC, and ANX drivers to the latest versions. These can all be found on the Stone Driver Finder
Note: Please ensure the notebook is plugged into the AC mains before proceeding with any EC or BIOS update.
Process
Download the latest ANX Firmware update tool, also found on the Stone Driver Finder, and extract the files, we then need to ascertain what version of the firmware we're running. To do this execute the " ANX74x_7327_Show.exe" found in the Show_tool_V0.6 folder. This will generate a version text file called log.txt. Check the version you are running and if it's older than 1.09.04 then proceed with the steps below.
1. Run the ANX7411_OCM-V1.904_V17.exe to initiate the update.
2. Run the Clevo_V19_PDO_40W_F7_04.exe to complete the update.

3. Restart the system
4. Run the ANX74x_7327_Show.exe in the show tool folder to check if the system has updated correctly. OCM current version = 1904 means it has updated correctly to the latest version 1.09.04.
Applies to:
- Stonebook Lite L115A - NOTCHA-338
- Stonebook Pro P113A & P115A - NOTCHA-339 & NOTCHA-340
Scenario
Consider the following situation:
- You are building an image for deployment
- Your development system has the SATA hard drive controller mode configured as "IDE"
- You wish to deploy the image to systems with the controller mode configured as "AHCI", as this delivers better performance
- When you try and deploy the image, the system blue screens on bootup. You use the "Disable restart on System failure" option which allows you to see that the blue screen code is "0x0000007b - Inaccessible boot device"
Cause
The Windows AHCI driver is not left enabled when the system is installed on a system using an IDE controller. When you then boot the image on the AHCI system, the system does not have an AHCI driver enabled, so the system cannot boot.
Resolution
- Boot the image up with the system configured in IDE mode
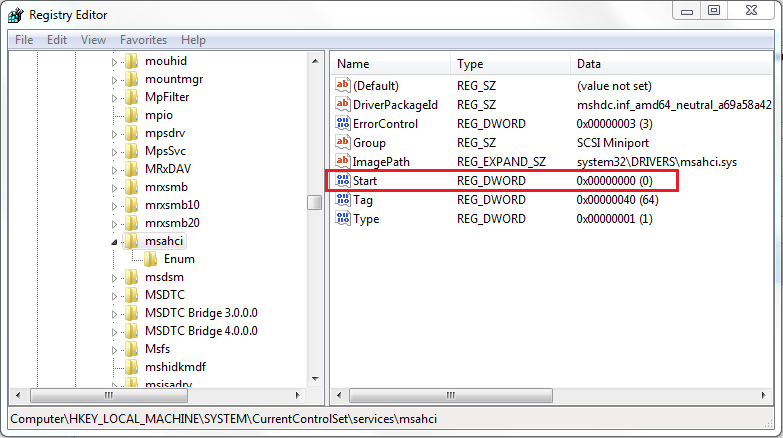
- Run REGEDIT
- Browse to HKEY_LOCAL_MACHINE\System\CurrentControlSet\Services\msahci (Windows 7)
- Browse to HKEY_LOCAL_MACHINE\System\CurrentControlSet\Services\storahci (Windows 8)
- Change the Start value to 0
Example
Windows 7 (service name is msahci)
Windows 8 (service name is storahci)
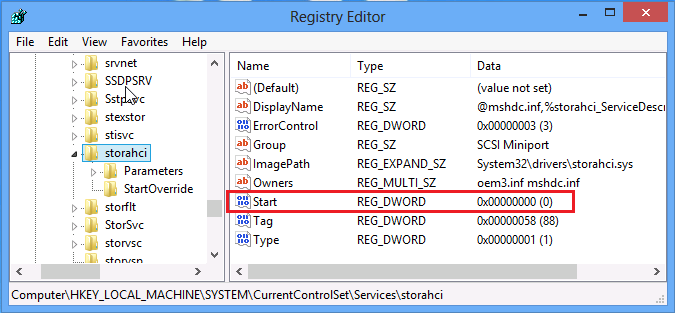
Applies to:
- All desktop or laptop machines running Windows 7 or Windows 8
Scenerio
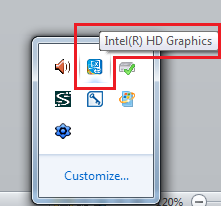
When you Install the Intel HD Graphics Driver, the Intel tray Icon and Hotkey program are installed by default. In some situations it is advantageous to remove these programs, for example, to prevent users accidentally rotating the screen.
How this Can Be Done
This can be done by manually by making registry changes to the system. There are two methods available, and old and a new method which will depend upon the age of the Intel HD Graphics driver you have installed.
New Method
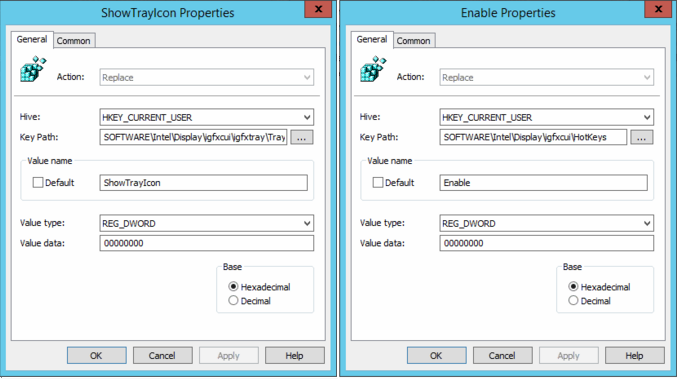
Check for a Registry entry under HKEY_CURRENT_USER\Software\Intel\Display\igfxcui\igfxtray\TrayIcon > ShowTrayIcon.
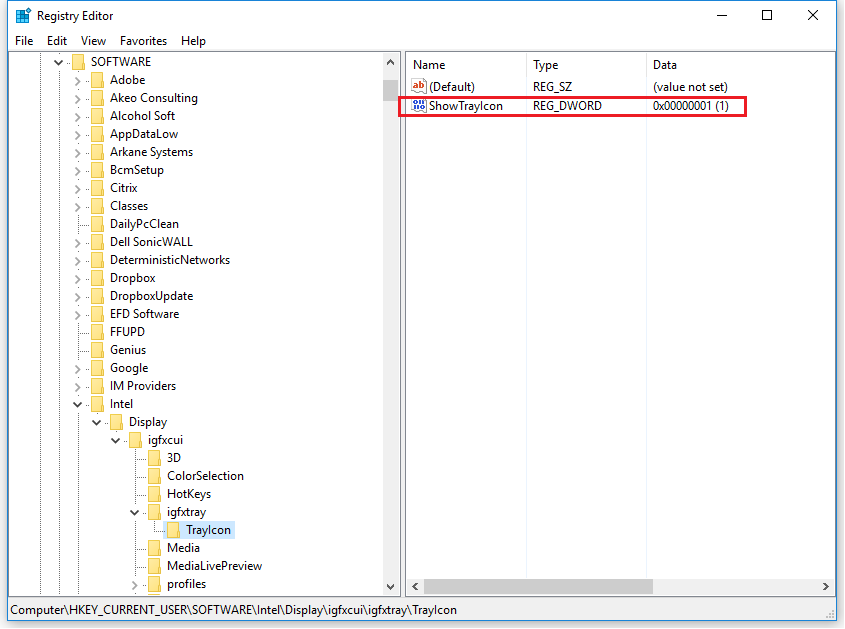
- If you have this key, you can set the value to 0 to prevent the tray icon from appearing. If you do not have this key, either create the TrayIcon key and then RegDWORD, or try the Old Method below.
- You will also need to disable the Hotkey functionality by setting HKEY_CURRENT_USER\Software\Intel\Display\igfxcui\HotKeys > Enable to 0.
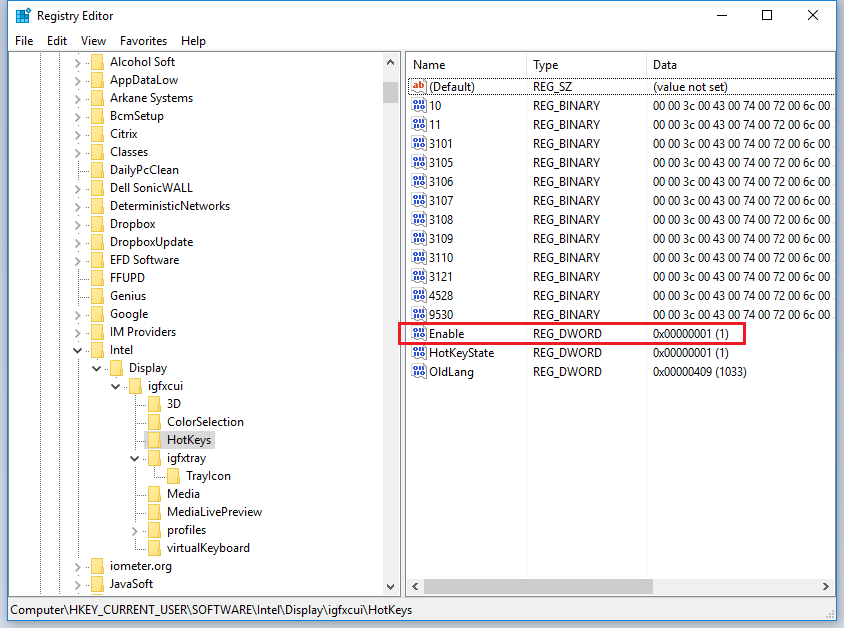
Note: As this is a per-user setting, as part of a managed deployment you may wish to deploy this registry change as a user group policy preference. This is the easiest way to push out this setting.
Check the for the presence of the key IgfxTray under HKEY_LOCAL_MACHINE\SOFTWARE\Microsoft\Windows\CurrentVersion\Run. If you have this key and the above method does not work, then it is likely that you have an older Intel display driver. If you have an older driver, you will need to remove the three keys below to prevent the tray icon from appearing.
HKEY_LOCAL_MACHINE\SOFTWARE\Microsoft\Windows\CurrentVersion\Run - IgfxTray
HKEY_LOCAL_MACHINE\SOFTWARE\Microsoft\Windows\CurrentVersion\Run - HotKeysCmds
HKEY_LOCAL_MACHINE\SOFTWARE\Microsoft\Windows\CurrentVersion\Run - Persistence
Once removed, there is no easy way to restore the tray icon other than restoring the registry entries from another machine, or reinstalling the driver.
Deployment Package
Manual removal is not convenient when rolling out large numbers of PCs. Please use the attached package for removal as part of a deployment or rollout.
The package contains:
- The registry file to remove the required registry entries (for example, you can use regedit /s remove_intel_igfx_tray.reg as part of a script).
- An alternative script for removal which relies upon the registry file.
Note: The deployment task must be run with Administrative rights. The package includes registry entries for both the new and old method. The old method needs to be run once per machine as it is a machine setting. The new method needs to be run per user, as it is a user registry setting.
Applies to:
- Desktop, Laptop and Tablet products which include Intel HD Graphics.
New UEFI Firmware Features
The Stone Classmate 3 like many new tablets has been designed to provide the latest firmware features including:
- Rapid boot times (including support for Windows Fastboot).
- Support for Windows 8 secure boot.
- Support for other recent industry standards which include security, power management and compatibility.
- Support for Windows 8.1 x86 only.
This new firmware feature set is known as "UEFI" and it replaces the traditional BIOS code for configuring and booting a machine into the operating system.
The "BIOS setup" screen may look very similar to setup screens of previous models, but the BIOS code underneath is very different to models of just a few years ago.
As a Windows 8.x only unit, the Classmate 3 does not support legacy BIOS compatibility modes. This is a reflection upon the industry's drive to improve the usability and features of new systems, albeit at the cost of reducing legacy support.
What Does this Mean in Terms of Installing an Operating System?
This means that the operating system you want to install needs to support UEFI features, such as the GPT ("GUID Partition Table") method of disk partitioning. Windows 8.x supports this method. The older "master boot record" or MBR method of partitioning hard drives is not supported by the Classmate 3.
Note: This means that Windows 8.x images created in MBR mode cannot be used on the Classmate 3 until the boot loader has been reconfigured to use UEFI. Additionally, we always recommend the preparation of fresh software images for each model of machine you plan to deploy. For more information on this, please contact Stone support.
Installing Windows Again From Scratch
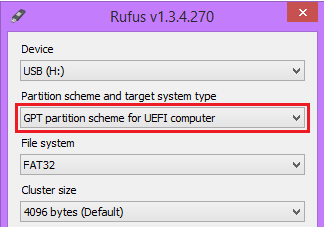
UEFI only support means that if you want to install a new, fresh copy of Windows 8.x, you must use an ISO to USB tool which can create the USB pen drive for use by UEFI systems, i.e. the disk formatting method is GPT.
One tool that can do this, for example, is Rufus.
What About Disk Imaging Software?
Methods of disk imaging also need to support the GPT partitioning method in order to boot. For example, if you have a Ghost 2.5.1 (11.5.1) bootable CD or pen drive based on Window Vista (Windows PE 2.0), this will not boot on the Classmate 3, as Windows Vista does not support GPT partitioning. You will not be able to actually boot from the CD or pen drive.
It is recommended on the Classmate 3 to use bootable media made using Windows 8.1, or Windows PE 5.0.
So How Can I Image the Classmate 3?
Stone can pre-install your choice of software image at our factory, saving you time in the deployment of your new equipment. If you are a network manager or technician you can also use the resources below to modify your existing imaging tools - where possible - to support UEFI systems such as the Classmate 3.
Alternatively, a potentially easier solution is to use tools within Windows 8 to create a Windows System Image onto an external hard disk. This will allow you to backup a system to be used as a master image and then restore the image onto other system.
A third party tutorial on this process is available here.
Tip: When working with the Classmate 3, use the F2 key to access BIOS setup by tapping the F2 key right from the moment you turn the unit on. Alternatively, use F11 to access the boot menu.
General Information on Modifying Existing Tools
The Classmate 3 does not have a wired LAN interface. This means that system images either need to be transferred using a USB pen drive or hard drive, or by using an optional USB3 to Gigabit LAN adapter (such as Stone part code CABUSB-224).
Ghost Solutions Suite 2.5.1 (11.5.1)
You will need to transfer your Ghost software to a Windows PE 5.0 environment. Please note however that Ghost 11.5.1 does not support disks larger than 2TB in size.
Short instructions:
(Advanced Users Only)
- Rework your Ghost media so that it runs off Windows PE 5.0 x86 (32-bit).
- Add the drivers for the Stone USB/LAN adapter into the boot image.
- Add the drivers for the Intel I/O Technologies (so that the Classmate 3 keyboard functions).
- Connect your Ghost Pen drive (based on Windows PE 5.0) to one of the available USB ports.
- Connect the USB/LAN adapter into the other available USB port (you will need the dock connected to have 2 USB ports in total available).
- Tap the F11 key from power on to go into the Boot Menu and boot from the USB HDD (the pen drive).
- (Alternatively, tap the DEL key from power on to go into the Setup Menu).
- Run Ghost as normal to upload or download images over the network.
- When you have deployed the image, you will then need to use the command prompt to run the BCDBOOT command to fix the boot loader. For example, from the driver letter of the destination, run bcdboot w:\windows /s: w: /f UEFI (where W is the drive letter of the destination)
Alternatively, if you are a licensed Ghost Solutions Suite 2.5.1 customer we can provide an ISO image containing an Windows PE 5.0 and Ghost 11.5.1, upon you providing details of your Ghost license. This can be used on a USB pen drive. However, this media is unsupported. Contact Stone Support for more details on how to obtain this ISO image.
SCCM / Microsoft Deployment Toolkit
We have provided a link below to a Windows PE 5.0 image which will allow you to execute an imaging script over the network through the use of a mapped drive.
Method 1 - Use MDT WinPE Images - Short Instructions
(Advanced Users Only)
- Modify your x86 Windows PE 5.0 generated boot images to include driver support for the USB/LAN adapter.
- Also add the drivers for the Intel I/O Technologies (so that the Classmate 3 keyboard functions).
- You will then need to transfer the boot image to a USB pen drive, or use PXE Boot:
- PXE Boot is only available to PXE Servers which support EFI and X86 clients. This excludes Windows Server 2008R2 but includes Windows Server 2012 (for more information see here).
- To support x86 PXE boot, you will need to use a supported USB/LAN adapter such as CABUSB-224, which is a USB3 / Gigabit model (USB\VID_0B95&PID_1790). NOTACC-402 is not supported by the Classmate 3 for PXE Boot.
- The Classmate 3 needs to be running BIOS 1.04 or later to support PXE Boot on the CABUSB-224.
- Your Windows 2012 WDS server will need to have a Windows x86 boot image configured (x86uefi).
- You will likely need to convert the boot image to an ISO file and then deploy the ISO file to a USB pen drive using a program such as Rufus or ISO2USB.
Note: Depending on your imaging system, converting the WIM file to USB is not an easy process. See this third party tutorial for more information regarding MDT, or here for WDS.
- Boot the Classmate 3 from the pen drive with the USB/LAN adapter also connected.
Method 2 - Use Stone PE Boot Media and a Network Drive - Short Instructions
- On a system used for IT administration (for example, not the Classmate 3 itself) download the package which contains the image and the image writing program.
- Extract the package.
- Attach a blank USB pen drive of at least 2GB in size to the system.
- Install the imaging program and then run it.
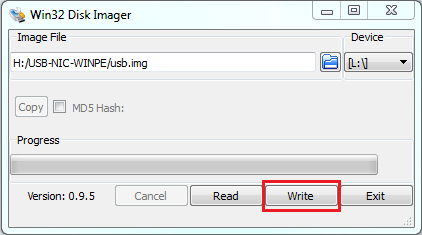
- Select the .IMG file and the drive letter of the USB pen drive.
- Click the Write button to write the image to the pen drive.
- Take the completed pen drive to the Classmate 3 and plug it in.
- Connect the USB/LAN adapter into the other available USB port (you will need the dock connected to have 2 USB ports in total available).
- Tap the F11 key from power on to go into the Boot Menu and boot from the USB HDD (the pen drive).
- (Alternatively, tap the DEL key from power on to go into the Setup Menu).
- When the pen drive has booted, you will get two programs:
- A Command Prompt – use this to run tools such as DISM.
- PE Network Manager – use the Network drives tab to map a network drive to a drive letter.
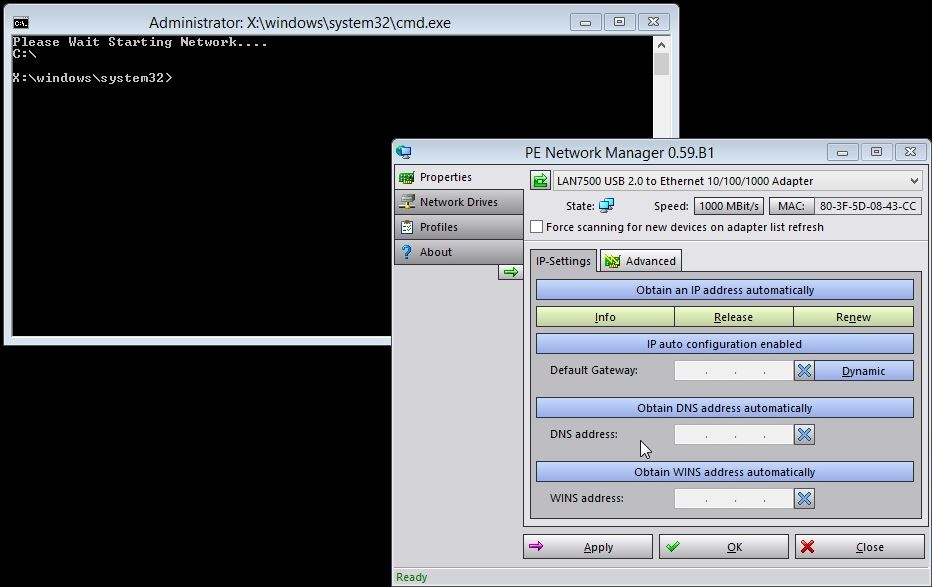
- To map the network drive you will need:
- To select a drive letter, such as M:
- The path to the network share in the form \\server\sharename
- Username: <username to access the share>
- Password: <password for the above user>
- Once you have mapped a network drive, use the command prompt to start your deployment script.
Windows Deployment Services (WDS)
Method 1 - Use Modified Boot or Install Images - Short Instructions
(Advanced Users Only)
- Ensure you are using x86 Windows PE 5.0 boot or install images in your WDS environment.
- Add the drivers for the Stone USB/LAN Adapter
- Add the drivers for the Intel I/O Technologies (so that the Classmate 3 keyboard functions)
- Connect the USB/LAN Adapter to the USB3.0 port on the Classmate 3.
- You will then need to transfer the boot image WIM file to a USB pen drive, and boot the Classmate 3 from the pen drive, or use PXE boot.
- PXE Boot is only available to PXE Servers which support EFI and X86 clients. This excludes Windows Server 2008R2 but includes Windows Server 2012 (for more information see here).
- To support x86 PXE boot, you will need to use a supported USB/LAN adapter such as CABUSB-224, which is a USB3 / Gigabit model. NOTACC-402 is not supported by the Classmate 3 for PXE Boot.
- The Classmate 3 needs to be running BIOS 1.04 or later to support PXE Boot on the CABUSB-224.
- Your Windows 2012 WDS server will need to have a Windows x86 boot image configured (x86uefi).
Note: Depending on your imaging system, converting the WIM file to USB is not an easy process. See this third party tutorial for more information regarding MDT, or here for WDS.
The driver packages below cover:
- NOTAC-402 USB2 to 10/100 LAN adapter - does not support PXE Boot on the Classmate 3.
- CABUSB-224 USB3 to Gigabit LAN Adapter (Startech USB3) - supports PXE Boot on the Classmate 3 when the Classmate 3 has BIOS 1.04 or later installed.
Windows 8.1 / PE 5.0 x86 (32-bit)
Windows 8.1 / PE 5.0 x64 (64-bit) (please note that the Classmate 3 does not support x64)
These are only available for x86 / 32-bit Windows 8.1.
Applies to:
- Stone Classmate 3 (NOTCHA-263 and NOTCHA-264)
Stone Classmate 3 (TL10IE1)
Please find attached the Stone Classmate 3 (TL10IE1) User Manual.
Applies to:
- Stone Classmate 3 (NOTCHA-263 and NOTCHA-264)
Stone Classmate 4 (TL10RE1)
Please find attached the Stone Classmate 4 (TL10RE1) User Manual.
Applies to:
- Stone Classmate 4 (NOTCHA-273)
Stone N120 (W310CZ) User Manual
Please see attached.
Manual Errata: The manual preface page II refers to compliance to EuP standards for off-mode. The N120 is compliant with the updated ErP standard for standby and off-mode with the power draw in these states as 0.5W or less.
Applies to:
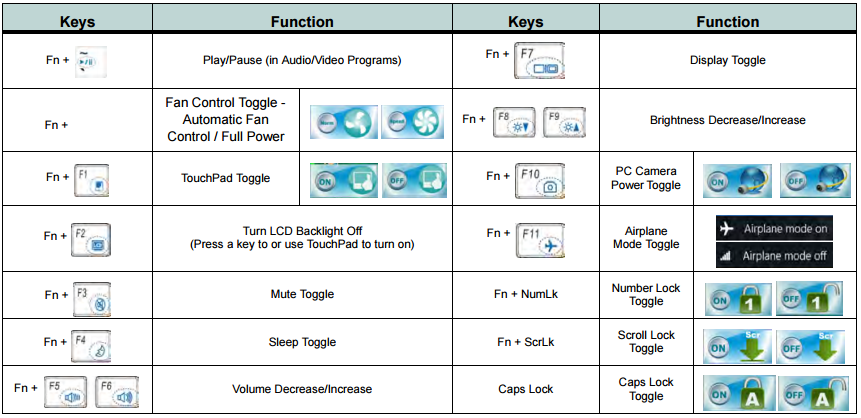
Stone N130 (W515TU) User Manual
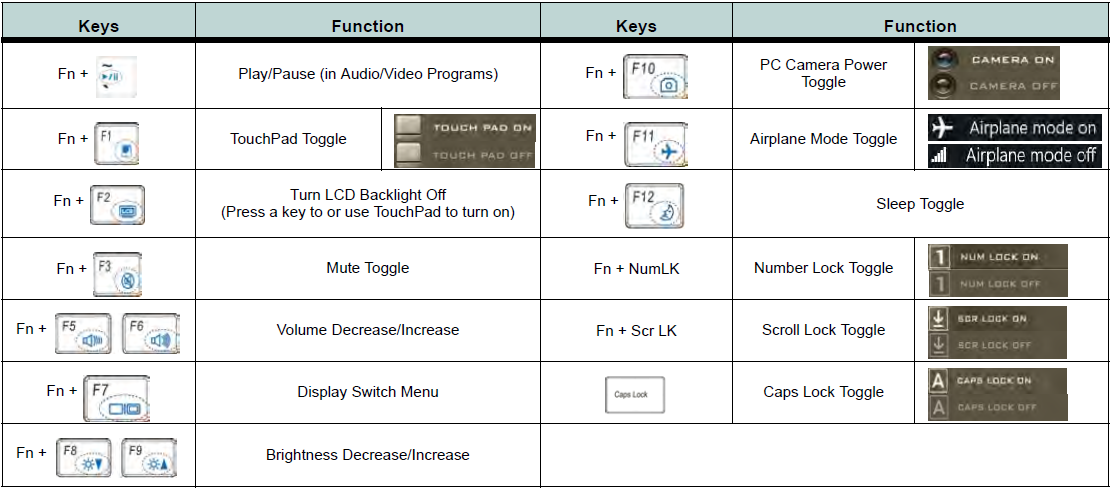
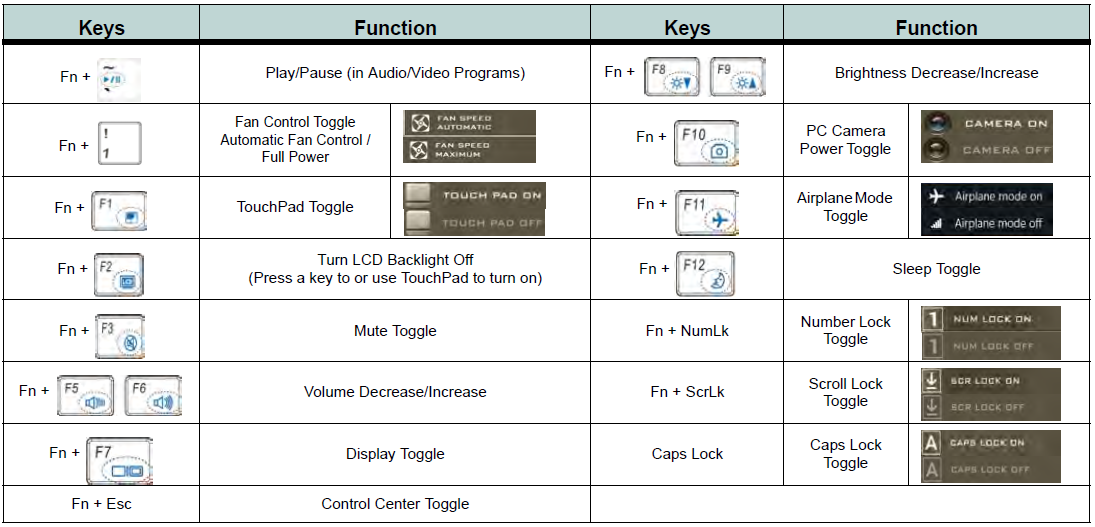
Please see attached. A summary of the function keys is also below.
Function Keys / Hotkeys
The function keys will act as hotkeys when pressed whilst the FN key is held down. Some key combinations will also generate an on screen message when the Hotkey utility is installed.
.PNG)
Note: The N130 does not have driver support for x86 operating systems. Only drivers for Windows 7 x64 and Windows 8.1 x64 are available for the N130.
Applies to:
Stone NT203-LV3 (S3101)
Please find attached the Stone NT203-LV3 (S3101) User Manual.
Applies to:
- Stone NT203-LV3 13.3" Laptop (NOTCHA-2220)
Stone NT210-H (W540SU1)
Please find attached the Stone NT210-H (W540SU1) User Manual.
Applies to:
- Stone NT210-H 14" Laptop (NOTCHA-272)
Stone NT305-Pro (T5110)
Please find attached the Stone NT305-Pro (T5110) User Manual.
Applies to:
- Stone NT305-Pro 15.6" Laptop (NOTCHA-211)
Stone NT308 (W258ELQ1)
Please find attached the Stone NT308 (W258ELQ1) User Manual.
Note: The NT308 is normally supplied with Intel B960 processors and the HM70 chipset. This is a Notebook Series I model as referred to in the manual.
Applies to:
Stone NT310 (W550EU)
Please find attached the Stone NT310 (W550EU) User Manual.
Manual Errata: The manual preface page II refers to compliance to EuP standards for standby and off-mode. The NT310 is compliant with the updated ErP standard for standby and off-mode with the power draw in these states as 0.5W or less.
Applies to:
Stone NT310-H (W550SU1)
Please find attached the Stone NT310-H (W550SU1) User Manual.
Function Keys / Hotkeys
The function keys will act as hotkeys when pressed whilst the FN key is held down. Some key combinations will also generate an on screen message when the Hotkey utility is installed.
Applies to:
- Stone NT310-H laptop (NOTCHA-260, NOTCHA-265, NOTCHA-271. NOTCHA-272, NOTCHA-274, NOTCHA-282 and ODMKIT-002 (replacement motherboard kit)).
Methods to Update the BIOS on the Stonebook Edge-R
Prerequisites (Applies to Both Methods)
-
Ensure the device is plugged into AC power.
-
Confirm the target BIOS image is correct, it should be version SP41MD103_STE_V15.bin or later.
-
Backup critical data if needed (BIOS flashing is low-risk but precautionary).
-
Identify current BIOS version if audit logging is required.
-
If BitLocker is enabled, it's critical to suspend protection before performing a BIOS update. This prevents the system from triggering recovery mode due to firmware changes. You can suspend BitLocker using either of the following methods.
-
Bitlocker suspension option A: Using Control Panel
1. Open Control Panel.
2. Navigate to System and Security > BitLocker Drive Encryption.
3. Click Suspend Protection next to the encrypted drive.
4. Confirm when prompted.
-
Bitlocker suspension option B: Using the following PowerShell command
Suspend-BitLocker -MountPoint "C:" -RebootCount 1
This suspends protection for one reboot cycle.
Note: The BIOS for the Stonebook Edge-R updates both the BIOS and the EC (embedded controller)
BIOS Update Method 1 (Preferred method): Windows
Download the Windows based flash tool from the Stone Driver Finder - Link
In the Win 11 folder run the flash.bat file as an administrator, this will start the flash process.
You will receive the following "Are you ready" prompt, type Y.
The machine will automatically reboot and the flashing process will continue with no further user input required.
The machine will reboot in between flashing processes before finally before shutting down. It's essential that you do not interrupt the process.
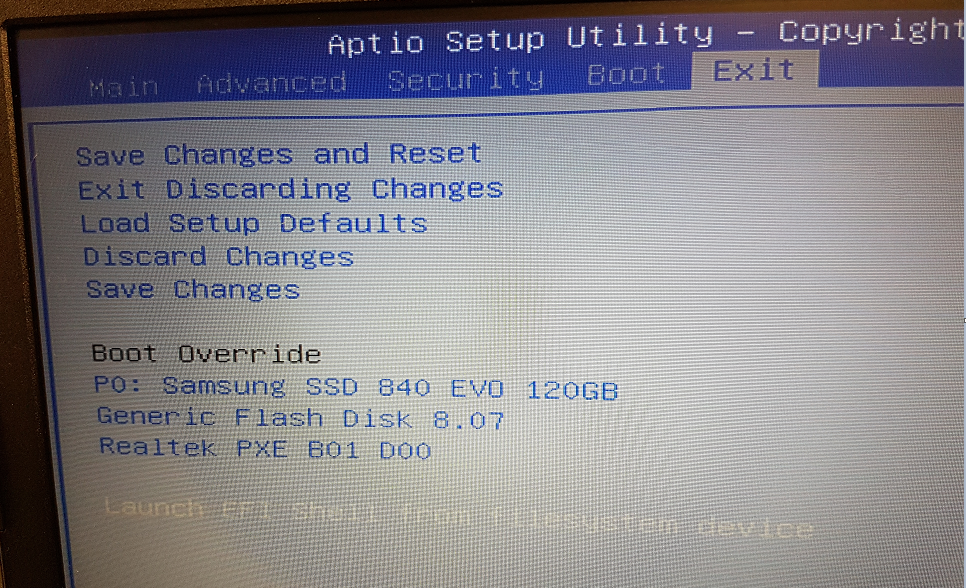
Method 2: UEFI Shell (USB-Based, Automated)
1. USB Preparation
- Download the relevant BIOS and shell files available from our driver finder here - Link
- Format a USB stick as FAT32.
- Copy the downloaded files onto the USB stick retaining the same file structure.
- The folder structure should look like this:
USB Root
├── EFI
│ └── BOOT
│ └── startup.nsh
├── SP41MD103_STE_V15.bin
└── AfuEfix64.efi
2. Disable Secureboot
Access the BIOS by pressing the DEL key immediately after powering on the system and disable secureboot.
To Disable Secure Boot on the Stonebook Edge-R;
1. Enter BIOS Setup
• Power on the system and immediately press the DEL key to access the BIOS.
2. Navigate to Secure Boot Settings
• Go to the Security tab.
• Scroll down and select Secure Boot Menu.
3. Modify Secure Boot Configuration
• Set Secure Boot Mode to Custom.
• Then, disable Secure Boot.
4. Save and Exit
• Save your changes and reboot the system
3. Flashing the BIOS
Once you have disabled secureboot, restart your notebook and press F7 during startup to open the Boot Menu. From the list, select your USB device to boot.
The flashing process will begin automatically - when prompted, simply press Y to confirm and continue, or N to cancel.
Wait until the notebook has completed the flashing and then access the BIOS to re-enable secureboot.
Note: Do not remove the AC Adapter whilst the BIOS update is in progress, as this could render the battery or machine unusable.
Applies to:
- Stonebook Edge-R EZ2R3A - NOTCHA-346
- Stonebook Edge-R EZ2R3B - NOTCHA-347
- Stonebook Edge-R EZ2R5A - NOTCHA-358
- Stonebook Edge-R EZ2R5B - NOTCHA-359
Updating the EC Firmware
Please only update the EC Firmware when instructed by Stone Support. Updating the EC Firmware as a matter of routine if you are not experiencing any issues is not recommended.
The instructions below are designed for Administrators. If you are not comfortable following these instructions please let your Stone Support representative know - and we will be happy to apply the update for you.
Note: The EC Firmware is separate to the main BIOS. The EC update does not include a BIOS update. This update procedure will also update the firmware of the attached battery.
Instructions
The W515LE EC update for Windows can be downloaded here (last update 15/1/17 to improve the reliability of the batch file).
- Download the file and extract to a new folder:
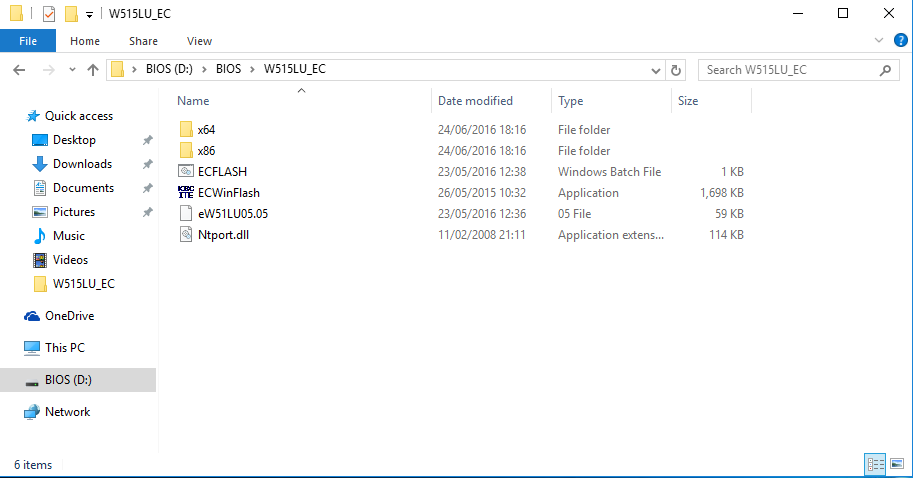
- Right click on ECFLASH.bat and click "Run as administrator"
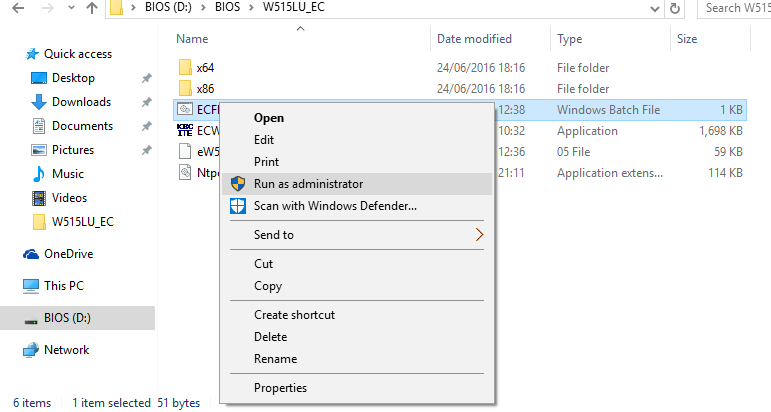
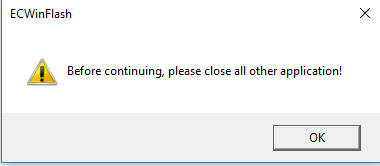
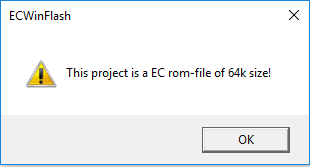
- You will then be met with 2 warnings, click "OK" to both.
- The flash programme will then appear and automatically re-flash the EC update.
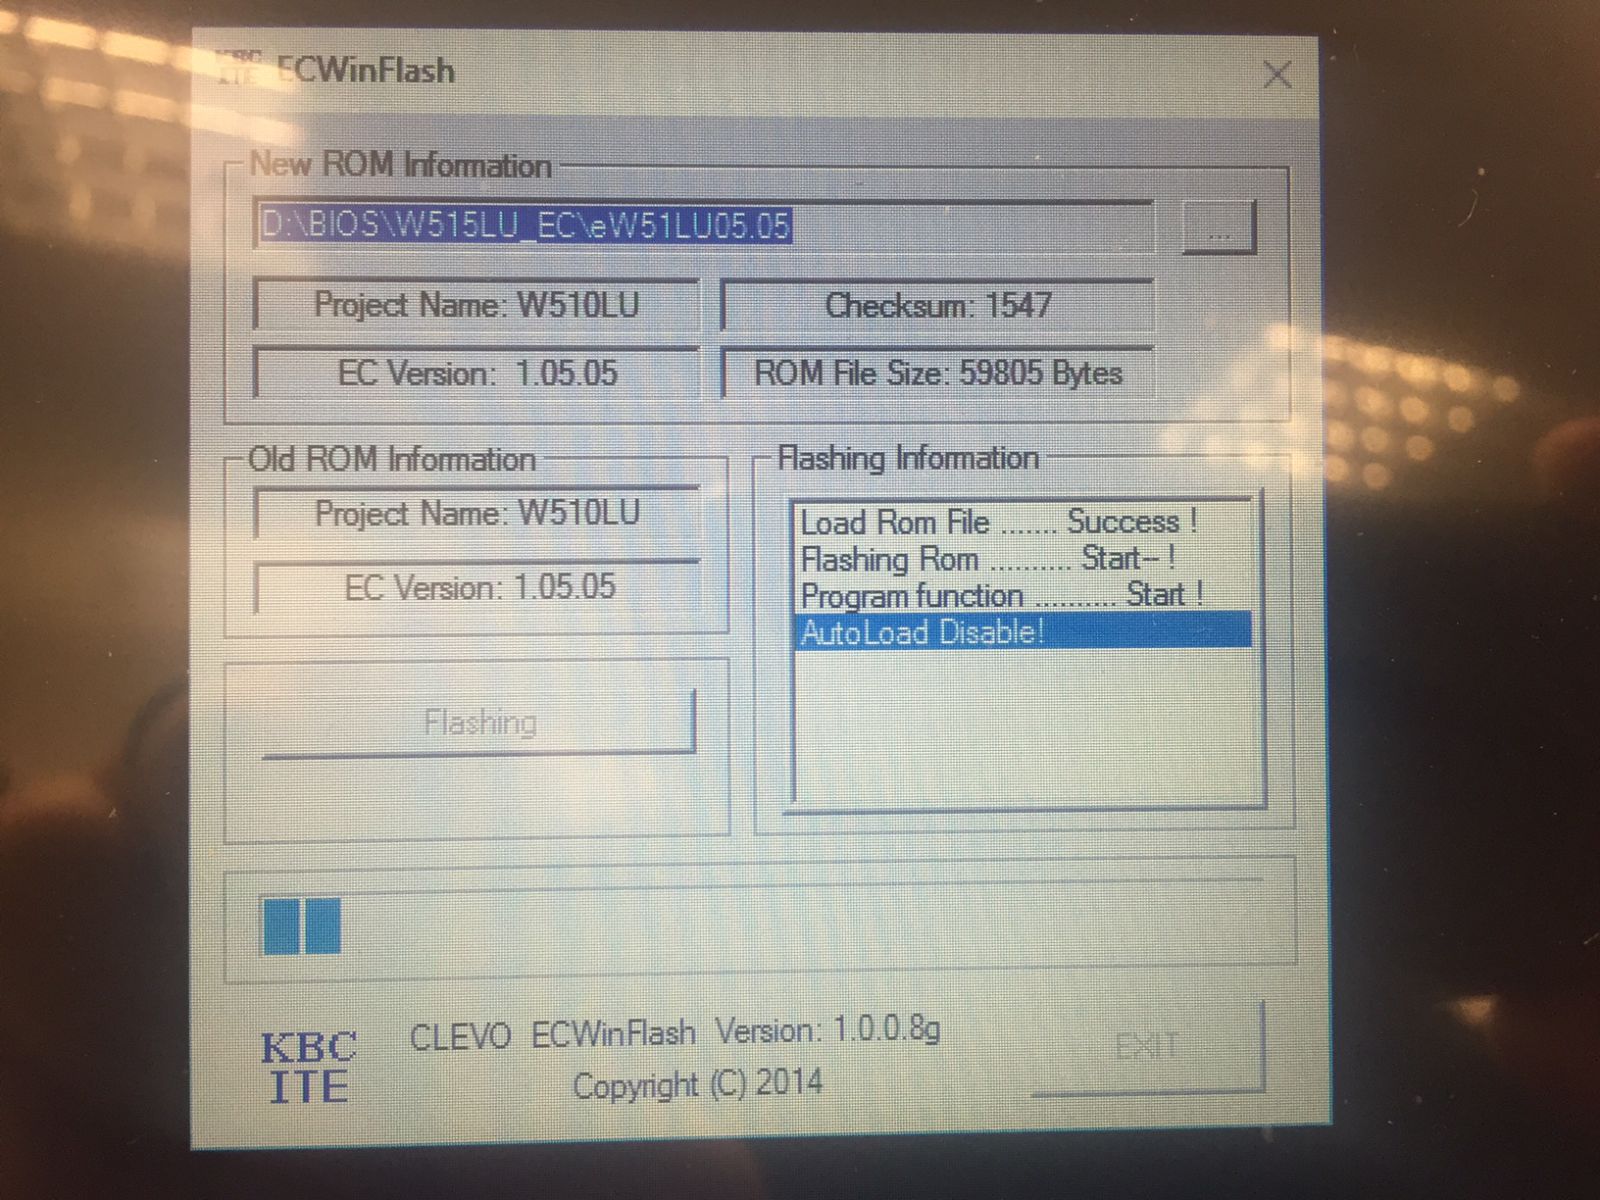
- Once this process is finished the machine will automatically power down.
- After the machine powers down, unplug the AC adapter for 10 seconds before plugging it back in.
- Turn the Stonebook Mini back on.
Note: Do not remove the AC Adapter whilst the EC update is in progress, as this could render the battery or machine unusable. Wait until the system automatically shuts off before proceeding to remove the AC adapter.
Applies to:
- Stonebook Mini M10A (w515lu) - NOTCHA-279 and NOTCHA-281
Stonebook Pro and StoneBook Lite
Please find attached the user manual for the Stonebook Mini M10A (w515lu).
Function Keys / Hotkeys
The function keys will act as hotkeys when pressed whilst the FN key is held down. Some key combinations will also generate an on screen message when the Hotkey utility is installed.
Applies to:
- Stonebook Mini M10A (w515lu) - NOTCHA-279, NOTCHA-281
Updating the EC Firmware
Please only update the EC Firmware when instructed by Stone Support. Updating the EC Firmware as a matter of routine if you are not experiencing any issues is not recommended.
The instructions below are designed for Administrators. If you are not comfortable following these instructions please let your Stone Support representative know - and we will be happy to apply the update for you.
Note: The EC Firmware is separate to the main BIOS. The EC update does not include a BIOS update. This update procedure will also update the firmware of the attached battery.
Instructions
There are two methods to update the EC Firmware on this model:
The N240JU Windows EC Update can be downloaded here (last updated 15/1/17 to make the batch file more reliable).
- Download the file above to the machine.
- Extract the package to a folder.
- Go into the WinFlash subfolder.
- Right hand click on ECFLASH.BAT and choose "Run as administrator".
- You may then be met with 2 warnings, click "OK" to both.
- The update process will then begin automatically.
- Once this process is finished the machine will automatically power down.
- After the machine powers down, unplug the AC adapter for 10 seconds before plugging it back in.
- Re-attach the AC adapter.
Note: Do not remove the AC Adapter whilst the EC update is in progress, as this could render the battery or machine unusable. Wait until the system automatically shuts off before proceeding to remove the AC adapter.
The N240JU EFI EC Update can be downloaded here.
This method requires that Windows is not running.
- Download the file and extract to the root of a FAT32 formatted USB pen drive.
- Shutdown the notebook.
- Plug the USB pen drive into the notebook whilst it is off.
- Turn on the laptop and use the F2 key to go into the BIOS.
- Use the arrow keys to go to the Exit Menu.
- Then choose "Launch EFI Shell from filesystem device".
- The system will boot into the EFI Shell.
- The shell will list all of the devices available to the EFI environment. Look for the file system, or FS device associated with the pen drive, shown as a Removable HardDisk. This is usually fs3.
.PNG)
- Type fsx: to select the USB pen drive, where x is the number of the drive in your system.
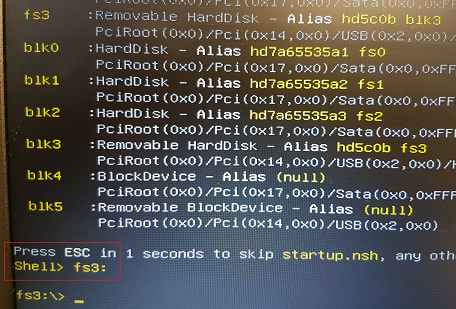
- (Note that the Shell prompt changes to confirm that the new drive has been selected)
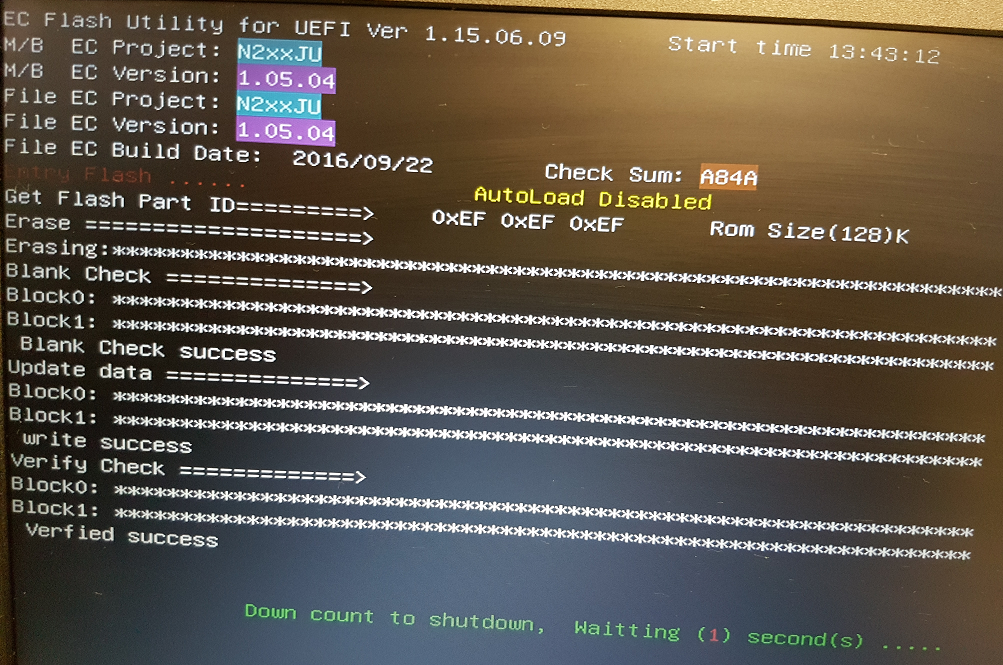
- Type in ECFLASH.NSH and press Enter
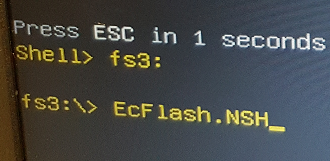
- The EC will be updated. When complete, the system will report that it will shut down.
- When the system has turned off, remove the AC adapter from the machine.
- Wait 10 seconds.
- Re-attach the AC adapter.
Note: Do not remove the AC Adapter whilst the EC update is in progress, as this could render the battery or machine unusable. Wait until the system automatically shuts off before proceeding to remove the AC adapter.
Applies to:
- Stonebook Pro P10A (n24_25ju) - NOTCHA-277
- Stonebook Pro P11A (n24_25ju) - NOTCHA-278
- Stonebook Lite L10A (n24_25ju) - NOTCHA-276
- Stonebook Lite L11A (n24_25ju) - NOTCHA-280
Stonebook Pro and StoneBook Lite
Please find attached the user manual for the following Stone notebooks:
- Stonebook Pro P10A (n24_25ju)
- Stonebook Pro P11A (n24_25ju)
- Stonebook Lite L10A (n24_25ju)
- Stonebook Lite L11A (n24_25ju)
Note: The attached manual refers to Model A and Model B systems. Model A is the Stonebook Lite (14") and Model B is the Stonebook Pro (15.6")
Function Keys / Hotkeys
The function keys will act as hotkeys when pressed whilst the FN key is held down. Some key combinations will also generate an on screen message when the Hotkey utility is installed.
Windows 7 Driver Support
The Stonebook Pro and Stonebook Lite have basic Windows 7 support. SCCM driver packs are available here or through the Driver Finder. A basic Windows 7 driver package for x86 and x64 is also available here. Stone have tested the Windows 7 drivers but recommend that you fully test your images and drivers before deploying systems.
If you are Installing Windows 7 from a USB Pen Drive:
You may need to add the USB 3.0 Drivers to the image - for more information see here.
If you are Booting From A Network Image
You may need to add the USB 3.0 Drivers to the image as well the the LAN Drivers (x86 or x64). You might need to remove older versions of the Realtek LAN Controller driver from your image first.
Note: The Stonebook Pro and Stonebook Lite include TPM 2.0 functionality. For this to work, the BIOS must be configured to boot in UEFI mode - to enable this, you must use the 6/9/16 or newer BIOS. Without this BIOS, the system will not be able to operate in UEFI mode with Windows 7, meaning that TPM functionality will not be available. If you switch from non-UEFI (legacy) to UEFI modes, you may need to remove the partitioning information on the notebooks hard drive to complete your operating system deployment.
Applies to:
- Stonebook Pro P10A (n24_25ju) - NOTCHA-277
- Stonebook Pro P11A (n24_25ju) - NOTCHA-278
- Stonebook Lite L10A (n24_25ju) - NOTCHA-276
- Stonebook Lite L11A (n24_25ju) - NOTCHA-280
Where is the Product Key?
Microsoft made an improvement to its activation process in Windows 8 meaning all machines built with this operating system installed no longer have a COA label affixed to them. A digital key is incorporated into the BIOS of the machine by Stone Computers in the factory.
You can still see that your machine is licensed for Windows 8 by the small logo label, usually affixed underneath your machine if your machine is a notebook.

Apples to:
- All systems shipped with Windows 8.x
Windows 10 Tested Models List
Please see the attached spreadsheet for a list of tested Stone systems or Stone motherboards for details on Windows 10 compatibility. Use the Stone driver finder to download updated drivers and/or use Windows Update to download the latest drivers post-Windows 10 installation.
Whilst the vast majority of models are compatible, models that are known to have compatibility problems are the NT309 and Classmate 3.
Applies to:
- Stone Products Manufactured 2014 to August 2015.
|


