Scenario
TPM Modules can become locked when too many incorrect PIN attempts are made to access the information stored on the module. The number of failed attempts before lockout will vary depending on the TPM version (1.2 or 2.0) and in the case of TPM 2.0, the policies configured in the operating system.
- If your system has TPM 2.0, then by default you need to wait 2 hours after lockout before re-attempting the correct pin, or wait 64 hours for the pin attempts to be completely forgotten.
If you have replaced the motherboard in your Bitlocker protected system and the new motherboard arrives with TPM provisioned, you may be locked out from TPM as you will likely not know the PIN, or you may not be able to re-provision the TPM for re-use.
When Locked Out
If you are locked out, you cannot enter the correct pin to remove the lockout. You then have three options:
When TPM is Unusable
When you can't take ownership of the TPM module or provision the TPM Module for use, follow these options:
- Check that you don't have manufacturer TPM drivers installed (always use generic Microsoft TPM software).
- In the case of Windows 7 x64 and TPM 2.0, make sure you are running the BIOS in UEFI mode.
- If you have replaced the motherboard, ensure that the motherboard BIOS is up to date.
- Clear the TPM
- You will need the TPM owner password or owner password file (.TPM). If you have protected your system with Bitlocker and cannot boot the system to get TPM.MSC, then you will need to boot the system from an alternative, non-encrypted drive.
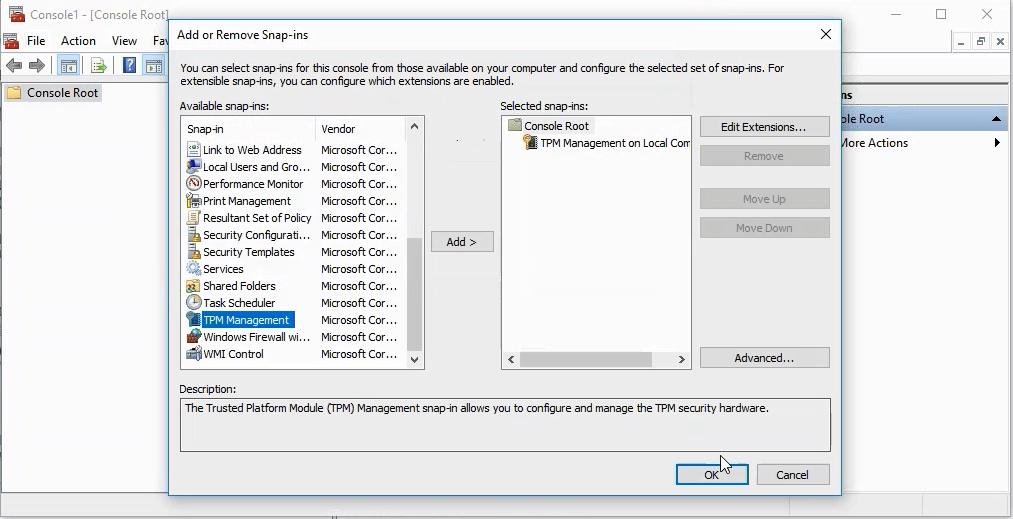
- Open MMC and select TPM Management for the Local Computer
- Click on Reset TPM Lockout.
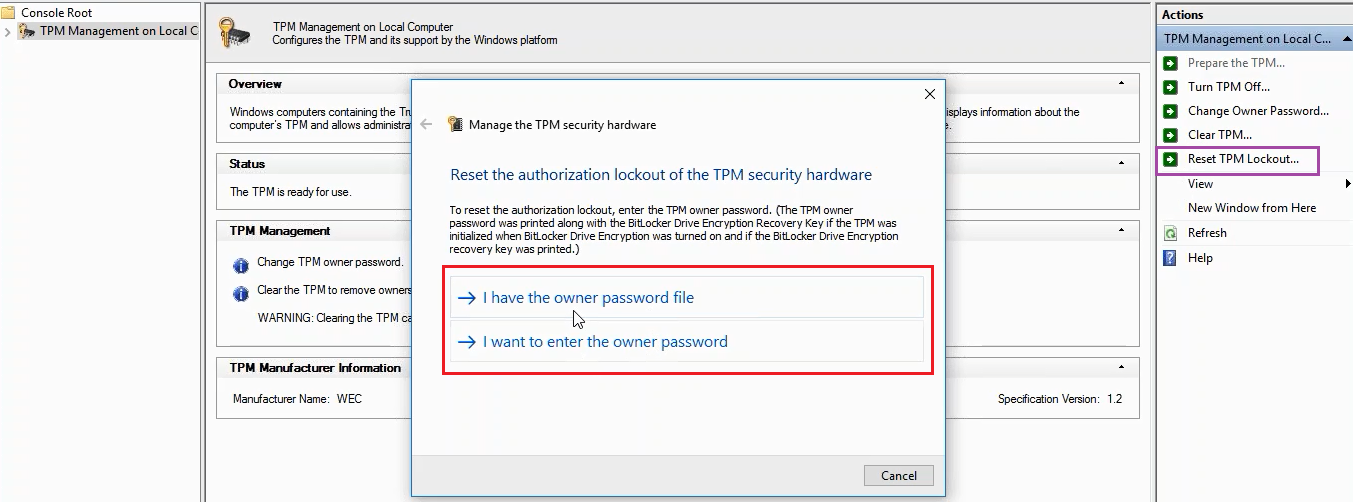
- Provide the TPM owner password or password file (.TPM)
Use these methods:
- To get around a TPM module which has been locked out from too many incorrect PIN attempts, and you don't want to wait for the lockout period to end or you don't have the owner password / password file.
- Or with a TPM module which cannot be re-provisioned, for example after a motherboard replacement.
Note: Bear in mind that this will delete the cryptographic information in the machine and you will lose the encrypted data, including any user data or documents stored on a Bitlocker protected drive.
Clearing the TPM can be done one of four ways, each of which increase in complexity. Always log on with local Administrative rights before using these instructions.
- Clearing the TPM Using the BIOS
- Clearing the TPM Using MMC
- Clearing the TPM Using the MMC after setting the Windows TPM Authorisation Level
- Clearing the TPM Using the MMC after Enabling Blocked TPM Commands
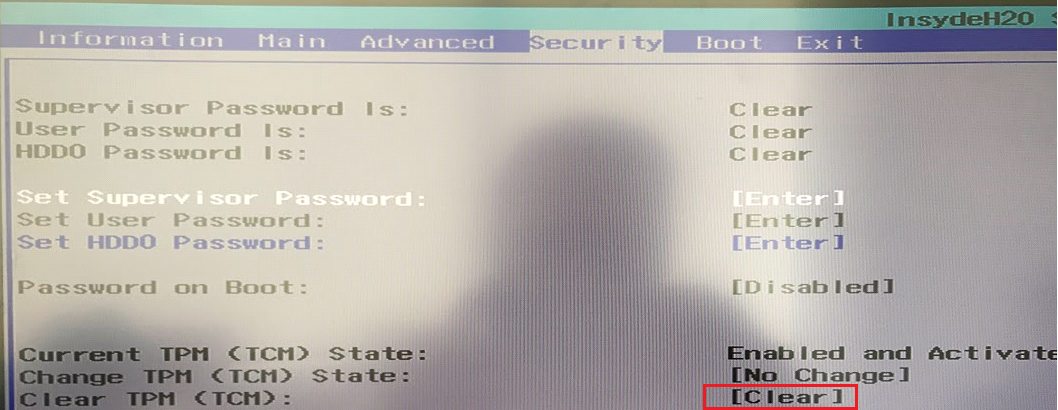
1. Clearing the TPM Using the BIOS
- In the BIOS, usually under the Security section, use the option to clear the TPM.
- This action cannot be reversed and will result in the loss of any encrypted data - for example, you will then need to reimage the machine and re-encrypt the drive.
2. Clearing the TPM Using MMC
If your BIOS does not have the option to clear the TPM, then you will need to clear the TPM using Windows.
- Open MMC and select TPM Management for the Local Computer
- Select Clear TPM...
- Click on Restart when prompted
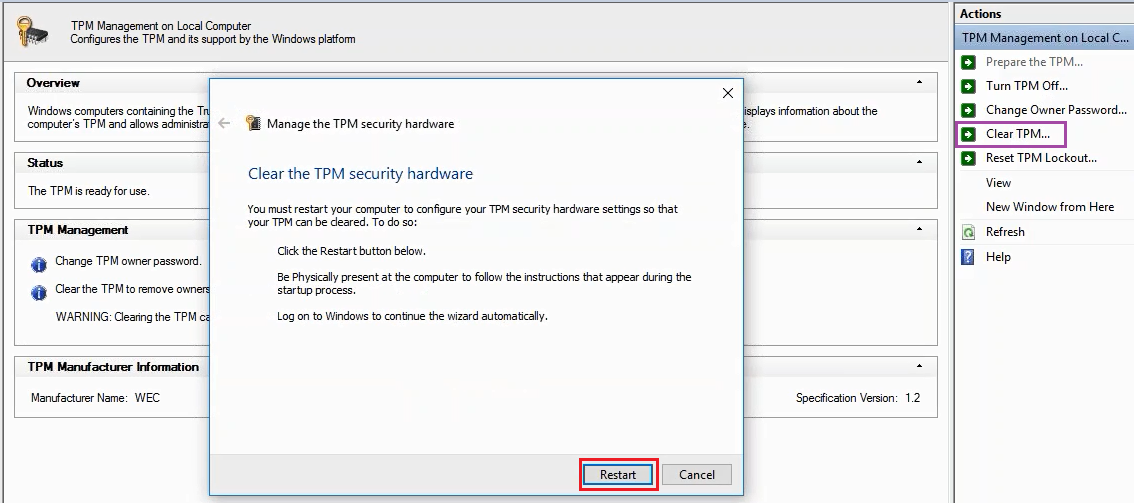
- When the system reboots you will be prompted to ensure that you want the TPM cleared.
3. Clearing the TPM Using the MMC after setting the Windows TPM Authorisation Level
Attempting to clearing the TPM without making any other Windows changes first, as in Step 2., may not be successful. This is because some versions of Windows have safeguards to prevent the accidental erasure of cryptographic information.
The first change to make if Step 2. is not successful is to change the Windows TPM Delegation Level.
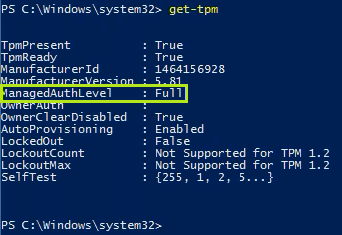
- Check the Delegation Level by running get-tpm from inside an Administrative PowerShell prompt.
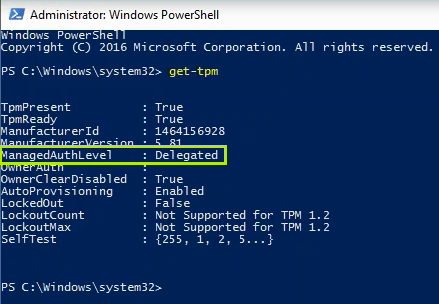
- Not that the default ManagedAuthLevel is Delegated. This needs to be changed to Managed.
- This needs to be done using Group Policy (if this setting has been administered centrally), or using the Local Policy Editor
- To make the change using the Local Policy Editor, first run gpedit.msc
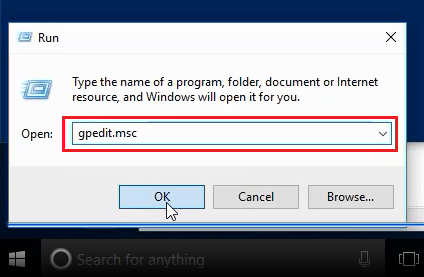
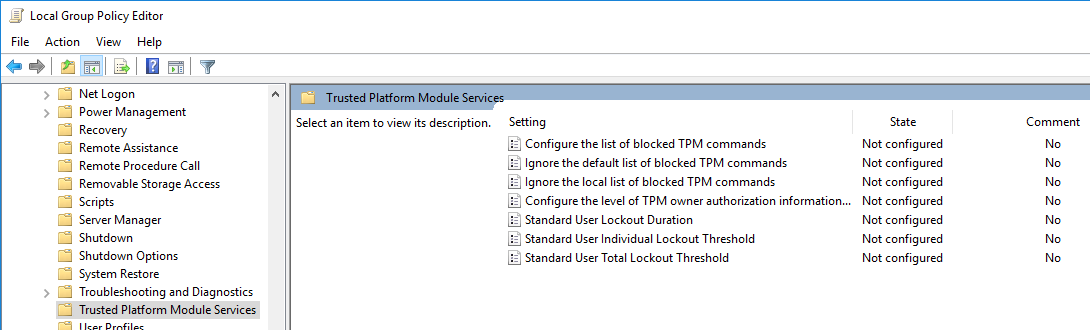
- Browse to Computer Configuration > Administrative Templates > System > Trusted Platform Module Services.
- Double click on the setting Configure the level of TPM owner authorization information available to the operating system.
- Change the setting from its default of Not Configured, to Enabled.
- Then, in the options, change the Operating system managed TPM authentication level to Full.
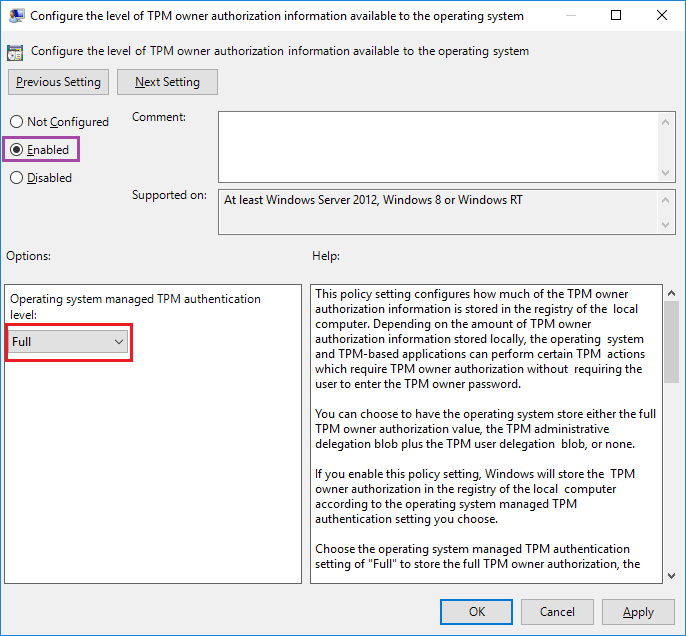
- Then click on OK.
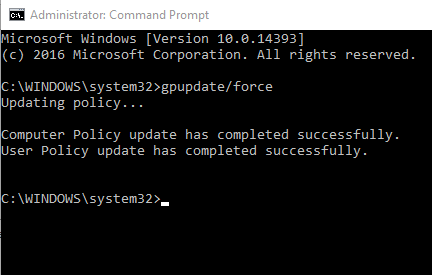
- Policy changes need to be applied to the system. To do this, from an Administrative command prompt, type GPUPDATE /FORCE
- You can now check that the Managed Authorisation Level has taken effect, by running get-tpm again from the Administrative Powershell prompt.
- Now re-attempt clearing the TPM using the MMC as in Step 2.
- If this method is successful, if you carry on using the same installation of Windows, you should then change the TPM owner authorization Policy back to Not Configured, to allow the default of Delegated to take effect.
Note: In the above screenshot, the TPM is not reported as locked out. If you are unable to provision a new TPM, the TPM may be an indeterminate state where is it not locked, but cannot easily be cleared unless you use the additional instructions in Steps 3 or 4.
4. Clearing the TPM Using the MMC after Enabling Blocked TPM Commands
Windows by default blocks the use of some TPM commands to prevent abuse. If the instructions in Step 2 do not work, you may need to de-restrict the TPM commands that can be used.
- Using MMC, open TPM Management for the Local Computer.
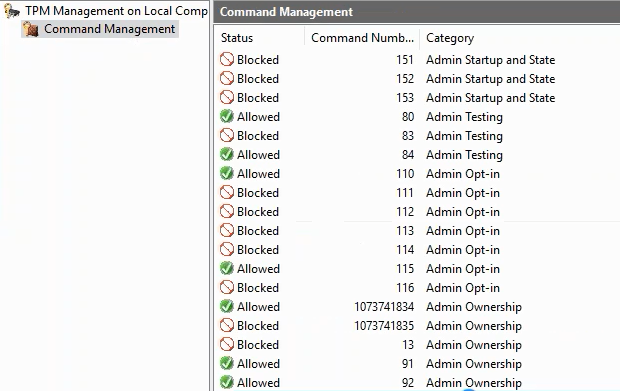
- Double click on TPM Management on Local Computer, to get to Command Management.
- Click on Command Management and confirm that some or all TPM commands are blocked from use.
- To enable the blocked commands, you will need to make changes either Group Policy (if your settings are centrally administered) or through the Local Policy.
- To get to the Local Policy, run gpedit.msc
- Browse to Computer Configuration > Administrative Templates > System > Trusted Platform Module Services.
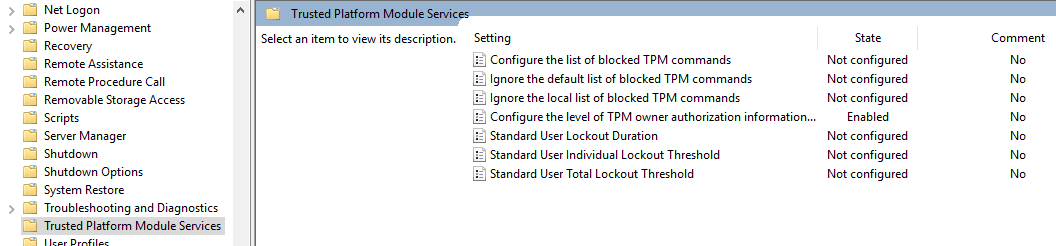
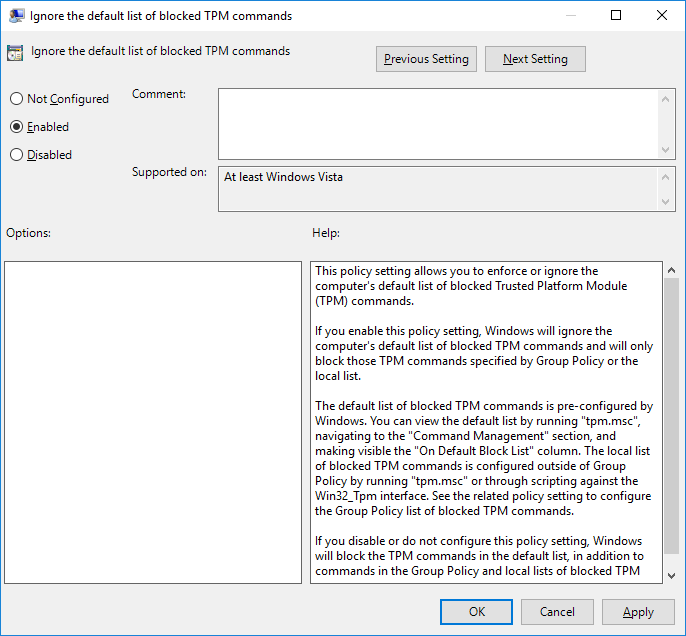
- Double click on Ignore the default list of blocked TPM commands, and change it from the default setting of Not Configured, to Enabled.
- Do the same for Ignore the local list of blocked TPM commands - change this to Enabled.

- You should now have three settings configured, as below.

- Again, update the local policy usage by running GPUPDATE /FORCE from an Administrative command prompt.
- Check that all TPM commands are now available.
- To do this, go back to the TPM Management MMC.
- Under Command Management, click Refresh on the right hand side.
- Confirm that all commands are now Allowed.

- Re-attempt Clearing the TPM using Step 2.
- If this method is successful, if you carry on using the same installation of Windows, you should then change the settings of Ignore the default list of blocked TPM commands and Ignore the local list of blocked TPM commands back to Not Configured.
Applies to:
- All systems with TPM 1.2 or 2.0


.png)