Troubleshooting

Basic DOS Commands for BIOS Pens and Window Preinstallation (PE) Environment

Command Prompt Type Summary

The command prompt is a useful environment to perform tasks such as updating BIOSes, retrieving log files or performing other diagnostic routines. There are four main types of command prompt:

Before running any diagnostic utilities or BIOS updates, you need to find out which one of the four command prompt types is required.

Basic Command Introduction

The commands below will help you to navigate and perform tasks in these situations.

Command Example
Table Of Commands

C:

Change to C: drive; similary A: D:

C:

CD

Change Directory. Thie will take you between folders.

CD\ will take you to the top of the directory

CD <directory name> takes you to that directory.

To change to another path, type the full path with slashes. e.g.
CD \WINDOWS\SYSTEM

DIR
Displays the contents of a directory (folder)

DIR *.LOG Will show all .log files in folder

RENAME
Rename a file. You must use the full file name.
REN <OLDNAME.EXE> <NEWNAME.EXE>
MD
Make directory. Creates a new directory below the current one.
MD <NEWDIR> creates a new directory called Newdir

COPY

The copy command allows you to copy from one location to another
 

COPY LOCATION\FILENAME.EXTENSION LOCATION\NEWNAME.EXTENSION will copy the file to the new location


HELP
Displays DOS Help. For help on an individual command, type HELP then the command for which you want more information.
HELP DIR displays information on the DIR command.

Note: Commands inside the command prompt are almost always not case sensitive, which means that they can be typed lower or uppercase or even a combination.

Applies to:


Windows 8 - How to get access to Safe mode when Windows won't start

Booting Windows 8 into Safe mode

Windows 8 no longer has the option to press F8 when the machine starts to get the advanced boot options menu, meaning that access to safe mode using this method has been removed. This has been implemented to improve boot times.

Booting into Safe-Mode before the Operating System Starts

This article shows you how to start a machine in safe mode when Windows wont boot. If you have already started Windows but still need safe mode, use the related articles below for tips.

If Windows 8 tries to start up and encounters a critical problem during boot, it will automatically launch the Automatic Repair function. This is the same as the old Start-Up Repair within Windows 7 and Windows Vista.

If your machine scans and Automatic Repair starts and does not detect, or is unable to solve the error, it will display the screen below. You will then need to click the Advanced Options button.

You will then be presented with the Advanced start up screen. You need to click on Troubleshoot > Advanced Options > Start Up settings > and then Restart.

It will then present you with the screen below where you can select Safe mode. As it states, use the F1-F9 to select the options (F4 for safemode)

Tip: You may also wish to use option 9/ Disable Automatic Restart after failure, so that any blue-screen message is visible on screen when the system crashes during bootup, rather than the system instantly restarting.

Applies to:


Why cant I use KMS activation to activate Windows 7 on my Samsung laptop purchased with Windows 8?

Problem

Windows 7 KMS Product Activation may not work on Samsung laptops purchased with Windows 8 (non-Pro). You may not be able to activate Windows 7 machines using a Key Management Server (KMS) on these models. KMS Activation is a common method of performing Microsoft Product Activation on large numbers of machines (more than 25) in an organisation.


Cause

This is caused by the Windows 8 BIOS of the Samsung machine not having the necessary SLIC tables for Windows 7 activation. As Windows 8 (non-Pro) does not have any downgrade rights to Windows 7, these SLIC tables have not been included.

Windows 7 KMS activation requires that the machine was purchased with an eligible version of Windows. Windows 8 (non-Pro) is not eligible as Windows 8 does not have downgrade rights.

Work Around

Additional Information


Applies to:


Why is my Windows 7 System giving me a Secure Boot Violation Error Message?

Problem

If you are running Windows 7 and your system uses an Asus motherboard, you may find that your system starts giving you an error message when you boot up, claiming that there is a "Secure Boot Violation".

Cause

The cause is a Spring 2016 Windows Update which causes systems that contain Asus motherboards to incorrectly enable Secure Boot. As Secure Boot is not supported by Windows 7, this results in the error message above.

Note: If you have not recently installed Windows Updates on your system, or if you are deploying a brand new system for the first time, you may not be affected by this precise issue. However the instructions below on disabling Secure Boot for Windows 7 still apply.

Resolution

The resolution depends on whether or not you have a small number of systems affected, or if you are  managing an issue that could potentially affect a large number of systems.

Small Numbers of PCs

To resolve this problem, disable Secure Boot in the BIOS Setup:

​Large Estates of PCs

To prevent this issue becoming a problem with a large number of PCs, consider whether you need to apply the Microsoft Update 3133977 to your Windows 7 systems:

More Information

This problem affects many systems based on Asus motherboards that support Secure Boot. The problem is not limited to systems manufactured by Stone Computers.

​If you are running Windows 8.x1, or Windows 10, you are not affected by this issue, as these operating systems are supported by Secure Boot.

Applies to:


How to Retrieve System Hardware WMI / DMI and Device Information

Utility Attached

The attached utility will retrieve system hardware WMI / DMI information, such as baseboard (motherboard) information and a list of enabled hardware devices.

This utility is useful in building WMI queries or scripts to uniquely identify hardware on a network, such as for SCCM task deployment or driver updates.

Instructions

Note: Sample useful WMI queries include WMIC ComputerSystem GET Model or, preferably, WMI Baseboard GET Product.

Apples to:


Windows 8 - Internet Explorer Add-ons and Plugins such as Java

Windows 8 Internet Explorer

Are you having issues with displaying content within Internet Explorer on Windows 8?

The Windows 8 style Internet Explorer application from the Start screen does not support add-ons. So if you are trying to play a game or watch a video that requires plug-ins such as Java, then you will need to open Internet Explorer on the desktop and try again.

You can do so by clicking the Icon of the Spanner on the bottom right hand corner of the screen, and then click View on the Desktop

Apples to:


Windows Always Starts in Safe Mode

Scenario

Cause

This can be caused by a configuration setting that may have been set by accident, or by malicious software. As a troubleshooting step, go to the System Configuration Utility (msconfig) and check that Safeboot is not selected (checked). You can find this on the Boot tab, under Boot Options - ensure the box is not checked for Safeboot.

To access the System Configuration Utility:

If you discover that Safeboot is checked, then simply uncheck it, click OK and then restart the system.

Example of a correctly configured system:

Applies to:


Windows Activation Reports that it is Unable to Reach Windows Activation Servers

Problem

You are trying to activate Windows in a location that uses a strict internet filter and a proxy server. Windows Activation does not work as it cannot reach the activation server.

Cause

Windows Activation does not use your web browser settings to look to see if a proxy server needs to be used to gain internet access. If your location does not allow internet access without using the Proxy server, access to the Windows Activation servers may not work, as above.

Resolution

You can resolve this issue by configuring the Windows HTTP component from an Administrative Command prompt.

To Get Proxy Settings from Edge or Internet Explorer

netsh winhttp import proxy source =ie

To Set the Proxy Manually

netsh winhttp set proxy <proxyserver:port> ""

How to Check the Existing Setting

From the Administrative Command Prompt, run the following:

netsh winhttp show proxy

This example shows a system that has not had WinHTTP configured to use a proxy.

How to Clear the WINHttp Proxy Setting

From the Administrative Command Prompt, run the following:

netsh winhttp reset proxy

Note: If you have lots of systems to activate in this way, and if you have a volume license agreement, considering using a Key Management Server (KMS) or Active Directory activation. If you would like us to help you configure this, contact your Stone Account Manager for details of our professional services.

Applies to:


I’ve recently installed a new application but this seems to have stopped my Windows computer from booting. What can I do?

Please tap the F8 key during the start-up process, from when you turn the machine on. You will be presented with the Windows boot menu. Please then choose the “Last known good configuration” option and this will restore your PCs software registry to the state before you installed the application. Your PC should then start Windows successfully.


Note: If the problem only appears after you have booted the system and logged on, the Last known good configuration option may not resolve the issue.

Applies to:


How to Fix Missing Reset and Refresh Options in Windows 8

Problem

if you attempt to either factory reset or refresh a machine with Windows 8, in some situations you may find that the options are missing, or you may be prompted for installation media.

Cause

This is a software problem where the recovery storage area is marked as disabled. Normally, installation media should not be required to perform a factory reset or refresh as the files are stored in the recovery area of the hard drive.

Resolution

If the refresh and reset options are missing, you may be able to restore them by following these steps:

Windows Recovery Environment (RE) and system reset configuration Information:

Windows RE status:         Disabled
Windows RE location:       \\?\GLOBALROOT\device\harddisk0\partition5\Recovery\WindowsRE
Boot Configuration Data (BCD) identifier: cc8ad4e1-dd86-11e1-b32d-0090f5a96a55
Recovery image location:
Recovery image index:      1
Custom image location:
Custom image index:        0

REGAENTC.EXE: Operation Successful

Applies to:


Windows 8 - No DVD Playback Software Included as Standard

Windows 8 DVD playback

Unlike Windows 7, Windows 8 does not include the software support as standard to play movies on DVD discs. If you insert a DVD disc into a Windows 8 machine you likely will not get an Autoplay menu - nothing happens.

To get around this problem, you will need to install additional software which provides support for DVD playback.

Windows Media Center

One option is the Microsoft Windows Media Center. This is not a free option - you will need to purchase and download it from Microsoft. This includes TV recording capabilities and DVD playback etc.

Third Party Alternatives

There are some third party alternatives to Windows Media Center. Some of them are without charge - for example you can download the VLC Media Player from http://www.videolan.org/vlc for free. Then when you insert a DVD you will get the Autoplay menu which will give you then option to choose to play the disk with the VLC player.

Applies to:


Windows 8 - Recovery Options

System Recovery Options

There are some new features that are available to use within Windows 8 if you are having system problems. Some of the options from previous versions of Windows are also still available.

If Windows won't start and you need to perform recovery, see this section.

To access the new feature, you first need to go to the Start Screen and then Open the Charms Bar (by hovering over the top or bottom right of the screen or pressing the Windows Key and C at the same time), then click on the Settings option > click Change PC Settings > click the General Tab (as below).

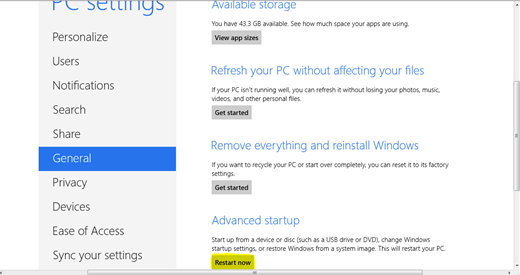
Refresh your PC without affecting files

This will do a reset of Windows 8 whilst keeping your user files and personalized settings; it will reset PC settings back to their defaults, Apps from the App Store will be kept, but third party apps from installation disk or downloaded from the internet will be removed. Note that a HTML document will be available on the desktop with a list of all the installed applications from the internet and installation media that was removed from the computer during the Refresh including a link to the site for re-download.

Remove Everything and Reinstall Windows

This will perform a complete reinstallation of Windows 8 - everything will be removed. It essential that you back up your data first before using this option as the system will be completey restored to default.

Other Recovery Options

From the general tab, select the Advanced start-up heading to bring up the following options:

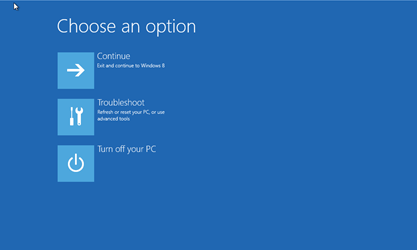
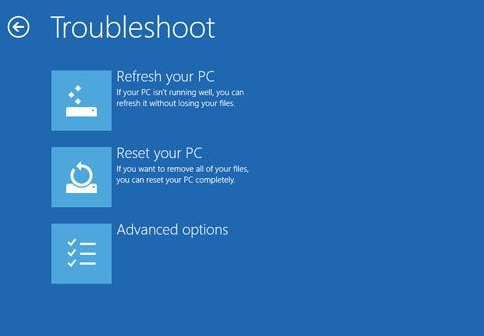
Then click on Troubleshoot, which will display the page below.

(Refresh and Reset are explained above)

If you click Advanced options, you will get the options below.

System Restore – this will launch the system restore options so you can restore your system back to a previous state. This does not affect user data.

System Image Recovery – this will do a complete Image restore (if you have previously created a recovery image). This will remove user data.

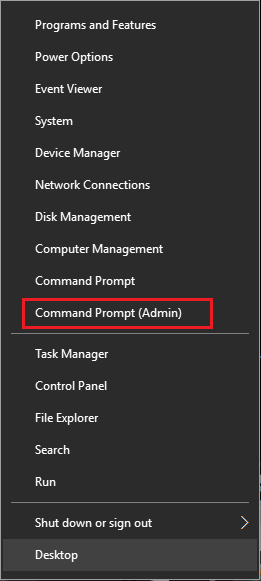
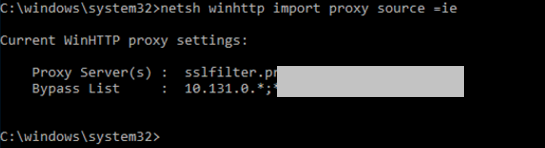
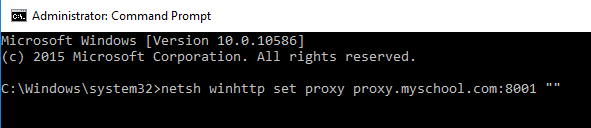
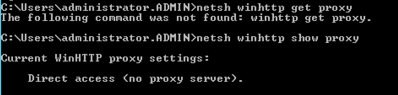
Command Prompt – this will open a command prompt based system recovery console for you to solve specific issues.

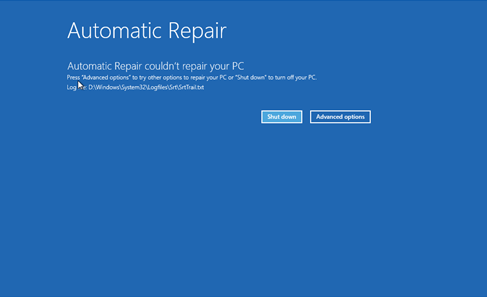
Automatic Repair – this is used to automatically detect and solve any start up issues.

How Do I Recover Windows 8 if the System Won't Boot?

To recover Windows 8 when it won't start, the system will first start Automatic Repair. After following Automatic repair, if this is unsuccessful - i.e. it reports that it couldnt repair your PC, you will have the the ability to click Advanced Options.
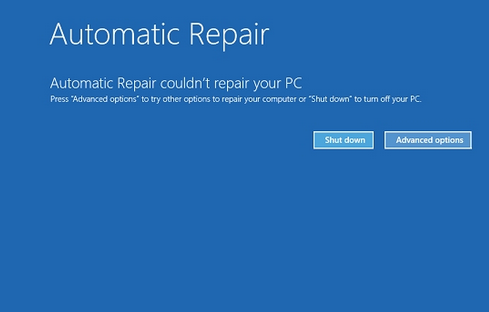
Applies to:


Windows 7 SP1 / Windows 8.1 - Windows Update is very Slow to Check for Updates, or Never Completes

Problem

Cause

This issue is caused by changes to Windows Update servers at Microsoft's end, meaning that updated Windows Update components are required to resolve this problem.

Resolution

Update the required components using the steps below.

Steps - Windows 7

Steps - Windows 8.1 with Update

Note: The fix for Windows 8.1 x64 also applies to Windows Server 2012 R2.

Applies to:


How to Recover Windows to the factory state

System Recovery Partition

Stone PCs and Notebooks come with a built in recovery partition which can be used to recover Windows to the factory defaults.

Please Note: This facility is only available if the recovery partition was not removed as part of a customers software deployment process. For example, a customer imaging process that removes all partitions will remove the ability to recover the system back to the factory state.

Recovery Process

You need to make sure any personal data is backed up to an external device before running the recovery, as using this procedure will erase all user data from the hard drive.

Instructions:

Note: Ensure that all user data, such as documents, settings and favorites are backed up to an external device or location before using the recovery procedure.

Upgrading to Windows 10 - Some Drivers May not be Installed After the Initial Upgrade

Problem

After upgrading to Windows 10 you may find that some device drivers are not installed. For example, the Microsoft Basic Display Driver might be used instead of a proper, fully featured display driver. This would not give the system performance that you would expect.

How to Fix Missing Drivers

There are several ways to add or provide the missing drivers.

Applies to:


How to fix: Realtek Audio Driver Wont Install - Error Code 0x000005b4 displayed, or driver update process times out

Problem

​Scenario

This problem can occur on low power or low performance systems with large device drivers such as the Realtek Audio driver. Low power systems include those based on Intel Atom processors. High performance systems that can normally install even a large driver in a few moments will not benefit from the resolution below.

Cause

Windows has a Device Driver installation process timeout value. The long delay or time required to install a large driver on a slow or low energy system means that the system may hit the default or configured device driver timeout value - and then the device driver installation will be automatically aborted. You may receive a message that the timeout has expired and/or you may get an error code of 0x000005b4.

Resolution

Increase the driver installation timeout value, and then re-attempt driver installation.

This can be done either by editing the local system policy or by importing a registry file.

Method 1 - Modifying the Local System Policy

Method 2 - Import a Registry Settings File

As an alternative to the method above, import the attached registry file. To do this, download the attachment to this article, and extract the .reg registry settings file. Then double click on it to import the setting. Finally, re-attempt driver installation.

Note: We recommend that you disable anti-virus software whilst performing driver updates. This will improve driver installation reliability. Always remember to re-enable your anti-virus software afterwards.

Applies to:


Windows 8 - How to Reboot into Safe Mode when you are already logged in to Windows

Booting Windows 8 into Safe Mode

Windows 8 no longer has the option to press F8 when the machine starts to get the advanced boot options menu, meaning that access to safe mode using this method has been removed. This has been implemented to improve boot times.

How to Reboot into Safe Mode When you have already logged into Windows

This article shows you how to reboot a machine into safe mode when you are already logged into Windows. Use the other articles attached to see safe mode options for when Windows doesnt start, or safe mode tips for when you haven't already logged in.

You can launch Safe mode from within Windows 8 by going to the Start Screen > Opening the Charms bar (press the Windows Key and C together) > Settings > Change PC Settings > ‘General’ heading > scroll to the bottom and under Advanced Startup click Restart Now.

You will then be presented with the Choose an option screen. You need to click on Troubleshoot > Advanced Options > Start Up Settings > Restart.

It will then present you with the screen below where you can select Safe mode. As it states, use the F1-F9 to select the options (F4 for safe mode)

Applies to:


Windows Update Error 80240037 - "Unsupported Hardware" with Windows 7 or Windows 8.1 and Kaby Lake Processors

Problem

Scenario

Cause

Each new generation of processor requires both driver support from component manufacturers and often, platform support from Microsoft.

As Windows 7 is now around 8 years old, as of 2017, Microsoft have decided not to add Kaby Lake support into Windows 7. Support is also not available for Windows 8.1 or Windows Server 2012 R2.

Additionally, supported video drivers are not available from Intel for the Kaby Lake on-chip graphics engine for Windows 7 or Windows 8.1

Note: With the Windows Update engine effectively disabled by the "March 2017 Preview of Monthly Quality Rollup" (Windows 7 - KB4012218 and Windows 8.1 - KB4012219), on detection of a Kaby Lake processor, your system is now exposed to future security issues or vulnerabilities.

This issue has been confirmed by Microsoft, here:

"Because of how this support policy is implemented, Windows 8.1 and Windows 7 devices that have a seventh generation or a later generation processor may no longer be able to scan or download updates through Windows Update or Microsoft Update."

Resolution

We recommend that customers upgrade to Windows 10 as soon as possible. If you need transition assistance from Stone, please contact your account manager.

Alternatively, if you need to run Windows 7 or Windows 8.1, perhaps to support an older application, there are two work-arounds:

Applies to:


How to repair the boot sector or boot configuration database (BCD) of a system that has been imaged but wont boot

Problem

Occasional problems with imaging tools and processes could lead to a system that will not boot after it has been reimaged. For example, differences in SATA controller, partition sizes or versions of imaging software could leave you with a system where the boot sector is not correct, or the boot configuration database (BCD) needs to be re-written.

Typically systems with this problem will not boot the operating system but just display a flashing cursor on the screen after the BIOS POST has completed.

Note: These instructions have been written for Windows 7 and do not apply to Windows XP.

Instructions

Stage 1 - Boot from the Recovery CD
1. Create a Windows 7 Recovery CD that matches the imaged operating system (for example 32 bit or 64 bit).
2. Boot the system from the CD.
3. Ensure you press a key when prompted to confirm that you want to boot the system from the CD.

Tip: If you cannot create a Windows 7 Recovery CD, then a bootable USB pen drive containing Windows PE will suffice.

Stage 2 - Set the Active Partition
4. When the system has finished booting from the CD, select the Command prompt option from the menu.
5. At the command prompt type DISKPART and then press enter. You will get the DISKPART> prompt.
6. Type the following instructions in red precisely:
7. DISKPART>select disk 0 and press enter.
8. DISKPART>list partition and press enter.
9. DISKPART>select partition 0 (this should be the partition that the system boots from, normally the small reserved area) and press enter.
10. DISKPART>active and press enter.
11. DISKPART>exit and press enter.
12. You are then returned to the X:\ prompt

Stage 3 - Fix the Master Boot Record, Boot sector and Boot Configuration Database (BCD)
13. From the Recovery Command Prompt (normally X:\>) select the C drive - i.e. type C:
14. Change to the Boot Directory i.e. cd\boot and then press enter
15. Type in bootrec /FixMbr and press enter.
16. Then type bootrec /FixBoot and press enter.
17. Finally, type bootrec /RebuildBCD and press enter.
18. After rebuild has finished reboot the machine.
19. The machine should now boot into windows 7.

Further Information

You may be able to prevent this situatiuon when deploying an Operating System image by using an option in your disk imaging software to completely recreate the partition table and boot sector (effectively erasing the drive), for example by using the DISKPART CLEAN ALL command. Note that this may remove Virtual PC check or other pre-installed tools.

Applies to:


How to Deal with Windows 10 Upgrade Error Code 80240020

Problem

You may experience an error code of 80240020 during the Windows 10 Upgrade process after you've had confirmation that the upgrade is ready to install.

Resolution

This command should trigger a fresh download of the Windows 10 files into the Softwaredistribution\Downloads directory. Once the files have been successfully downloaded into the directory the upgrade process should start again.

The upgrade process goes through the following stages - Copying files -> Install Features and Drivers -> Configuring settings.

Once complete the system will reboot into Windows 10. You can then delete the temporary folder you saved earlier.

Applies to:


Wake On LAN (WOL) may not work on Systems Running Windows 8.x or Windows 10

Problem

Due to the way in which Windows 8.x handles system and device power states there may be some instances where a desktop or notebook computer cannot be remotely switched on by a "Wake on LAN" (WOL) command. The same model of system can be remotely switched on using WOL if the system is running Windows 7.

Cause

The Windows 8 Fast Boot feature also controls how the system is shutdown. The mode that Windows 8 uses to power down devices can leave the system not able to respond to WOL commands.

Resolution

To resolve this problem, turn off Windows 8 fast boot features.

Steps

Note: Further information can be found at the following linkt http://support.microsoft.com/kb/2776718

Applies to:


Windows 8 - How to Reboot into Safe mode From the Logon Screen

Booting Windows 8 into Safe mode

Windows 8 no longer has the option to press F8 when the machine starts to get the advanced boot options menu, meaning that access to safe mode using this method has been removed. This has been implemented to improve boot times.

Booting into Safemode Before you Log in

This article shows you how to reboot a machine into safe mode if you haven't already logged in. Use the other articles attached to see safe mode options for when Windows doesn't start, or safe mode tips for when you have already logged in.

If you wish to boot into safe mode before you log in, then you can do so by following these steps:

First you need to click past the Lock screen to go to the Log in screen. You then need to click the Power Icon at the bottom right of the screen > hold the SHIFT key down and then click Restart.

You will then be presented with the advanced start up screen. You need to click on Troubleshoot > Advanced Options > Start Up settings > Restart.

It will then present you with the screen below where you can select safe mode. As it states, use the F1-F9 to select the options (F4 for safe mode)

Applies to:


How to Resolve Windows Update Error 0x8024402F

Problem

You may receive Windows Update Error 0x8024402F even if the system has been reimaged.

Products

Any desktop or laptop product running Microsoft Windows 7 or Windows 8.

Root Cause

This is caused by a problem with the Microsoft .NET Framework 4 Client Profile.

Resolution

Unninstall the Microsoft .NET Framework 4 Client Profile:

1. Start->Control Panel->Programs and Features

2. Locate the Microsoft .NET Framework 4 Client Profile

3. Right click and then select Uninstall / Change

4. Confirm that you want this component to be uninstalled. This may take a few minutes.

5. Restart the system.

6. When the system has reboot, re-run Windows Update and as normal.

More Information: This has been documented on the Microsoft Technet here.

Applies to:


Windows 10 - No DVD Playback Software Included as Standard

Windows 10 DVD and Blu-Ray playback

Unlike Windows 7, Windows 10 does not include the software support as standard to play movies on DVD discs. If you insert a DVD disc into a Windows 10 machine you likely will not get an Autoplay menu - nothing happens.

To get around this problem, you will need to install additional software which provides support for DVD playback.

Windows DVD Player

Windows DVD Player is available from the Microsoft App Store. You will need to sign into the App Store to be able to download and install this software. This software is currently free if you upgraded from some versions of Windows 7 or Windows 8, or else it is around £12.

VLC Media Player

This third party software is free and will play DVD disks and some unencrypted Blu-Ray disks. Most Blu-Ray films are encrypted and will not play with VLC Media Player.

Download the VLC Media Player from http://www.videolan.org/vlc for free. Then when you insert a DVD you will get the Autoplay menu which will give you then option to choose to play the disk with the VLC player.

Blu-Ray Software for Films

If you require Blu-Ray software capable of playing films and other content, please contact your Stone account manager, for pricing on one of our media suites.

Applies to:


Third Party Products -> Desktop Operating Systems (Windows etc.) -> Troubleshooting
https://kb.stonegroup.co.uk/index.php?CategoryID=65