Stone Equinox / Storage Spaces Direct (S2D) Hyper-V Cluster UPS Shutdown Script
Storage Spaces Direct (S2D) nodes provide disk resiliency to each other as part of the storage network.
When an extended power outage occurs that exceeds the available battery runtime, it is important that a managed shutdown process is used:
- To ensure that all virtual machines are saved or shutdown
- To ensure that nodes do not start moving virtual machine loads between nodes
- To ensure that any individual node does not switch off until all cluster workload has ceased - this ensures that the S2D disk storage is consistent and not degraded
A software package is now available to provide this shutdown facility. It is compatible with all UPS software that supports shutdown via a script or command file.
Latest version: v121 with Installer version v1.0.28 (06/06/2025)
See:
Pre-Requisites
A. Install your UPS Software as normal
Its a good idea to install your UPS Software first, as depending on the type of software installed, the software will be configured for you by the installation script.
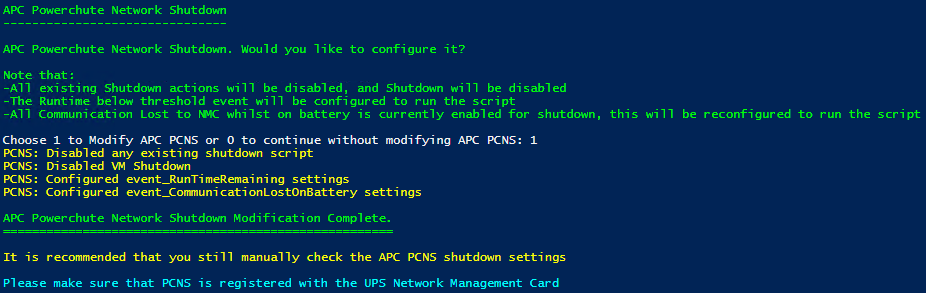
Note: If you are using APC Powerchute Network Shutdown (PCNS) v5 or newer, do not tick the box to enable Hyper-V support on PCNS. PCNS Hyper-V support is an optional paid feature in PCNS 5.x, and is not required by the UPS Shutdown script.
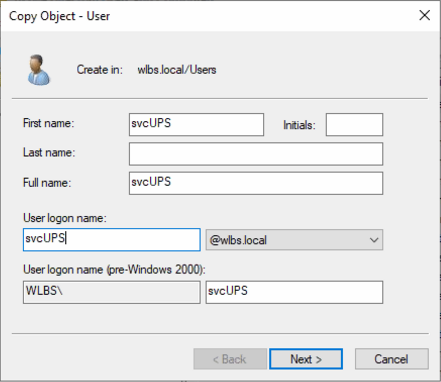
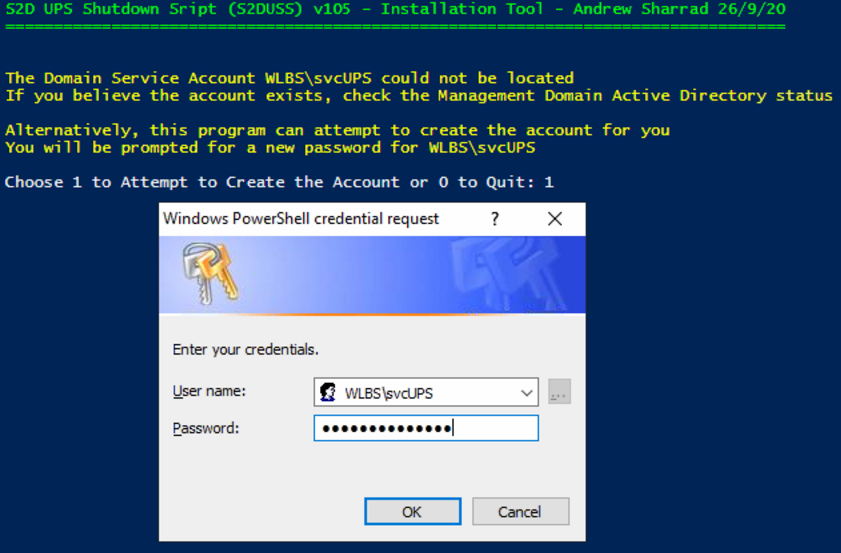
B. Manual creation of a domain service account. Optional: If you do not follow this step to create a S2D Management domain account called svcUPs, the installation script will do it for you.
- In your S2D Management domain, create an Active Directory domain service account called svcUPS
- This account should have domain administrator rights, as it needs to be able to control the cluster
- Either copy the existing domain administrator account, or make a fresh, new account, and add it the Domain Admins group
- Make sure the account is set so that the password never expires
- Leave the account object in the Users container, or somewhere else unaffected by group policy
- Set a secure password on the account and make a note of it

Installation on each S2D Host
- Download the script and extract it to a suitable folder, for example C:\_STONE\S2DUPSShutdown
- Do not extract to a network location
- You should have 3 files in the folder
- Install_S2D_UPS_Shutdown_Script_(S2DUSS).ps1
- Instructions.TXT
- Double click on Install_S2D_UPS_Shutdown_Script_(S2DUSS).ps1. This starts the installation and may prompt for administrator approval
- If you have already created the svcUPS account, enter in the svcUPS password when prompted
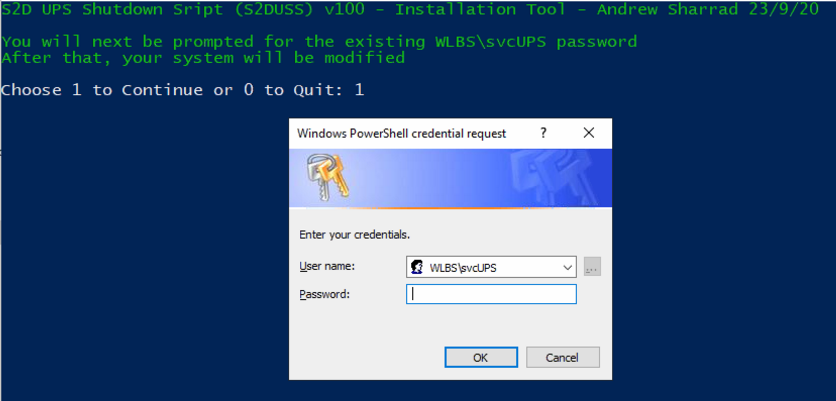
- Alternatively, if the account does not exist, you will be offered to create a new account with a new complex password
- Type in the new password. The account will be created in the S2D Management Domain Active Directory
- When you have supplied the password for the existing or new account, the script will complete the tool installation.
- When it completes, note the exact name and location of the CMD file that the UPS software must call.
- Copy the CMD filename into your clipboard to make it easier to use later
- Example: C:\Program Files\Stone\HAS\S2D UPS Shutdown Script\StartShutdown.CMD
.PNG)
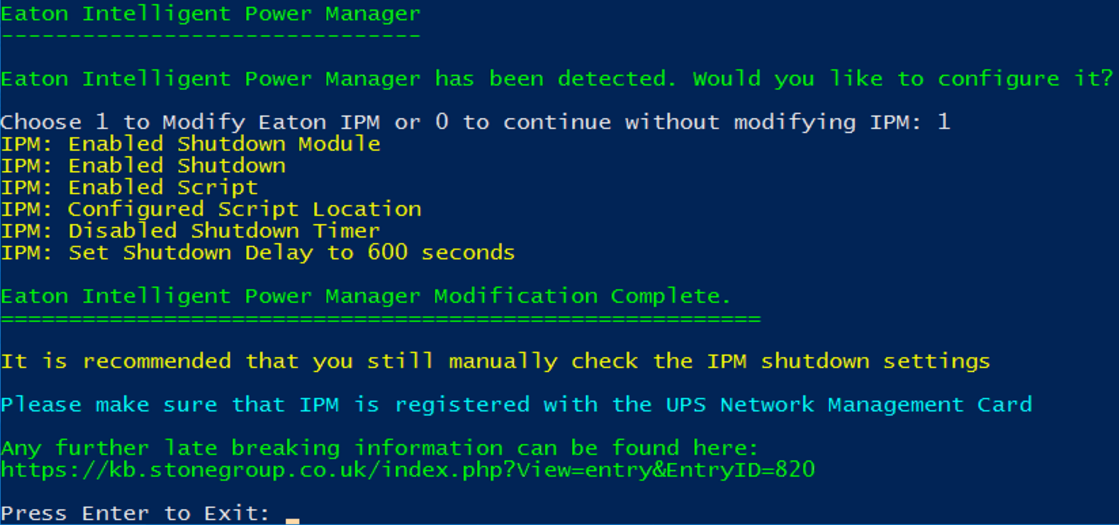
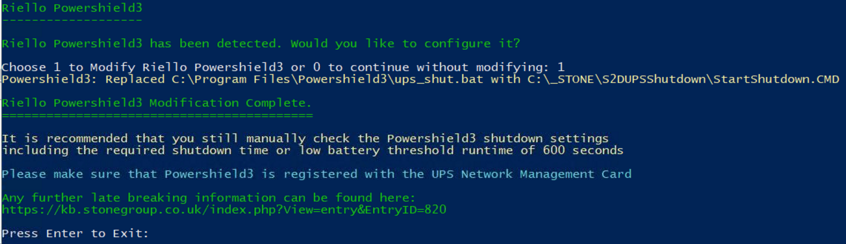
Note: If Eaton Intelligent Power Protector (IPP), Eaton Intelligent Power Manager (IPM), APC Powerchute Network Shutdown, HPE Power Protector or Riello Powershield3 is running, the script will offer to configure the software settings for you. See
Configuring the UPS Software.
- The installer will have renamed or created additional files:
- StartShutdown.CMD (newly created) - this is the file that the UPS software must run
- ShutdownControl.CMD - this does the heavy lifting of the shutdown procedure
- And a Logs directory, for debugging shutdown events
- Remember to complete the script installation on all Nodes in the cluster, as well as UPS software installation and configuration
Verifying Installation
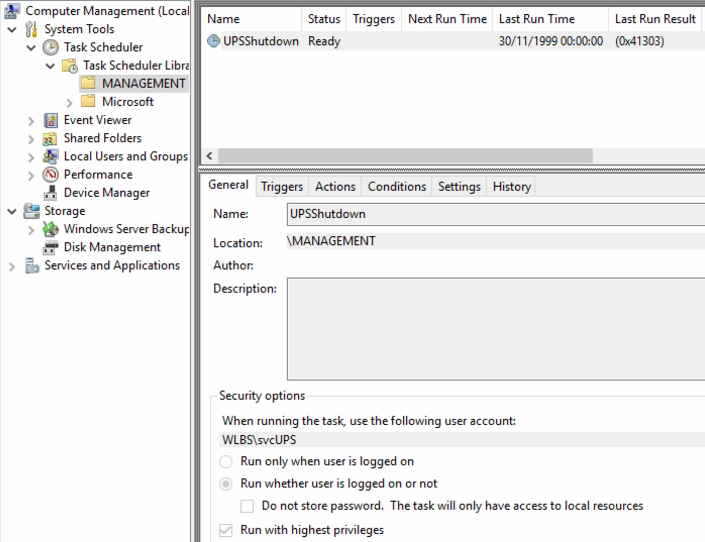
Check for a scheduled Task called UPShutdown in the \MANAGEMENT folder, in Task Scheduler
Automatic Configuration
You should install your UPS software before running the UPS Shutdown script installer, as the script installer may be able to configure your software for you.
After installation, we recommend that manually check your UPS Software shutdown settings
Software Supported for Automatic Configuration
- Eaton Intelligent Power Protector
- Eaton Intelligent Power Manager
- Riello Powershield 3
- APC Powerchute Network Shutdown
- HPE Power Protector
- APC Powerchute Serial Shutdown (partial config only - see the instruction on screen)
Manual Configuration / Verifying your UPS Software Shutdown settings
- Then, under the shutdown configuration, select that a script is used.
- You must specify that a shutdown duration of 600 seconds (10 minutes) is used. This lets the UPS software allow plenty of UPS battery runtime to ensure the systems shutdown cleanly.
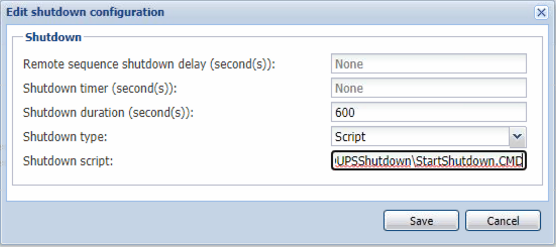
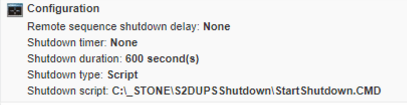
Reminder: You must configure the UPS software to use the shutdown script (for example C:\Program Files\Stone\HAS\S2D UPS Shutdown Script\StartShutdown.CMD) and a Shutdown Duration of at least 600 seconds
In a standard deployment, each Node in the Cluster should be running UPS software, and be connected to the same UPS using the UPS network management card. This means that when a low battery condition is detected, all nodes start shutting down at the same time.
However, the following configurations break this process:
- Different UPS for different nodes in the cluster
- In this situation, shutdowns may be triggered at different times depending on battery condition and load. This may lead to degraded storage at the end of the shutdown process
- Using a UPS that only supports serial or USB
- In this situation, only one node actually shuts down. The other nodes may or may not be running cluster VMs, but at the very least local VMs will still be running, and the hosts will not be cleanly shutdown.
In this situation, configure the SlaveNodes setting in the configuration file with a comma separated list of other nodes to initiate shutdowns on.
From Installer 1.0.26 and newer, this is automatically offered during the configuration process.
Sample Process:
- UPS Software on Node 1, connected via USB, detects a low battery condition
- It starts the UPS Shutdown command file
- This starts the Node 1 shutdown Task from Task Scheduler
- Node 1 then initiates the shutdown Tasks in Task Scheduler on the other nodes in the cluster
- The cluster is fully shutdown
- All local VMs are stopped
- And all hosts shutdown
You should arrange full systems downtime to test the shutdown sequence. You can then test the software either from the UPS software, or by running StartShutdown.CMD from an Administrative command prompt
- Check the Logs directory later for Cluster and Host shutdown events
- You can also check the Application log under Stone S2D UPS Shutdown Script
- When using Intel based servers, do not install UPS in parallel. For example, if you have two UPS and two nodes, dedicate one UPS to one Node
- This is because of the active/passive nature of the system power supplies
- In the event of one UPS battery lasting significantly longer than others, the Cluster (and all thus VMs) will still be shutdown by the first node triggered for shutdown
- Always ensure your network switches between the Hosts and the UPS Network Management card are also UPS protected
- Always periodically test your batteries using the run-time calibration feature
- Batteries that are 3 years old or more may require replacement
All of the settings in S2D_UPS_Settings.ini are shown below.
Concepts:
- LocalVMs: Virtual machines running on the local node. These may or may not be clustered. Clustered VMs are shutdown first
- Save or shutdown: By default, Local VMs will be Saved unless they have a memory demand of more than 8192MB, in which case they will be shutdown
- The starting of shutting down or saving of local VMs will be staggered over 2 minutes
- When the script starts, it sets up a separate cluster shutdown job that will start after 2 minutes, during which time the local virtual machines will be saved or shutdown
- During this time, in most situations, the same script running on other nodes will be saving or shutting down VMs local to those other nodes
- By default, after 4 minutes of starting the cluster shutdown job (total 6 minutes), the script will see if it is safe to turn off the node:
- When all local VMs (clustered and non-clustered) have completed shutdown/saving
- When the cluster has shutdown
- The remaining 4 minutes of the shutdown duration are to ensure the cluster and then the host have enough time to complete shutdown
[Locations]
LogFilePath=C:\Program Files\Stone\HAS\S2D UPS Shutdown Script\Logs
[LocalVMSettings]
;maximum number of seconds to start shutting down all local VMs
MaximumTimetoStartShuttingdownLocalVMs=120
;maximum number of seconds in between starting each VM shutdown. Will be automatically reduced to shutdown within MaximumTimetoStartShuttingdownLocalVMs
LocalVMsStaggeredDelay=5
;Set this to False to Always Shut down local VMs, to Set to True to save VMs instead of shutting down, dependant upon each VMs memory demand and the OnlySaveLocalVMsBelowMemoryDemandThreshold setting
SaveLocalVMs=True
;Set this to False to Always Save local VMs, or set to True to only Save VMs that have a memory demand below the threshold. If set to True and the VM has a memory demand above the threshold, it will be shutdown instead of being saved
OnlySaveLocalVMsBelowMemoryDemandThreshold=True
SaveLocalVMsMemoryDemandThresholdMB=8192
;VMs with a memory demand above this threshold will be shutdown, instead of being saved
[ClusterSettings]
ShutdownCluster=True
OnlyInitiateClusterShutdownIfPoolOwner=False
;The amount of time in seconds before shutdown-cluster is issued
StartClusterShutdownDelay=120
[LocalNodePowerOff]
;Shutdown of this Node - in S2D, this needs to happen after all Cluster IO has ceased
TurnOffThisNode=True
;The settings below is the time in seconds, after Stage 2 has been started, that we will wait for the cluster shutdown job to complete before testing to see if we are ready to turn off the node
ClusterShutdownTimeout=240
;The settings below get the script to check every 5 seconds to see if these conditions have been met
DontTurnOffNodeifLocalClusteredVMsStillRunning=True
DontTurnOffNodeifLocalNonClusteredVMsStillRunning=True
DontTurnOffNodeifClusterIsStillRunning=True
[SlaveNodes]
;Provide a comma separated list of Nodes that this node will use to remotely start the UPS Shutdown script during a shutdown event
SlaveNodes=
[Misc]
Version=121
;Total Shutdown time should be:
;The greater of:
;MaximumTimetoStartShuttingdownLocalVMs + time to save or shutdown last VMs
;StartClusterShutdownDelay + ClusterShutdownTimeout
;Then a final optional checks for LocalClusteredVMs, LocalNon-ClusteredVMs, and then the Cluster itself
;Then issuing Local Host Shutdown
Applies to:
- Stone Computers Equinox
- Stone Computers Elysium
- Most S2D Hyperconverged Platforms