Frequently Asked Questions (FAQ)

How to Obtain the Serial Number of your Computer

The Serial Number

When logging a support call with Stone Computers Service helpdesk, one of the details that we need to identify the machine is the Serial number.

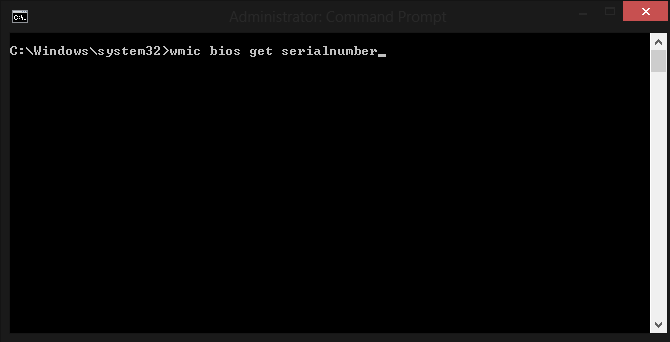
This is usually found on a silver Stone sticker (underneath the bar code) on the case. For any reason this number has become faded over time due to use, you are able to access it through the command line as below.

How to Retrieve the Serial Number from the Motherboard

These steps are designed for a system administrator, or for customers which have local administrator rights. If you do not have the permissions to add programs or make changes to your system, you may need your administrator to carry out these instructions for you:

Steps:

This will then query the bios for the system serial number and return it in the command line.

Tip: Alternatively, use the Stone WMI tool to get the serial number as well as other additional BIOS information, including BIOS version and UUID.


Applies to:


Is my Stone PC 64-bit compatible? What are the benefits?

All current Stone PC systems (with exception of some netbook and tablet products) are 64-bit Windows capable. 64-bit capable systems allow a 64-bit version of Windows to address more memory, whereas traditional 32-bit systems were limited to 4GB of memory. If your system has more than 4GB of memory you will need to be running 64-bit Windows to take advantage of this increased capacity.

Note: Intel Atom based desktop products (as well as Atom based netbooks) are also only suported under 32-bit Windows, meaning that they cannot make use of more then 4GB of system memory.


Applies to:


How to Update the BIOS on the Stone NT210-H Laptop

How to Update the BIOS on the NT210-H Laptop

BIOS Updates are available for the Stone NT210-H Haswell based laptop.

Note: Please only update the BIOS if necessary. The BIOS should not be updated unless you are experiencing a specific issue which requires an update. This BIOS update is designed to be used by Administrators. Contact Stone Support for further advice.

What you need to Perform the Update

Steps

Note 1: Do not attempt to use this BIOS update procedure inside a "DOS" box or command prompt inside another operating system. Always run all parts of the update from a pure DOS boot.

Note 2: Always ensure that the laptop is connected to the mains and that the battery has at least 20% charge before attempting to perform the flash.

Applies to:


My Laptop or Tablet Battery does not Last as Long as it Used To - Is it Faulty?

Stone Branded Laptops and Tablets Warranty Provision

Our branded laptops and tablets are available with some of the best service offerings available in the industry, including next business day service options for a length of up to five years.

The batteries on Stone branded product are warranted for a maximum of three years. This protects you against manufacturing defects or outright battery failures (such as the battery not being detected).

However, like most battery warranties today there are some limits or exclusions; these are based upon the technology used to produce modern batteries.

Reduction in Capacity Over Time

Lithium-ION (LI-ION) batteries do not suffer from the memory effect problem of earlier generations of battery technology. However, LI-ION batteries do suffer from loss of original battery capacity over time. This is irrespective of the amount of use and irrespective of where or not the battery has been stored in a discharged (flat) or charged state.

The amount of capacity loss varies, but on average it equates to between 20% and 30% of the original battery capacity per year.

This means that at the end of two years, for example, the battery capacity may have reduced in the amount of runtime available from between 40% and 60% from the original level. This is the standard expectation of LI-ION battery capacity performance across the industry, and this is the reason that notebook batteries are now generally classed as consumable items.

Reductions of battery capacity over time are not covered by the battery warranty.

What Can I do to Minimise the Reduction of Capacity?

To protect the battery as much as possible, protect the equipment from extremes of temperature, especially temperatures below freezing or above 30C. For example, do not leave the equipment exposed outside, and do not leave the equipment in direct sunlight. Also avoid placing the equipment directly above or in contact with radiators or other strong heat sources.

Other Recommendations: Always use the correct charger to charge the equipment. Replace any chargers which become damaged. If your laptop has a removable battery is not going to be used for a period of time of more than 4 weeks, consider storing the laptop with the battery removed to prevent "dead" batteries - deeply discharged batteries which will not respond to normal charges.

What Else Can I Do?

Customers that need long battery run times after two or three years of battery use may wish to consider buying replacement batteries. Your Stone Account manager will be able to advise you on price and availability.

Tip: If you need to lengthen the amount of time your Windows based laptop or tablet can run on battery, consider changing the systems power plan to the "Power saver" plan to maximise runtime.

Applies to:


How to change the DMI information on a Stone NT303 or NT307 Notebook

Changing DMI Strings

Some of the DMI strings in the Intel desktop board BIOSes can be changed using the utilty attached to this article. To run the utility, you will need a Windows 98SE bootable USB pen drive.

  1. Make the USB pen drive bootable.
  2. Extract the utility to the pen drive.
  3. Boot the system from the pen drive (use the F10 option to get the boot menu).
  4. Run DMI.BAT

The following strings will be prompted for:

​This DMI utility will also program "OEGStone" into the BIOS as a manufacturer string.

Applies to:


I’m using Windows 7 64-bit. I have Internet Explorer installed. Should I use the 64-bit version that’s available?

We recommend you use the standard 32-bit version of Internet Explorer for the best experience.

 Applies to:


How to Update the BIOS on the Stonebook Pro or Stonebook Lite Laptops

How to Update the BIOS on the Stonebook Pro or Stonebook Lite Laptops

A BIOS update is available for the Stonebook Pro and Stonebook Lite Skylake based laptops. This BIOS introduces UEFI support for Windows 7 installations. UEFI support is required for TPM (2.0) functionality on these models with Windows 7, due to a Microsoft limitation.

Note: Please only update the BIOS if necessary. The BIOS should not be updated unless you are experiencing a specific issue which requires an update. This BIOS update is designed to be used by Administrators. Contact Stone Support for further advice.

What you need to Perform the Update

Method 1 - Windows 98SE DOS Bootable Pen Drive

Note: With this method, do not attempt to use this BIOS update procedure inside a "DOS" box or command prompt inside another operating system such as Windows 10. Always run all parts of the update from a pure DOS boot.

Method 2 - Flashing from Within Windows 10

Always Note: For both methods, always ensure that the laptop is connected to the mains and that the battery has at least 20% charge before attempting to perform the flash.

Applies to:


What is Flight Mode? Why doesn't the wireless LAN indicator work on my laptop?

Flight Mode

Flight or Airplane mode on modern laptops is a setting than can be used to ensure that all of the laptops internal wireless, bluetooth and 3G/4G connectivity is turned off.

Laptops such as the Stone NT310-H and newer have a Wireless Flight mode status indicator which works the opposite way around to previous Wireless LAN indicators.

Use the keyboard hotkey on the NT310-H of Fn + F11 to toggle Wireless Flight mode on and off.

This functionality works in both Windows 7 and Windows 8.x.

My Flight Mode LED Does Not Work. Why is this?

If you do not get an on-screen message regarding flight mode or wireless status, or if the Airplane LED stays on or off when you press Fn + F11, this is because you have not installed the Hotkey Utility. Install the Hotkey utility to get on screen messages about most function keys, for example, audio settings. The Hotkey utility also controls the Airplane mode LED.

Download the Hotkey Utility from the Stone Driver Finder. Ensure you install the latest version available for your model and operating system.

Stone NT310-H Function Key Summary

Windows 8

In addition to Fn + F11 support Windows 8 and 8.1 support a Wireless Flight mode toggle via the Charm Bar - Open the Charm Bar, go to Settings, then WiFi.

Applies to:


How to change the DMI information on a N120, NT210-H, NT308, NT309, NT310 or NT310-H Notebook

Changing DMI Strings

Some of the DMI strings in the Intel desktop board BIOSes can be changed using the utilty attached to this article. To run the utility, you will need a Windows 98SE bootable USB pen drive.

  1. Make the USB pen drive command prompt bootable.
  2. Disable UEFI boot in the BIOS, if enabled.
  3. Extract the utility to the pen drive.
  4. Boot the system from the pen drive (use the F10 option to get the boot menu).
  5. Run DMI.BAT

The following strings will be prompted for:

​This DMI utility will also program "OEGStone" into the BIOS as a manufacturer string.

And lastly:

  1. Start the system back up and re-enable UEFI boot in the BIOS if it was previously enabled.

Applies to:


I have installed a 3G Card and inserted a SIM card - why isn't it detected in Device Manager?

Problem

I have a 3G card installed in my Stone/Clevo notebook and I have a compatible SIM card inserted, but the 3G card is not shown in Device Manager, preventing me from using it to connect to the Internet.

How to Solve this Issue

It is possible that the 3G capability on the notebook is switched off, in a similar way that the Wireless Network adapter can be switched on and off by using a function (Fn) key.

The 3G capability can be switched on and off using the key combination (Fn + -).

Note: You may be unaware that the 3G functionality can be switched on and off in this way, as there is no labelling on the keyboard to suggest this.

 Applies to:


How can I Clear a TPM module or Recover from Authorisation Lockout?

Scenario

TPM Modules can become locked when too many incorrect PIN attempts are made to access the information stored on the module. The number of failed attempts before lockout will vary depending on the TPM version (1.2 or 2.0) and in the case of TPM 2.0, the policies configured in the operating system.

If you have replaced the motherboard in your Bitlocker protected system and the new motherboard arrives with TPM provisioned, you may be locked out from TPM as you will likely not know the PIN, or you may not be able to re-provision the TPM for re-use.

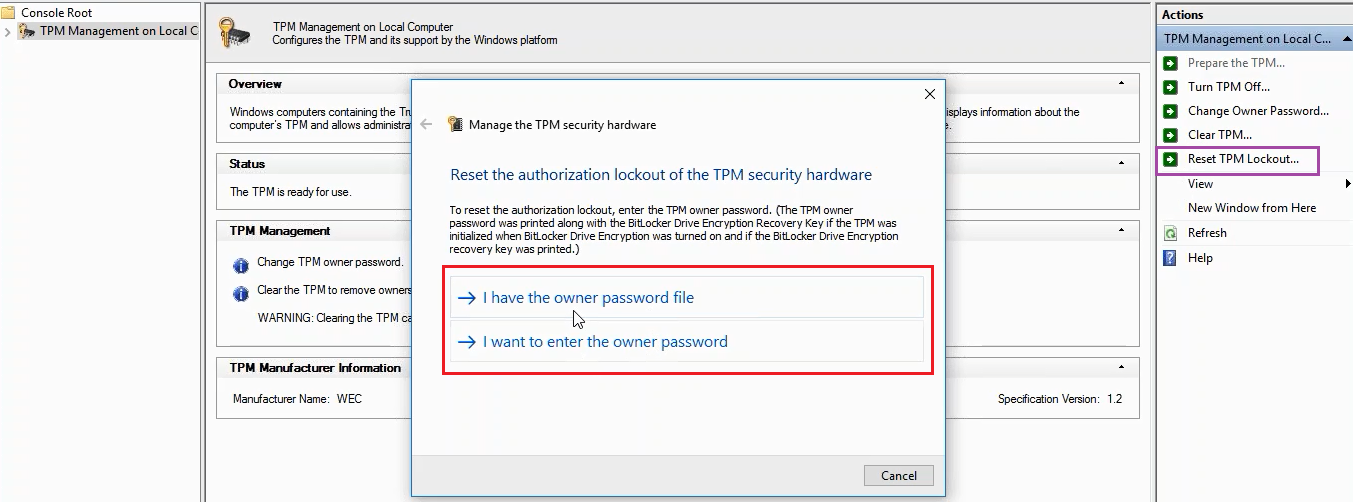
When Locked Out

If you are locked out, you cannot enter the correct pin to remove the lockout. You then have three options:

When TPM is Unusable

When you can't take ownership of the TPM module or provision the TPM Module for use, follow these options:

Removing the Lockout

​​

Clearing the TPM

Use these methods:

Note: Bear in mind that this will delete the cryptographic information in the machine and you will lose the encrypted data, including any user data or documents stored on a Bitlocker protected drive.

Clearing the TPM can be done one of four ways, each of which increase in complexity. Always log on with local Administrative rights before using these instructions.

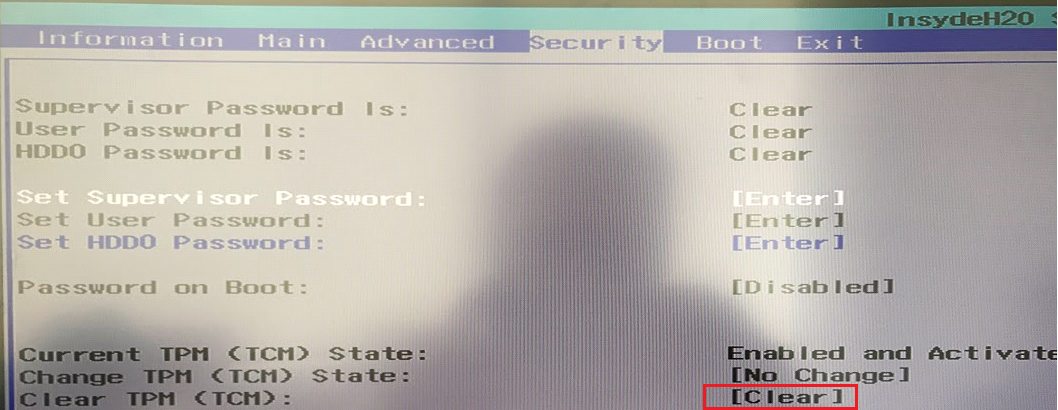
  1. Clearing the TPM Using the BIOS
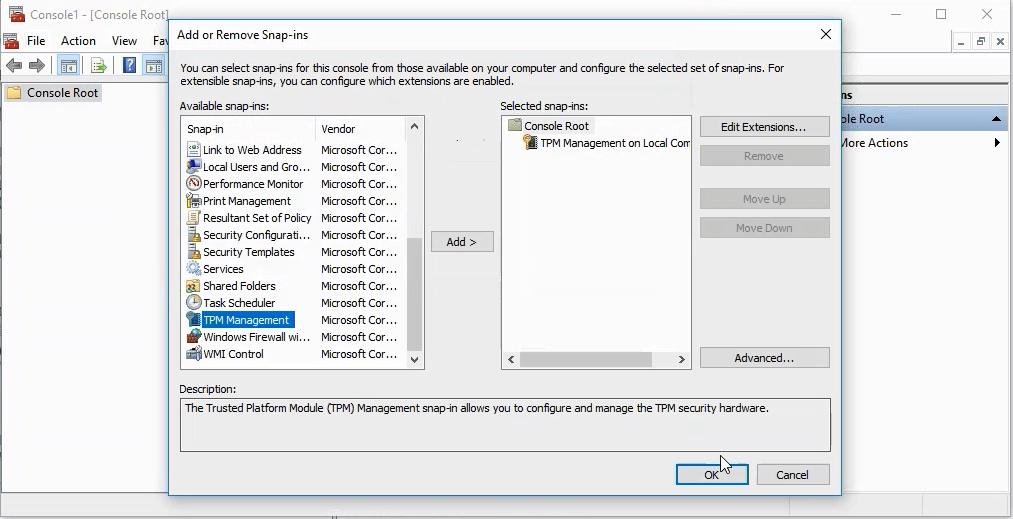
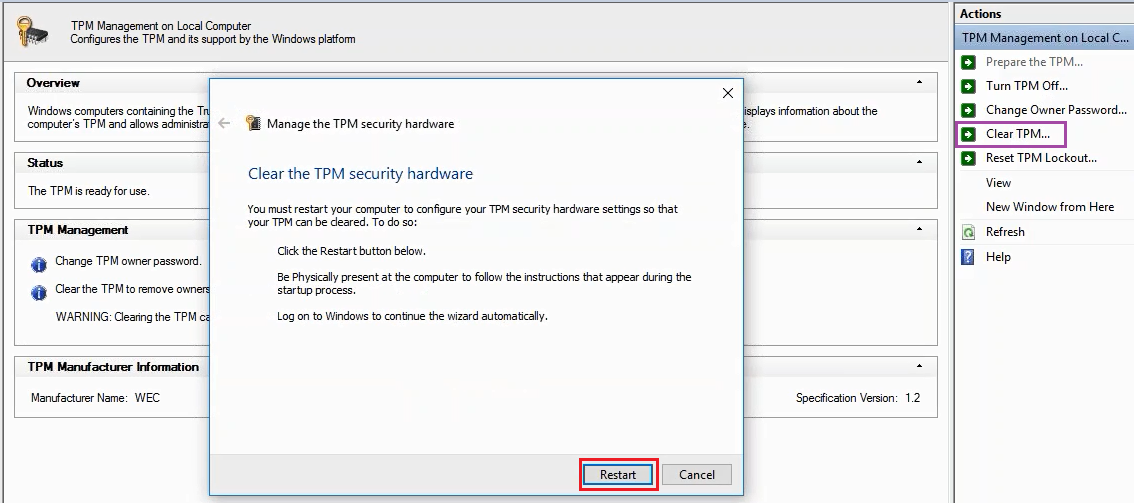
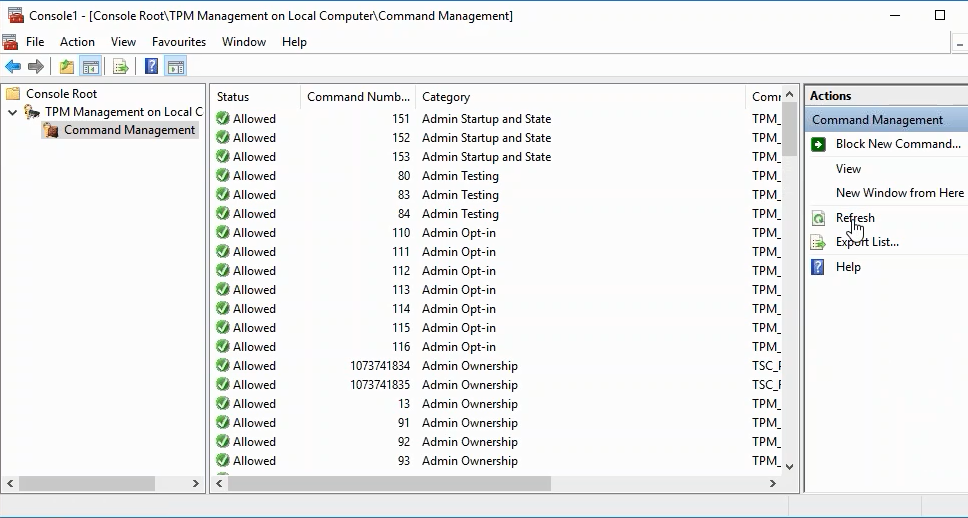
  2. Clearing the TPM Using MMC
  3. Clearing the TPM Using the MMC after setting the Windows TPM Authorisation Level
  4. Clearing the TPM Using the MMC after Enabling Blocked TPM Commands

1. Clearing the TPM Using the BIOS

2. Clearing the TPM Using MMC

If your BIOS does not have the option to clear the TPM, then you will need to clear the TPM using Windows.

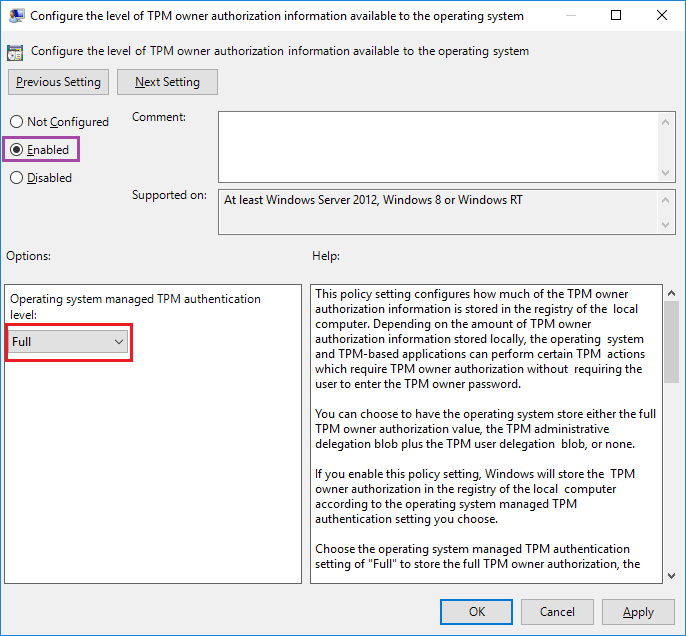
3. Clearing the TPM Using the MMC after setting the Windows TPM Authorisation Level

Attempting to clearing the TPM without making any other Windows changes first, as in Step 2., may not be successful. This is because some versions of Windows have safeguards to prevent the accidental erasure of cryptographic information.

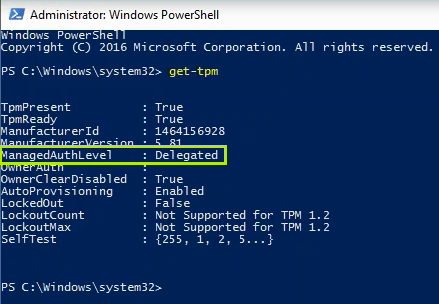
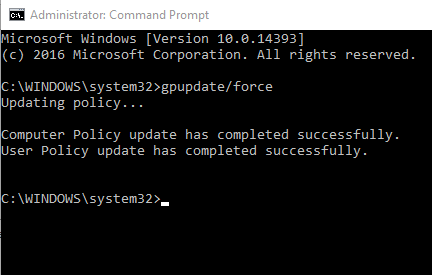
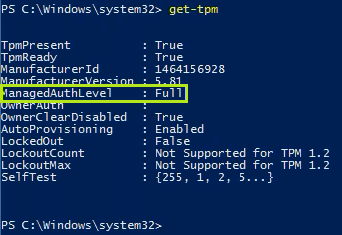
The first change to make if Step 2. is not successful is to change the Windows TPM Delegation Level.

Note: In the above screenshot, the TPM is not reported as locked out. If you are unable to provision a new TPM, the TPM may be an indeterminate state where is it not locked, but cannot easily be cleared unless you use the additional instructions in Steps 3 or 4.

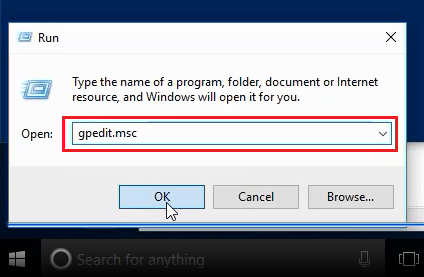
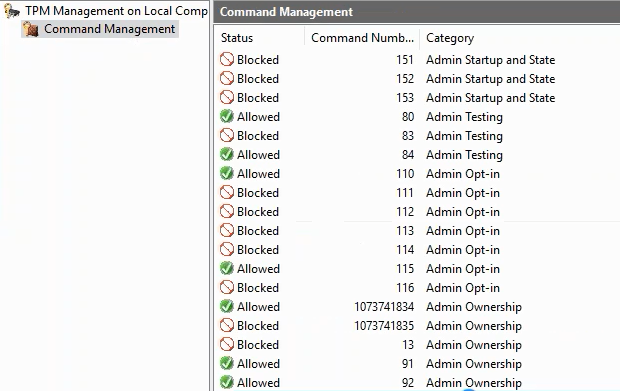
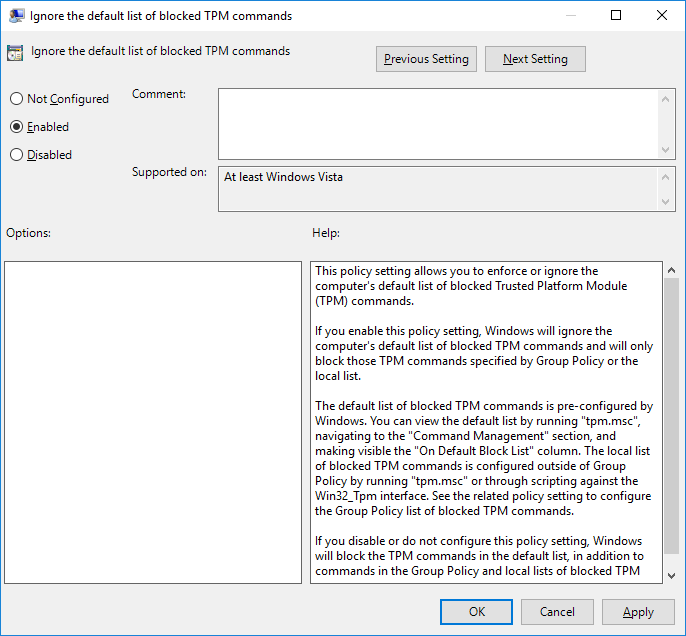
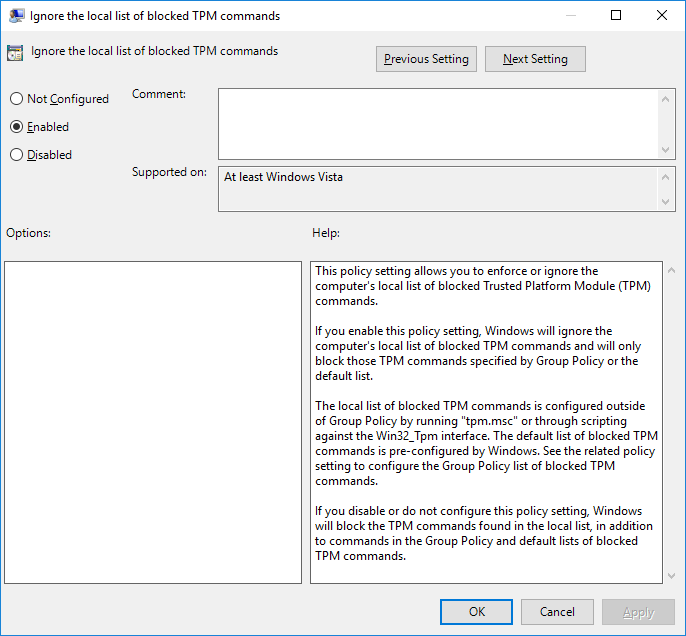
4. Clearing the TPM Using the MMC after Enabling Blocked TPM Commands

Windows by default blocks the use of some TPM commands to prevent abuse. If the instructions in Step 2 do not work, you may need to de-restrict the TPM commands that can be used.

Applies to:


How to Identify which USB ports are USB 3.0 ports on a Stone Computers System

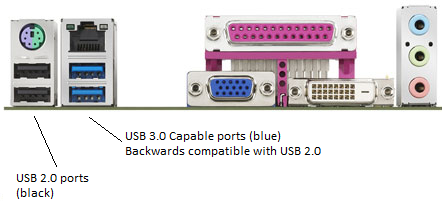
Stone Computers systems USB 3.0 ports can be recognised by the blue colour of the USB port connector. This is an industry standard. Use the USB 3.0 ports to take advantage of much faster data transfer rates compared to USB 2.0, when used with devices that support this standard.

Note: USB 3.0 ports are backwards compatible with USB 2.0 devices, and vice-versa. To get the best performance from your devices, always plug USB 3.0 capable peripherals into USB 3.0 ports.

Applies to:


Stone Notebook BIOS Passwords Explained - Supervisor, User and Boot

Three Levels of Access

There are three levels of BIOS password on Stone notebooks from the 2012 model year onwards.

Example

If you set a Supervisor password and then attempt to access the BIOS, you will be prompted for a password. If you skip entering this password - i.e. you just press the Enter key - you will be given User mode privileges in the BIOS unless a User mode password has previously been configured. If a User mode password has previously been configured, then you must enter with the Supervisor or User password to gain any access to the BIOS.

Applies To


How to change the DMI information on a Stone N108 Netbook

Changing DMI Strings

Some of the DMI strings in Stone N108 Netbooks can be changed using the utilty attached to this article. To run the utility, you will need a Windows 98SE bootable USB pen drive.

  1. Make the USB pen drive bootable.
  2. Extract the utility to the pen drive.
  3. Boot the system from the pen drive (use the F10 option to get the boot menu).
  4. Run DMI.BAT

The following strings will be prompted for:

​This DMI utility will also program "OEGStone" into the BIOS as a manufacturer string.

Applies to:


How can I Enable or Disable Bluetooth devices from the command line in Windows?

Enabling or Disabling Devices from the Command Line

It is possible to Enable or Disable devices from the command line using the Microsoft Devcon utility. This simulates device manager functionality.

The sample scripts attached will enable or disable all bluetooth devices from the following Intel wireless adapters:

Instructions

As the devcon utility is not redistributable you will need to download this from Microsoft:

  1. Download the Devcon package from here to your Desktop or Downloads folder.
  2. Extract the Devcon package by double clicking on the download. Extract the files to a sub-folder called "devcon extracted". Then copy the "devcon.exe" file from the i386 subfolder inside "devcon extracted".
  3. Paste the devcon.exe file into a new working folder called "BT utilities"
  4. Download the "enable or disable devices.zip" file attached to this article and extract the contents into "BT utilities"
  5. Modify the enable_BT.cmd and disable_BT.cmd files to include any additional device IDs that you might need.
  6. Make the "BT utilities" folder available over the network, and test it.
  7. You may be able to deploy this utility using group policy but bear in mind that any device manager operations, including those called by the Devcon utility, may require Administrative rights.

Note: If you deploy this utility using group policy please test it thoroughly to ensure that the script does not distrupt your user's experience.

Applies to:


Webcam not working after Windows 10 1803/1809/1903/20H1/20H2 update.

Problem

The webcam detects in device manager, but the end user cannot access it in some, or all apps.

Steps

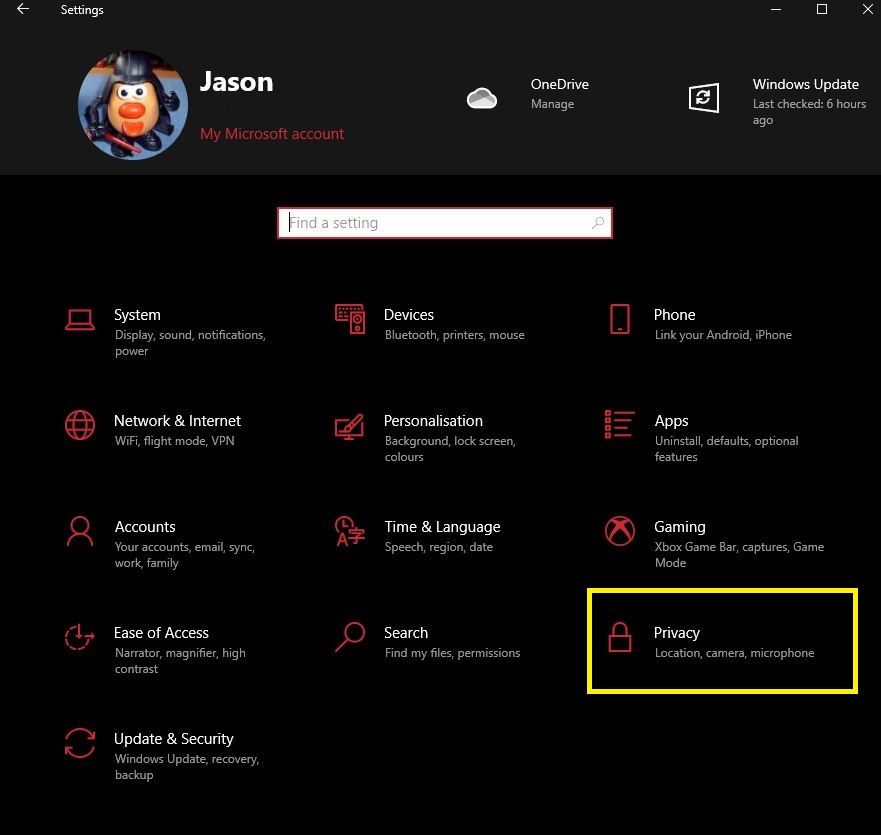
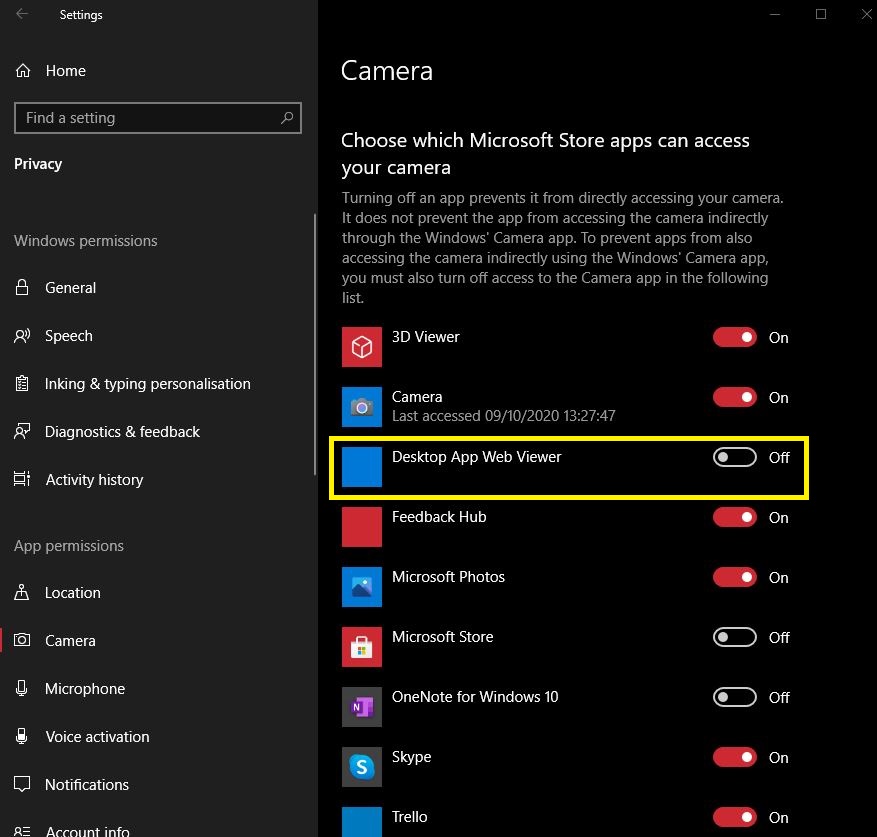
1. Go to Windows settings and select Privacy. Alternatively you can start a search for camera privacy settings

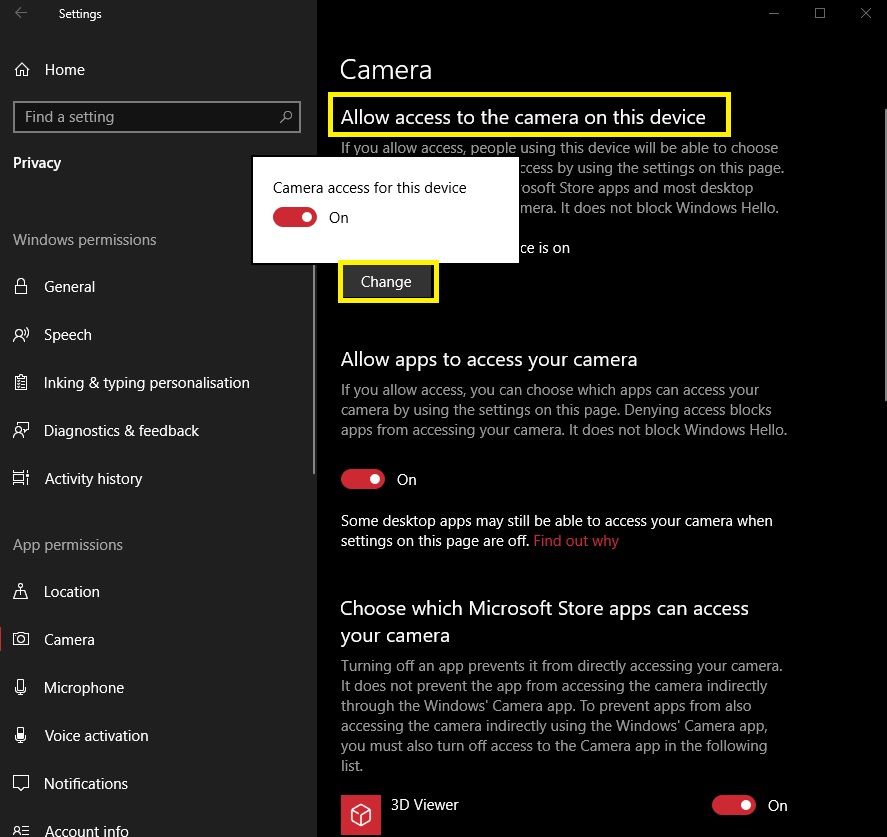
2. Select the camera option in the left pane and verify that it says "Camera access for this device is on". If it's off click on change and toggle it to on.

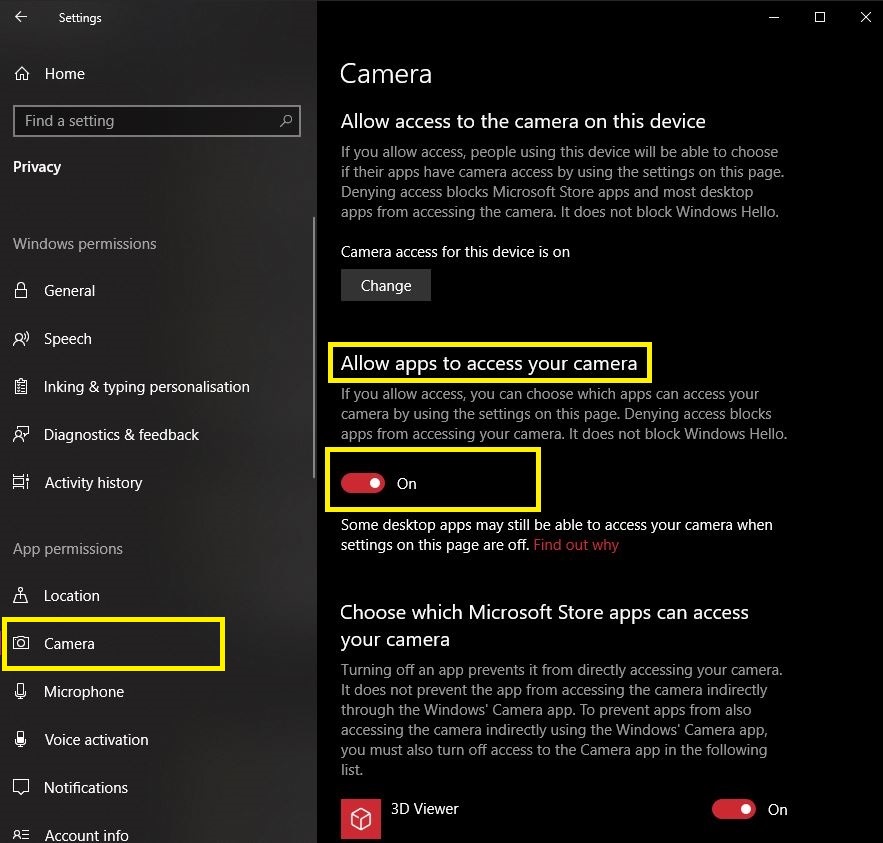
3. Make sure the  “Allow apps to access your camera” switch is on.


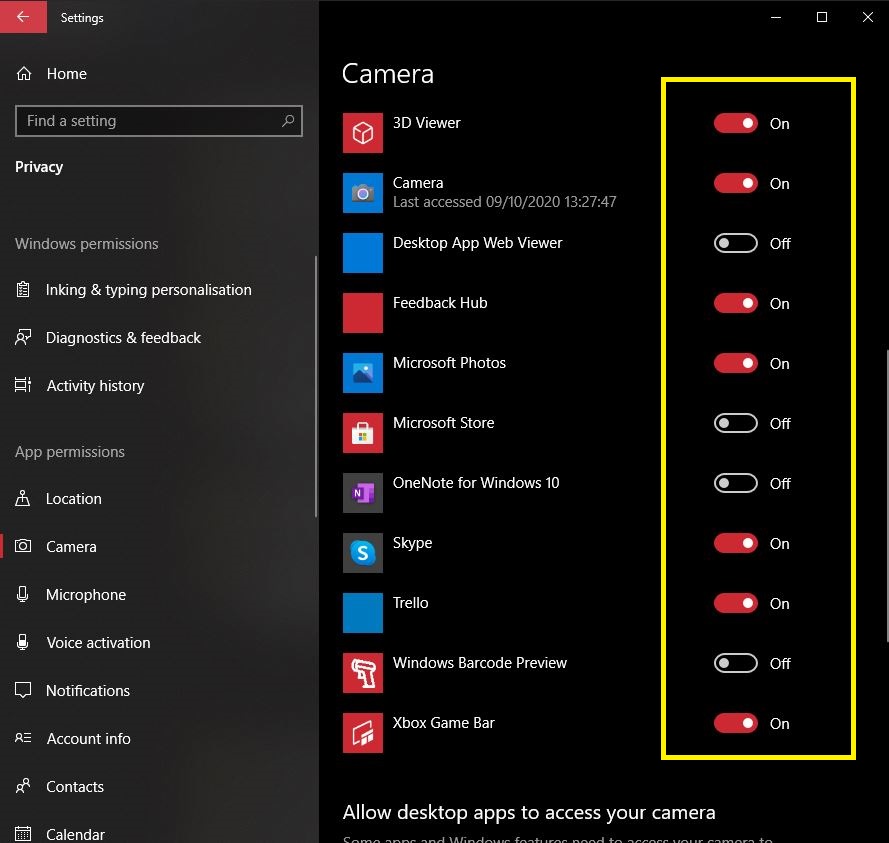
4. Under "Choose which Microsoft Store apps can access your camera" you can now toggle on the apps you want to use.

5. Make sure that the "Desktop App Web Viewer" is turned on as some desktop applications will need it.

Note: Desktop App Web Viewer may be named Win32WebViewHost on earlier versions of Windows.

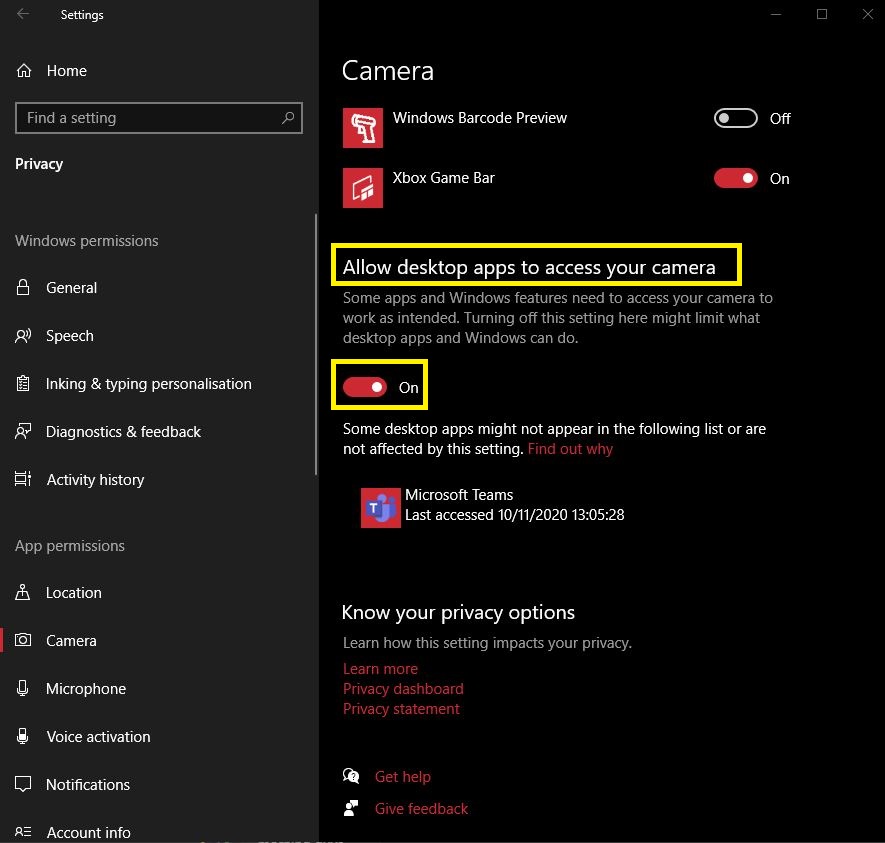
6. Scroll down and ensure the "Allow desktop apps to access your camera" is toggled on.

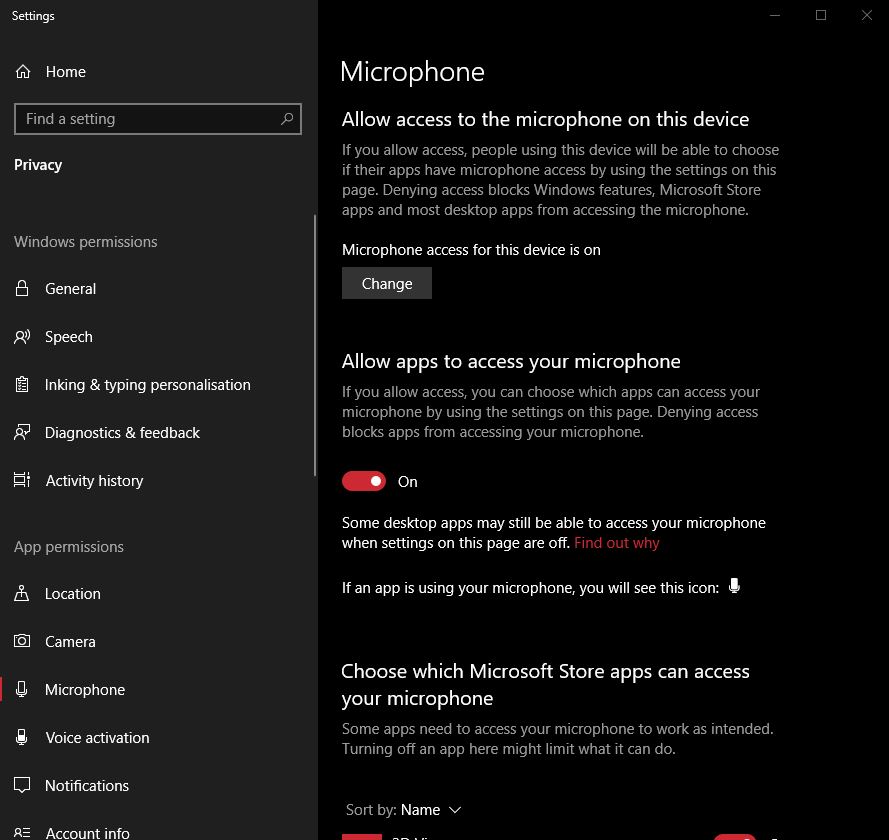
7. You will also need to apply these same changes for the microphone privacy settings.

8. Restart the applications you were having issues with that required the use of the webcam & mic.


Applies to:


Where can I get an updated system BIOS for my Stone system? Do I need to update my BIOS?

We do not recommend that you update your BIOS unless you have a specific problem that needs resolving. In this instance, please contact Stone support for assistance. We can help you diagnose any problem, and can give you all of the information you need for any BIOS update.

If you would like to try the BIOS update on your own, these are made available when necessary on the Stone driver finder - Stone Driver Finder.

Note: BIOS files available on the driver finder will not include any BIOS customizations that may have been set up for you when you purchased your machine. Please make a note of important BIOS settings, such as SATA controller mode (AHCI or IDE mode) before attempting the upgrade.


Applies to:


How to Update the BIOS on the Stone Classmate 3 (TL10ie)

BIOS Updates

Important: The instructions in this article are for advanced users only, or experienced IT personnel. It is not recommended to perform a BIOS update on your Classmate 3 unless you have a specific issue which can only be rectified by a BIOS update. If you require assistance with any issue, please contact our support team first.

As of November 2014, there is now a BIOS update available to support the new USB 3.0 / Gigabit LAN Adapter, CABUSB-224. This is version 1.04. (This is seperate to the previous update for the touchscreen firmware for early units - see related articles - however the update for the touchscreen is not related to the main BIOS).

Overview

The original BIOS 1.00 (dated 2014.0606) was shipped on systems until the end of November 2014. To flash the latest BIOS 1.04, an intermediate BIOS version 1.02 must be installed first.

To perform the flash, the EFI System Partition must be present on the hard drive. This means that the hard drive/SSD/flash module must be fitted and working before the BIOS can be updated. Once you have an EFI system partition, the BIOS update(s) can be performed either in the EFI Environment or the Windows PE Environment.

BIOS 1.04 has an optional dock firmware update ("dock_V106"). This firmware update is only applicable to the original dock models which use an orange power connector. This update can only be done in Windows PE or full Windows. It cannot be done inside EFI.

Additionally, BIOS 1.04 has an optional tablet EC firmware update ("Tablet_V106"). This can be applied to any model that was shipped before December 2014. This update can only be done in EFI. It cannot be done inside Windows or Windows PE.

Initial Steps (Assuming BIOS 1.00 is currenly installed)

Tip: If you have the Classmate 3 Windows PE boot pen drive, it may be a good idea to store the BIOS update files in a directory on this pen drive. This way, if you have to use the Windows PE boot to create the EFI System Partition (ESP) you can then proceed with the flash process as soon as you have finished making the partition.

Once you are sure an EFI System Partition is present:

Option 1: Flash From Within Windows

This option is quickest if the system is already booted into Windows or Windows PE.

Note: The BIOS flash process is completed after a system reboot.

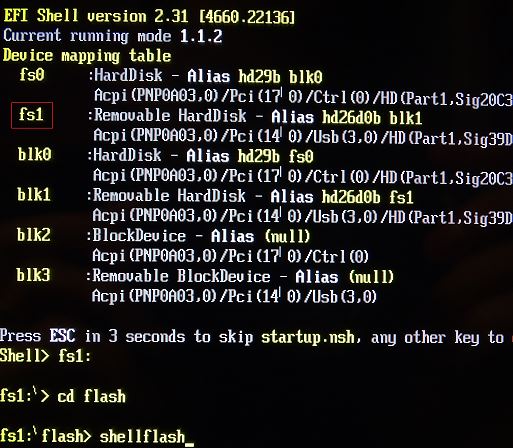
Option 2: Flash from the EFI Shell

This option is quickest if you don't have an Administrative logon to the copy of Windows that is installed, or don't want to wait to boot full Windows. Again, the EFI System Partition needs to be present. If you have the EFI System Partition, when you boot to the EFI Shell the pen drive will be available as FS1:. If you do not have an EFI system partition the only drive available to you will be FS0:, and you will need to create the EFI System partition using a bootable Windows PE drive.

Note: The flash process is completed after a system reboot.
 

If the Flash Process Fails

If you get an error message about ESP, or the flash process fails at the point of "Reading the file", you likely don't have an EFI system partition. Create the partition, and repeat the flash process.

Other reasons for failure in flashing include already having the same BIOS installed.

Creating the EFI System Partition (ESP)

The EFI System Partition (ESP) is a reserved partition on the hard drive (which could be a mechanical or flash based drive) which some EFI tools, including BIOS update utilities, can use to store code.

Note: Creating the ESP using the method below is recommended on systems that have no operating system, as the instructions below will erase the contents of the hard drive.
 

Instructions

Stage 1 - Create Windows PE Media which includes Support for the Classmate

A specific download of Windows PE is available which includes support for the Classmate 3 Intel drivers, to allow the keyboard and mouse to function in the PE environment.

  • On a system used for IT administration (for example, not the Classmate 3 itself) download the package which contains the image and the image writing program.
  • Extract the package.
  • Attach a blank USB pen drive of at least 2GB in size to the system.
  • Install the imaging program and then run it.
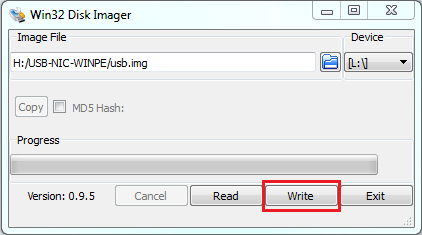
  • Select the .IMG file and the drive letter of the USB pen drive.
  • Click the Write button to write the image to the pen drive.
Stage 2 - Copy the BIOS Update Files to the Windows PE Pen Drive (optional)

  • Download the BIOS file and extract it to a folder on your newly created Windows PE boot pen drive.

Stage 3 - Boot the Unit and Create the ESP

  • Connect the pen drive prepared above to the Classmate 3.
  • Power the Classmate 3 on and immediately use the F11 key to get to the boot menu.
  • Select to boot from your USB media
  • At the Windows PE command prompt, either run the create_esp.bat batch file in the create_esp subfolder from the Classmate 3 BIOS update (that you extracted above) or, issue the following commands:

diskpart (the system will enter the diskpart context)
select disk 0
clean
convert gpt
create partition efi size=100
format quick fs=fat32 label="System"
exit
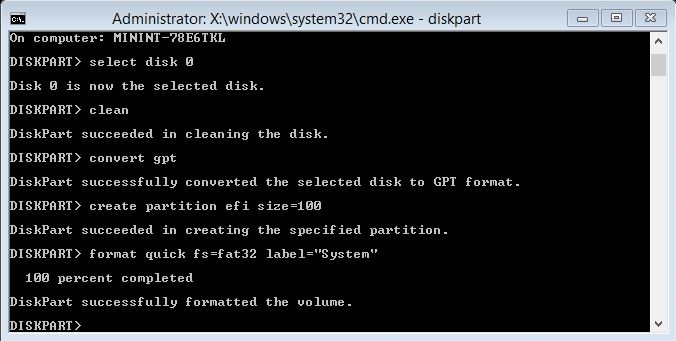
Remember: Creating the ESP above is a destructive process that will erase the contents of the first system hard drive.

Stage 4 - Run the Classmate 3 Windows Flasher

If you extracted the Classmate 3 BIOS update files to the pen drive, you can now re-attempt flashing. No reboot is required in-between creating the ESP and re-attempting the flash.

Standard BIOS Downloads

Current BIOS

BIOS 1.00 0606 Original Stone Logo BIOS (this is the original shipping BIOS until November 2014).

BIOS 1.02 Intermediate BIOS (this BIOS must be installed before you can update to BIOS 1.04; this is not a Stone Logo BIOS so machines should not be left running the BIOS).

BIOS 1.04 Stone Logo BIOS (includes "dock_v106" for docks which have an orange power connector, and "tablet_v106" - an EC update for all models shipped before December 2014).

Combined BIOS Package 1.00 to 1.04 - All BIOSes and Firmwares (includes all of the above and the touchscreen update for early units with unresponsive touchscreens).

Applies to:


How to Update the BIOS on the Stone NT310 Laptop
Security Advisory: In May 2017, Intel released details regarding a critical security issue present in some Intel business chipsets. 

The product referenced on this page is impacted by this security issue. Due to the age of the product, a BIOS patch or Management Engine update may not yet be available. Please follow the mitigating actions highlighted here.

How to Update the BIOS on the NT310 Laptop

BIOS Updates are available for the Stone NT310 laptop which add support for Windows 8.1.

Note: Please only update the BIOS if necessary. The BIOS should not be updated unless you are experiencing a specific issue which requires an update. This BIOS update is designed to be used by Administrators. Contact Stone Support for further advice.

What you need to Perform the Update

Windows 8 / 8.1:

Windows 7:

Steps

Note 1: Do not attempt to use this BIOS update procedure inside a "DOS" box or command prompt inside another operating system. Always run all parts of the update from a pure DOS boot.

Note 2: Always ensure that the laptop is connected to the mains and that the battery has at least 20% charge before attempting to perform the flash.

As of 11/3/2014, when you have updated the BIOS you will have these new code versions installed:

Applies to:


Notebook Chargers - Notes on the use of third party chargers and diagnosing problems

Use of Third Party Chargers

Use of third party laptop chargers on Stone branded laptop products is supported but only when an appropriate charger is used. Use of a charger of the wrong rating or connector may void your product warranty, and may cause product damage.

Guidelines on the use of Third Party Chargers

We recommend the use of branded charges which clearly show the CE Marking, and show if the device is Class 1 or Class 2.

Example

For an original adapter that supplies 19V 3.42A (65W) please see the following examples of substitute adapter and whether or not they can be used:

Rating / Output Can this be used?
18.5V 3.5A No. The voltage is too low (18.5V), so even though the total power output is sufficient the adapter should not be used.

19V 3.0A 

No. The current available (3.0A) is too low. The adapter will not be able to provide sufficient power
19V 4.74A This adapter supplies the correct voltage (19V) and can supply ample current (4.74A is more than 3.42A). This adapter can be used as long as the connector size and polarity exactly matches the old adapter.
24V 3.42A  No. The voltage is too high (24V).

Key:

Note: If you are unsure as to the suitability of a replacement third party AC adapter please contact support before using the adapter. Alternatively, Stone may be able to supply you with a replacement adapter.

Diagnosis

Some notebook or tablet chargers have an LED directly on the charger itself. This LED is only useful to tell you that there is mains present (for example, that the fuse is OK). If the LED is not functioning, AC mains could still be present but the charger has failed. Conversely, even if the LED is illuminated, this does not guarantee that the charger is fully functional.

Other Dos and Donts

Applies to:


I need to extend the battery life on my Stone Computers laptop as I am planning to travel. Is this possible?

Answer

Stone Computers laptop systems support the latest power-saving techniques when manufactured to extend the battery life, or run-time. You will need to configure your operating system to enable these technologies. Instructions for Microsoft Windows 7 are below.

Instructions

Note: We recommend during normal use that you use the Balanced power plan as this will provide optimum performance.


Applies to:


What is a Dead Screen Pixel? Is it covered under Warranty?

What is a Dead, or Stuck Pixel?

All modern flat panel screens are made up of tiny lit elements known as pixels. These pixels use combinations of red, blue and green light to build images on the screen.

It is a fact of the technology that even despite the highest manufacturing standards, that sometimes it is possible to receive a new screen and have a dead pixel. This could be visible as a pixel that is constantly white, constantly black, or partially stuck - for example, it might be a stuck on as red, blue or green.

Example: The example below shows a dead, or stuck pixel. In this case, the pixel is off, or black.

Example of a Stuck Pixel

What Is the Pixel Policy Standard?

Manufacturers make equipment to an international standard (called ISO 13406-2) so that users receive the experience that they expect. Most equipment that Stone supplies is known as Class II equipment as regards pixel policy. Details of what the policy is are covered below. It is only when you have a number of dead pixels over the amount specified in the table is the product deemed to have fallen short of the standard.

ISO 13406-2 Class II Pixel Policy - How Many Faulty Pixels Can there be?

Class White Pixels Black Pixels R/G/B Pixels W/B Clusters R/G/B Clusters
II - Per Million Pixels 2 2 5 0 2

​These numbers are all per million screen pixels. On a standard 15.6" laptop screen that has a 1366x768 resolution, there are just over one million pixels, so the above numbers apply exactly.

So, am I Covered by Warranty?

Stone is proud to deliver excellent products and customer service, and as such we support our partners and suppliers with this pixel policy. If you receive a product that is outside of this policy please let us know within 30 days so that we can get the unit exchanged under our dead-on-arrival (DOA) facility.

If you have a single black or white stuck pixel, then usually this is not covered. Please do not hesitate to contact our Support team if you are unsure if you are covered or not.

Applies to:


How to Update the BIOS on the Stone NT310-H Laptop
Security Advisory: In May 2017, Intel released details regarding a critical security issue present in some Intel business chipsets. 

The product referenced on this page is not expected to be impacted by this security issue.

(For more details regarding the security issue present in some versions of Intel Active Management Technology (AMT), Intel Standard Manageability (ISM) and Intel Small Business Technology, see here.)

How to Update the BIOS on the NT310-H Laptop

BIOS Updates are available for the Stone NT310-H Haswell based laptop.

Note: Please only update the BIOS if necessary. The BIOS should not be updated unless you are experiencing a specific issue which requires an update. This BIOS update is designed to be used by Administrators. Contact Stone Support for further advice.

What you need to Perform the Update

Steps

Note 1: Do not attempt to use this BIOS update procedure inside a "DOS" box or command prompt inside another operating system. Always run all parts of the update from a pure DOS boot.

Note 2: Always ensure that the laptop is connected to the mains and that the battery has at least 20% charge before attempting to perform the flash.

Applies to:


Stone Branded Products -> Laptops, Netbooks and Tablets -> Frequently Asked Questions (FAQ)
https://kb.stonegroup.co.uk/index.php?CategoryID=21