Methods to Update the BIOS on the Stonebook Edge-R
Prerequisites (Applies to Both Methods)
-
Ensure the device is plugged into AC power.
-
Confirm the target BIOS image is correct, it should be version SP41MD103_STE_V15.bin or later.
-
Backup critical data if needed (BIOS flashing is low-risk but precautionary).
-
Identify current BIOS version if audit logging is required.
-
If BitLocker is enabled, it's critical to suspend protection before performing a BIOS update. This prevents the system from triggering recovery mode due to firmware changes. You can suspend BitLocker using either of the following methods.
-
Bitlocker suspension option A: Using Control Panel
1. Open Control Panel.
2. Navigate to System and Security > BitLocker Drive Encryption.
3. Click Suspend Protection next to the encrypted drive.
4. Confirm when prompted. -
Bitlocker suspension option B: Using the following PowerShell command
Suspend-BitLocker -MountPoint "C:" -RebootCount 1
This suspends protection for one reboot cycle.
Note: The BIOS for the Stonebook Edge-R updates both the BIOS and the EC (embedded controller)
BIOS Update Method 1 (Preferred method): Windows
Download the Windows based flash tool from the Stone Driver Finder - Link
In the Win 11 folder run the flash.bat file as an administrator, this will start the flash process.
You will receive the following "Are you ready" prompt, type Y.
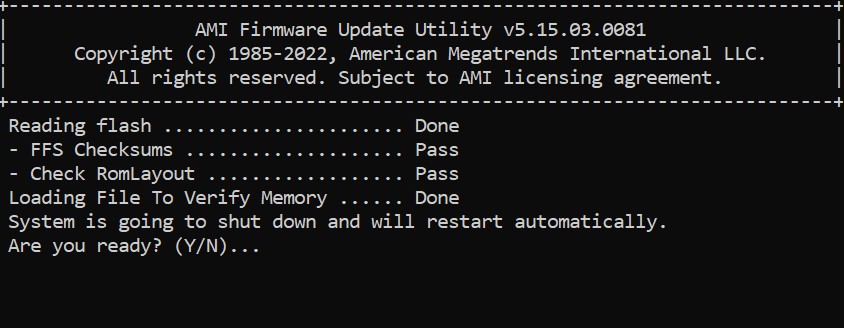
The machine will automatically reboot and the flashing process will continue with no further user input required.
The machine will reboot in between flashing processes before finally before shutting down. It's essential that you do not interrupt the process.
Method 2: UEFI Shell (USB-Based, Automated)
1. USB Preparation
- Download the relevant BIOS and shell files available from our driver finder here - Link
- Format a USB stick as FAT32.
- Copy the downloaded files onto the USB stick retaining the same file structure.
- The folder structure should look like this:
USB Root
├── EFI
│ └── BOOT
│ └── startup.nsh
├── SP41MD103_STE_V15.bin
└── AfuEfix64.efi
2. Disable Secureboot
Access the BIOS by pressing the DEL key immediately after powering on the system and disable secureboot.
To Disable Secure Boot on the Stonebook Edge-R;
1. Enter BIOS Setup
• Power on the system and immediately press the DEL key to access the BIOS.
2. Navigate to Secure Boot Settings
• Go to the Security tab.
• Scroll down and select Secure Boot Menu.
3. Modify Secure Boot Configuration
• Set Secure Boot Mode to Custom.
• Then, disable Secure Boot.
4. Save and Exit
• Save your changes and reboot the system
3. Flashing the BIOS
Once you have disabled secureboot, restart your notebook and press F7 during startup to open the Boot Menu. From the list, select your USB device to boot.
The flashing process will begin automatically - when prompted, simply press Y to confirm and continue, or N to cancel.
Wait until the notebook has completed the flashing and then access the BIOS to re-enable secureboot.
Note: Do not remove the AC Adapter whilst the BIOS update is in progress, as this could render the battery or machine unusable.
Applies to:
- Stonebook Edge-R EZ2R3A - NOTCHA-346
- Stonebook Edge-R EZ2R3B - NOTCHA-347
- Stonebook Edge-R EZ2R5A - NOTCHA-358
- Stonebook Edge-R EZ2R5B - NOTCHA-359