Application software

Intel Wireless Display - Intel WiDi - Setup Guide (Windows 10)

Intel WiDi Technology Setup

Intel Wireless Display allows you to stream content including videos from your WiDi ready laptop to your WiDi compatible device. This is a great technology to take advantage of if you want to display pictures or videos on a larger screen such as an HD compatible television, especially if routing cables is it not an option.

What you need

To take advantage of Intel WiDi Technology, you need to have the following:

How to set Up WiDi (Windows 10)

See the attached Intel WiDi Quick Start Guide or Intel WiDI User Guide.

Applies to:


Microsoft Office 2013 Product Activation

Office Product Activation

The attached guide shows the process of activating Microsoft Office 2013 using the Product Key Identifier cards that are enclosed with selected machines.

Applies to:


I’m using Windows 7 64-bit. I have Internet Explorer installed. Should I use the 64-bit version that’s available?

We recommend you use the standard 32-bit version of Internet Explorer for the best experience.

 Applies to:


How to Fix System Center Endpoint Protection Automatic or Manual Updates Not Working

Problem

Resolution

You need to enable Microsoft Update, so that the system will be able to install updates for products other than the core Windows operating system, which includes Endpoint Protection.

Instructions

The instructions below are for Windows 8.1 and Server 2012R2, however similar instructions apply to Windows 8 and Windows 7.

System Center Endpoint Protection will then update automatically without any problems, and manual updates will also work.

Applies to:


Installing Symantec Endpoint Encryption (SEE) with Virtual PC Health Check

Problem

Installing Symantec Endpoint Encyption (SEE) on systems that have the Virtual PC Health Check installed may cause the system to stop booting.

Products

Symantec Endpoint Encryption and Windows 7 with Virtual PC Health Check

Issue

When you try and boot the system you will be presented with the "Press F3 for Virtual PC Check". During a normal boot, you would ignore this message and let it timeout. However with Symantec Endpoint Encryption installed after the message has timed-out, it will simply re-appear and the boot process will not continue.

If you press F3 you will get a message that says "NF" and the system will not proceed any further.

Root Cause

Installing Symantec Endpoint Encryption on a system that has the Virtual PC Health Check installed. Virtual PC Health Check uses boot code that doesnt work when the partition layout is changed by programs such as Symantec Endpoint Encryption.

Resolution

1. If you are deploying an Operating System image, use the option in your disk imaging software to remove Virtual PC Health check by deleting the entire contents of the hard drive (for example, use the DISKPART CLEAN command).

2. If you are not deploying an image, or if you are already at the point where the system cannot boot, you will need to use the recovery process below:

Stage 1 - Boot from the Windows 7 DVD

Stage 2 - Start the Recovery Command Prompt

Stage 3 - Repair the Master Boot Record (MBR)

This will have now stopped Virtual PC Health Check from running as the Master Boot Record (MBR) will have been replaced. This should allow the system to complete booting while Symantec Endpoint Encryption is installed.

 Applies to:


How to Work Around Office 2010 Reporting that it Couldn't Activate as "an unspecified error has occurred".

Problem

Cause

The cause appears to be some recent product updates that may break the activation process.

Resolution

Reinstalling the product may solve the problem, or re-entering the product key (if not using KMS activation) may also help. However, there is also a work-around below. The work-around is designed for 32-bit Office however the instructions differ depending on whether you are running 32-bit or 64-bit Windows. When you are running 64-bit Windows, 32-bit Office resides in the C:\Program Files (x86)\Microsoft Office\Office14 folder. When you are running 32-bit Windows, Office resides in the C:\Program Files\Microsoft Office\Office14 folder.

Windows 7 or Windows 8 64bit Work Around

Tip:  Use the TAB key after CD<space> to auto-complete the directory names. For example, type CD Pro and then press the tab key until CD "Program Files (x86)" appears.

This should then reactive office. Look for confirmation that this was successful.

Windows 7 or Windows 8 32bit Work Around

Tip:  Use the TAB key after CD<space> to auto-complete the directory names. For example, type CD Pro and then press the tab key until CD "Program Files" appears

This should then reactive office. Look for confirmation that this was successful.

Applies to:


How to fix Slow or Unresponsive Web Browers such as Internet Explorer

Problem

Web browsers such as Internet Explorer (IE) and Firefox have a large number of add-ons available through the internet to increase or enhance functionality. Unfortunately these add-ons can cause IE and Firefox to slow down or become unresponsive during use.

How to Resolve this problem

or:

How to Disable your Browser's Add-Ons

Internet Explorer

To reset your Internet Explorer settings, you need to click the 'Tools' menu tab (or the star settings button) > 'Internet Options' > click the 'Advanced Tab' > then click the 'Reset' button. (Use the "Delete Personal Settings" check box if you have no personal settings such as cookies which you need to keep, as this may also help towards solving the issue)

Firefox

You need to click the 'Help' menu tab > click the 'Troubleshooting Information' > 'Reset Firefox' button.

Both of these methods will keep your Bookmarks or Favourites.

Applies to:


Office 2010 “Cannot Verify License” Error Message When Entering Product Key

Problem

When entering a MAK activation key into Office 2010 the setup wizard may report that it "Cannot Verify the License". You will then be prompted to repair your Office installation but doing so may not fix the problem.

Cause

The cause is a problem with the Office Software Protection Platform software component.

Resolution

Note: C:\Programdata is a hidden folder. You will need to set Explorer to Show hidden files, folders and drives to see this folder.


Applies to:


How to fix PC crashes when using Internet Explorer and graphics or image intensive web sites.

Problem

If you use Internet Explorer (IE) on some graphically intensive or image intensive web sites, systems with older integrated graphics may crash. For example, if you use Internet Explorer with Google Maps Satellite mode to view landscape images of an area, and then move or scroll the viewed area, the browser window may become unresponsive or the system may suffer a blue-screen crash.

Cause

The cause of this is the advanced rendering engine available in Internet Explorer (IE) and Windows Vista or newer. Internet Explorer will use graphics card rendering technologies where available to improve the smoothness and performance of the image to be viewed, allowing for quicker screen re-draws, zooms etc.

Windows incorrectly identifies that some lower integrated graphics solutions are capable of the required functionality in hardware, when Windows Vista, 7 or 8 are being used.

Known problem chipsets include:

Generally, updating the graphics card driver or increasing the dedicated video memory does not solve this issue.

How to Solve this Issue

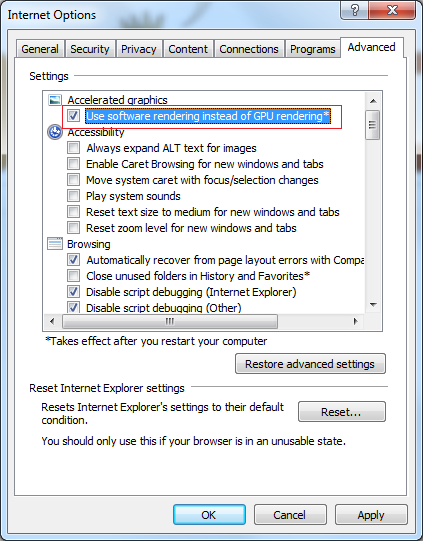
Turn off GPU rendering in Internet Explorer

To do this, open up IE tools (by clicking Tools, or the star symbol) and then go to Internet Options. Go into the "Advanced" tab and then turn on "Use software rendering instead of GPU rendering". The result should look like the example below.

Note: If you are deploying Windows 7 or Windows 8 for the first time across your network we always recommend that you perform usability and reliability testing to ensure that all of your applications, including web browsing, works as planned. Contact your account manager at Stone Computers if you would more information on the services which we can offer.

Applies to:


Intel Wireless Display - Intel WiDi - Setup Guide (Windows 7, 8, Windows 8.1)

Intel WiDi Technology Setup

Intel Wireless Display allows you to stream content including videos from your WiDi ready laptop to your WiDi compatible device. This is a great technology to take advantage of if you want to display pictures or videos on a larger screen such as an HD compatible television, especially if routing cables is it not an option.

What you need

To take advantage of Intel WiDi Technology, you need to have the following:

How to set Up WiDi (Windows 7 and Windows 8)

With your WiDi certified receiver installed correctly and setup - for example, plugged into an HDMI port on your television - you can then setup your WiDi sender device (such as the Stone NT310) to establish the connection.

1. To start with you will need to install the Intel WiDi update tool. This will detect your hardware, check it against the minimum requirements and provide details of any drivers that need to be updated.

2. Install the WiDi Software itself.

3. You will then need to:

How to set Up WiDi (Windows 8.1)

WiDi is actually built into Windows 8.1 and no additional software application is needed. To connect to your device you need to:

Troubleshooting

Sound

If you have an issue with sound (such as the sound is not reaching the receiving device) then you will need to go into the Sound properties within Windows and ensure that he default Playback device selected is your receiving device.

Unable to see the receiver (error relating to non DFS Channel)

If you can't see the receiver in the list of devices, it may be due to the network adapter settings. WiDi only operates on 2.4GHz so on some systems it may be necessary to disable the 5GHz band.

How to set Up WiDi (Windows 10)

Please see the attached article.

Applies to:


How to Manually Activate Volume License versions of Office 2010

Problem

Volume license version of Microsoft Office 2010 may not prompt for a product key during installation. These products do however require to be activated within a grace period, normally 25 days.

Activation Methods

Office 2010 Volume license editions can be activated either using a KMS server, with an Office 2010 KMS key installed into the activation server, or by using a MAK key. This article covers MAK key installation which is more suited for small to medium sized organisations.

How to use the MAK key

Step 1.

Step 2.

Step 3.


Note: KMS Activation will be covered by a seperate article.


Applies to:


How to Uninstall Netintelligence [NI]

Requirements

You will need the following to be able to uninstall the NetIntelligence software:

  1. Uninstall Password
  2. Internet Connection

To get the Uninstall password you will need to contact Stone Support. You will be asked for your machine serial number and your contact details for your NetIntelligence account. Stone support may also guide you through obtaining the NetIntelligence SUC code or Asset key from your machine in order to generate the Uninstall password.

Instructions

When you have your uninstallation password, and while connected to the internet, please follow these instructions:

The uninstaller will then ask you the uninstall password. Type in the password exactly and and press "Continue".

Note: Please ensure you type the password exactly as given, including capital and lower case letters.


Third Party Products -> Application software
https://kb.stonegroup.co.uk/index.php?CategoryID=14